
- Chapter 1: The World Before and After the Cloud
- Chapter 2: The Global Map of AWS
- Chapter 3: The Keys to the Kingdom: Mastering IAM Security
- Chapter 4: EC2: Your Virtual Server in the Cloud
- Chapter 5: S3: The Infinite Filing Cabinet
- Chapter 6: VPC: Building Your Own Private Network
- Chapter 7: Databases on Demand: RDS and DynamoDB
- Chapter 8: Never Go Down: High Availability, Load Balancing, and Auto Scaling
- Chapter 9: The Future is Now: Serverless with AWS Lambda
- Chapter 10: Building with Blueprints: Infrastructure as Code with CloudFormation
- Chapter 11: Keeping an Eye on Everything: Monitoring, Logging, and Auditing
- Chapter 12: A Real-World Blueprint: Architecting a 3-Tier Web App
- Chapter 13: Don’t Break the Bank: AWS Cost Management and Optimization
1.1 The Old Way: Building Your Own Power Plant
Imagine you want to launch a new website. In the “old days” (not so long ago!), the process was slow, expensive, and full of guesswork.
- Guess Your Needs: You’d have to predict how many visitors you’d get. Guess too low, and your site crashes. Guess too high, and you’ve wasted thousands of dollars on powerful servers that sit idle.
- Buy Hardware: You’d order physical servers, routers, and storage drives. This meant a huge upfront capital expense.
- Wait: It could take weeks or months for the hardware to arrive.
- Set It Up: You’d have to rack the servers in a data center, install the operating system, configure the network, and hope everything worked.
- Maintain It: You were responsible for everything. If a hard drive failed at 3 AM, you got the call.
This is like deciding you need electricity and your only option is to build your own power plant. It’s a massive, inefficient undertaking.
1.2 The New Way: The Cloud is the Electricity Grid
Cloud Computing, and AWS specifically, changed everything.
Instead of building your own power plant, you just plug into the national electricity grid. You use as much or as little power as you need, and you only pay for what you use. You don’t have to worry about maintaining the power plant, the turbines, or the transmission lines—the power company handles all of that.
AWS is the IT equivalent of the power grid. It provides on-demand computing power, storage, databases, and hundreds of other services. You can spin up a server in minutes, shut it down when you’re done, and only pay for the seconds you used it. This allows for incredible speed, agility, and cost-efficiency.
1.3 The Cloud Service Models: The Pizza Analogy
Not all cloud services are the same. They offer different levels of control and convenience. The best way to understand this is the “Pizza as a Service” analogy.
- On-Premises (The Old Way): Made at Home You are responsible for everything. You buy the flour, tomatoes, and cheese. You make the dough. You have to own an oven and a kitchen. You provide the electricity and the dining table. It’s maximum control, but also maximum effort.
- Infrastructure as a Service (IaaS): Take and Bake You go to a store and buy a pre-made pizza kit. They provide the dough, sauce, and toppings (the infrastructure). You take it home, use your own oven and kitchen (the platform), and assemble and bake it yourself.
- In AWS terms: AWS provides the virtual server, storage, and network (EC2, EBS, VPC). You are responsible for installing the operating system, managing security patches, and running your application code.
- Platform as a Service (PaaS): Pizza Delivered You order a pizza for delivery. The pizza place handles everything—the ingredients, making the dough, baking it in their oven. All you do is provide the table and drinks (your application code) and enjoy it.
- In AWS terms: AWS manages the servers, the operating system, and the platform (Elastic Beanstalk). You just upload your code, and it runs. You don’t worry about patching the OS.
- Software as a Service (SaaS): Dining Out You go to a restaurant. You don’t worry about anything except showing up and eating. The restaurant handles the food, the oven, the table, the service—everything.
- In AWS (or general tech) terms: You are just using a finished product, like Gmail, Dropbox, or Salesforce. You manage your data within the app, but the provider manages everything else.

IaaS gives you building blocks. PaaS gives you a platform to build on. SaaS gives you a finished product. As you move from IaaS to SaaS, you trade control for convenience.
2.1 Why Geography Matters in the Cloud
When you deploy an application, you must decide where in the world it should live. This decision impacts three critical things:
- Speed (Latency): The closer your application is to your users, the faster it will feel for them. A user in London accessing a server in London will have a much better experience than if they were accessing a server in Sydney.
- Resilience (Fault Tolerance): What happens if a data center has a power outage? If your entire application is in that one building, it goes down. You need a way to survive failures.
- Law (Data Sovereignty): Some countries have laws requiring citizen data to be stored within the country’s borders. You must place your application in a location that complies with these laws.
AWS solves these problems with its global infrastructure, built on two key concepts: Regions and Availability Zones.
2.2 Core Concepts: Regions and Availability Zones
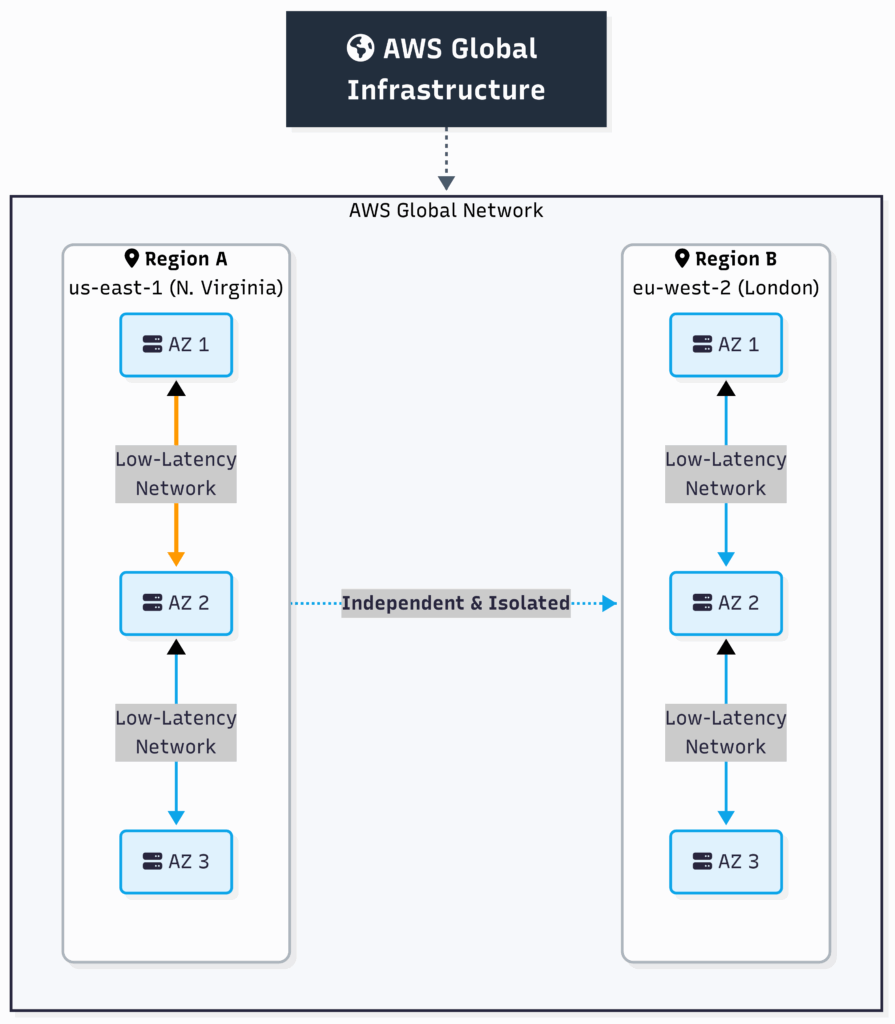
- Region: The City Think of a Region as a major city on the world map, like London, Tokyo, or Ohio. It’s a distinct, isolated geographical area. When you choose a Region, you are choosing the general location where your data and services will live. For example,
eu-west-2is the London Region, andap-northeast-1is the Tokyo Region. Regions are completely independent of each other. A disaster in the Tokyo Region will have no impact on the London Region. - Availability Zone (AZ): The Neighborhood A single data center is a single point of failure. To solve this, each Region is made up of multiple, isolated locations called Availability Zones (AZs). Think of an AZ as a secure, independent neighborhood within the city (Region).
- Each AZ is a complete data center with its own independent power, cooling, and networking.
- They are physically separate (often miles apart) to protect against disasters like fires or floods.
- They are connected to each other with super-fast, low-latency private fiber-optic networks.
This structure is the key to high availability. By running your application across at least two AZs, you can ensure that if one of them fails, your application stays online as traffic is automatically routed to the healthy AZ.
This diagram shows how everything fits together.
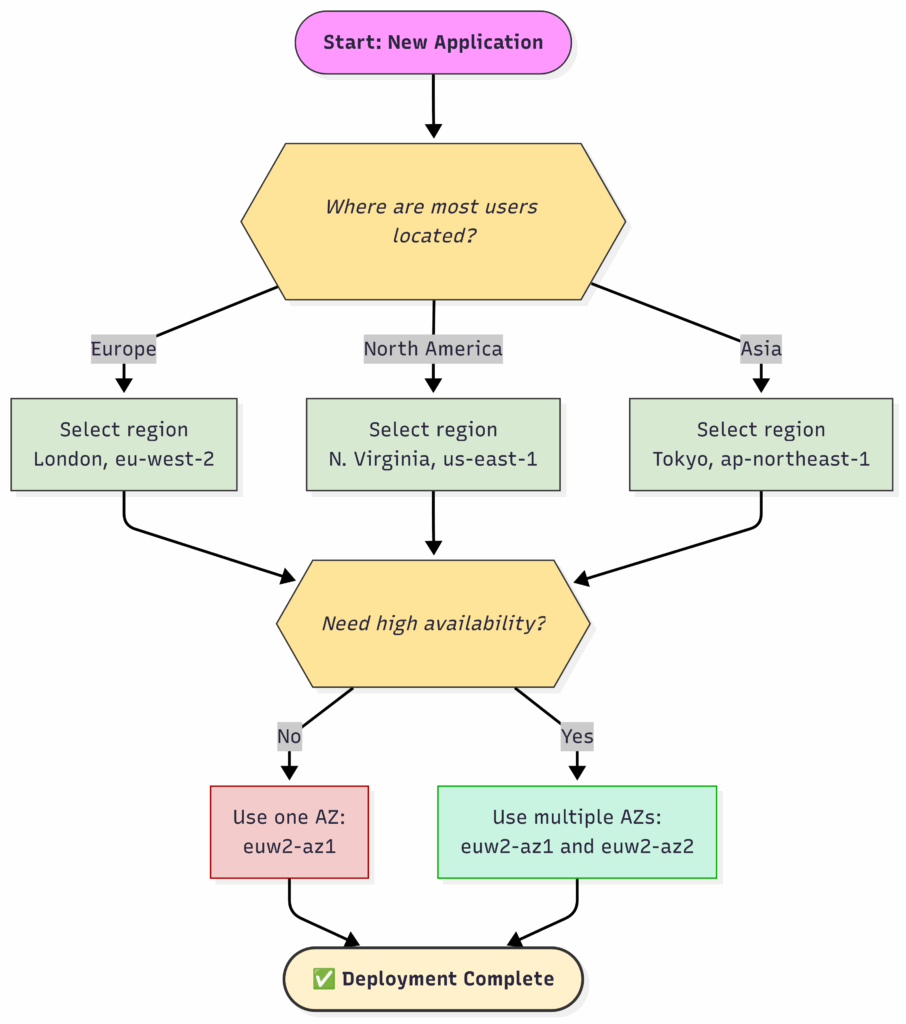
Here is the thought process for selecting the right location for your application.
2.3 Practical AWS CLI Commands
Let’s explore the global infrastructure using the AWS Command Line Interface (CLI).
# First, ensure your CLI is configured. If not, run 'aws configure'.
# Let's set our default region to London for this example.
aws configure set region eu-west-2

# List all available AWS Regions your account can access.
# The --query parameter filters the JSON output to show only the RegionName.
# The --output text makes it a clean list instead of a JSON object.
echo "Fetching all available regions..."
aws ec2 describe-regions --query "Regions[].RegionName" --output text

# Now, let's list the Availability Zones available WITHIN our configured default region (London).
echo "Fetching Availability Zones for eu-west-2 (London)..."
aws ec2 describe-availability-zones --query "AvailabilityZones[].ZoneName" --output text3.1 The Security Guard and the Keycards
Imagine your AWS account is a secure, high-tech office building. When you first create the account, you get the root user. This is the “building owner” who holds the master key that can open every single door, disable the security systems, and even demolish the building. You should never use this master key for day-to-day work. It’s too powerful and too risky. You lock it away in a safe for emergencies only.
So how do people get work done? You hire a security guard and issue keycards. IAM (Identity and Access Management) is your security guard. IAM lets you create and manage users and their level of access to AWS resources.
3.2 The Four Core “Characters” of IAM
- Users: The Employees A User is an individual person or an application that needs to interact with your AWS account. Each user has a name (e.g.,
bob) and their own credentials (a password for the console, and optional “access keys” for programmatic access). By default, a new user has zero permissions. They can’t do anything until you grant them access. - Groups: The Departments A Group is simply a collection of users. Instead of assigning permissions to each employee one by one, you put them into a department (a Group). For example, you can create a
Developersgroup and anAccountantsgroup. All users in theDevelopersgroup automatically inherit the permissions assigned to that group. This is the only sane way to manage permissions for more than a handful of users. - Policies: The Rules on the Keycard A Policy is a JSON document that explicitly defines permissions. It is the set of rules programmed onto a keycard. A policy document contains statements that say things like:
"Effect": "Allow", "Action": "s3:GetObject", "Resource": "arn:aws:s3:::my-company-reports/*"- In English: “This keycard is ALLOWED to perform the action of GETTING an OBJECT from the S3 bucket named
my-company-reports.” This is the Principle of Least Privilege: grant only the minimum permissions required to perform a task.
- Roles: The Temporary Visitor Pass A Role is one of the most powerful and secure concepts in AWS. A Role is an identity with permission policies that is temporary and can be assumed by a trusted entity.
- Analogy: Imagine a consultant needs to access your server room for one hour. You wouldn’t give them a permanent employee keycard (a User). Instead, you’d give them a visitor pass (a Role) that is only valid for one hour and only opens the server room door. Once they are done, the pass expires.
- This is the ideal way for AWS services to talk to each other. For example, you can grant an EC2 virtual server a Role that allows it to write files to an S3 bucket, without ever storing permanent credentials on the server.

Flow: A user (bob) is put into a Group (Developers). The Group has a Policy attached, granting permissions. Separately, an EC2 instance assumes a Role, which also has a Policy, allowing the EC2 instance to securely access other services like S3.
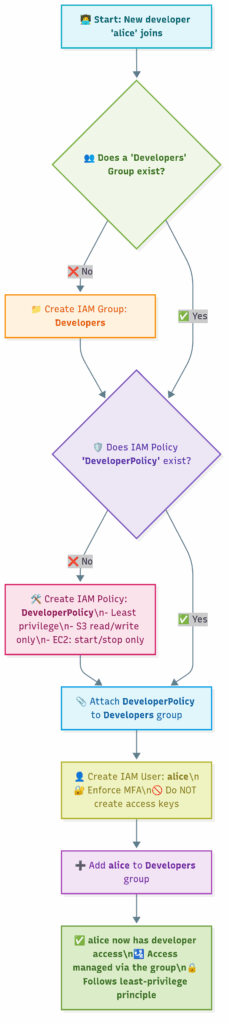
Securely Onboarding a New Developer
3.3 Practical AWS CLI Commands
Let’s use the CLI to execute the onboarding flowchart.
# 1. Create the IAM group 'Developers'
echo "Creating group..."
aws iam create-group --group-name Developers


# 2. Create the policy document in a local file. This is the JSON ruleset.
# This policy is very specific: it only allows listing buckets and managing objects
# inside a bucket named 'project-alpha-code'. THIS IS LEAST PRIVILEGE.
echo "Creating policy JSON file..."
cat > developer-policy.json <<EOF
{
    "Version": "2012-10-17",
    "Statement": [
        {
            "Effect": "Allow",
            "Action": "s3:ListAllMyBuckets",
            "Resource": "*"
        },
        {
            "Effect": "Allow",
            "Action": [
                "s3:PutObject",
                "s3:GetObject",
                "s3:DeleteObject"
            ],
            "Resource": "arn:aws:s3:::project-alpha-code/*"
        }
    ]
}
EOF


# 3. Create the policy in AWS from our file. We save the unique ARN (Amazon Resource Name).
echo "Creating IAM policy from file..."
POLICY_ARN=$(aws iam create-policy --policy-name DeveloperPolicy --policy-document file://developer-policy.json --query 'Policy.Arn' --output text)
echo "Policy created with ARN: $POLICY_ARN"


# 4. Attach the policy to the group
echo "Attaching policy to group..."
aws iam attach-group-policy --group-name Developers --policy-arn "$POLICY_ARN"


# 5. Create the new user 'alice'
echo "Creating user 'alice'..."
aws iam create-user --user-name alice


# 6. Add 'alice' to the 'Developers' group. She now inherits the permissions.
echo "Adding 'alice' to 'Developers' group..."
aws iam add-user-to-group --user-name alice --group-name Developers


# 7. (Optional) Verify that alice is in the group.
echo "Verifying group membership..."
aws iam get-group --group-name Developers --query "Users[].UserName"

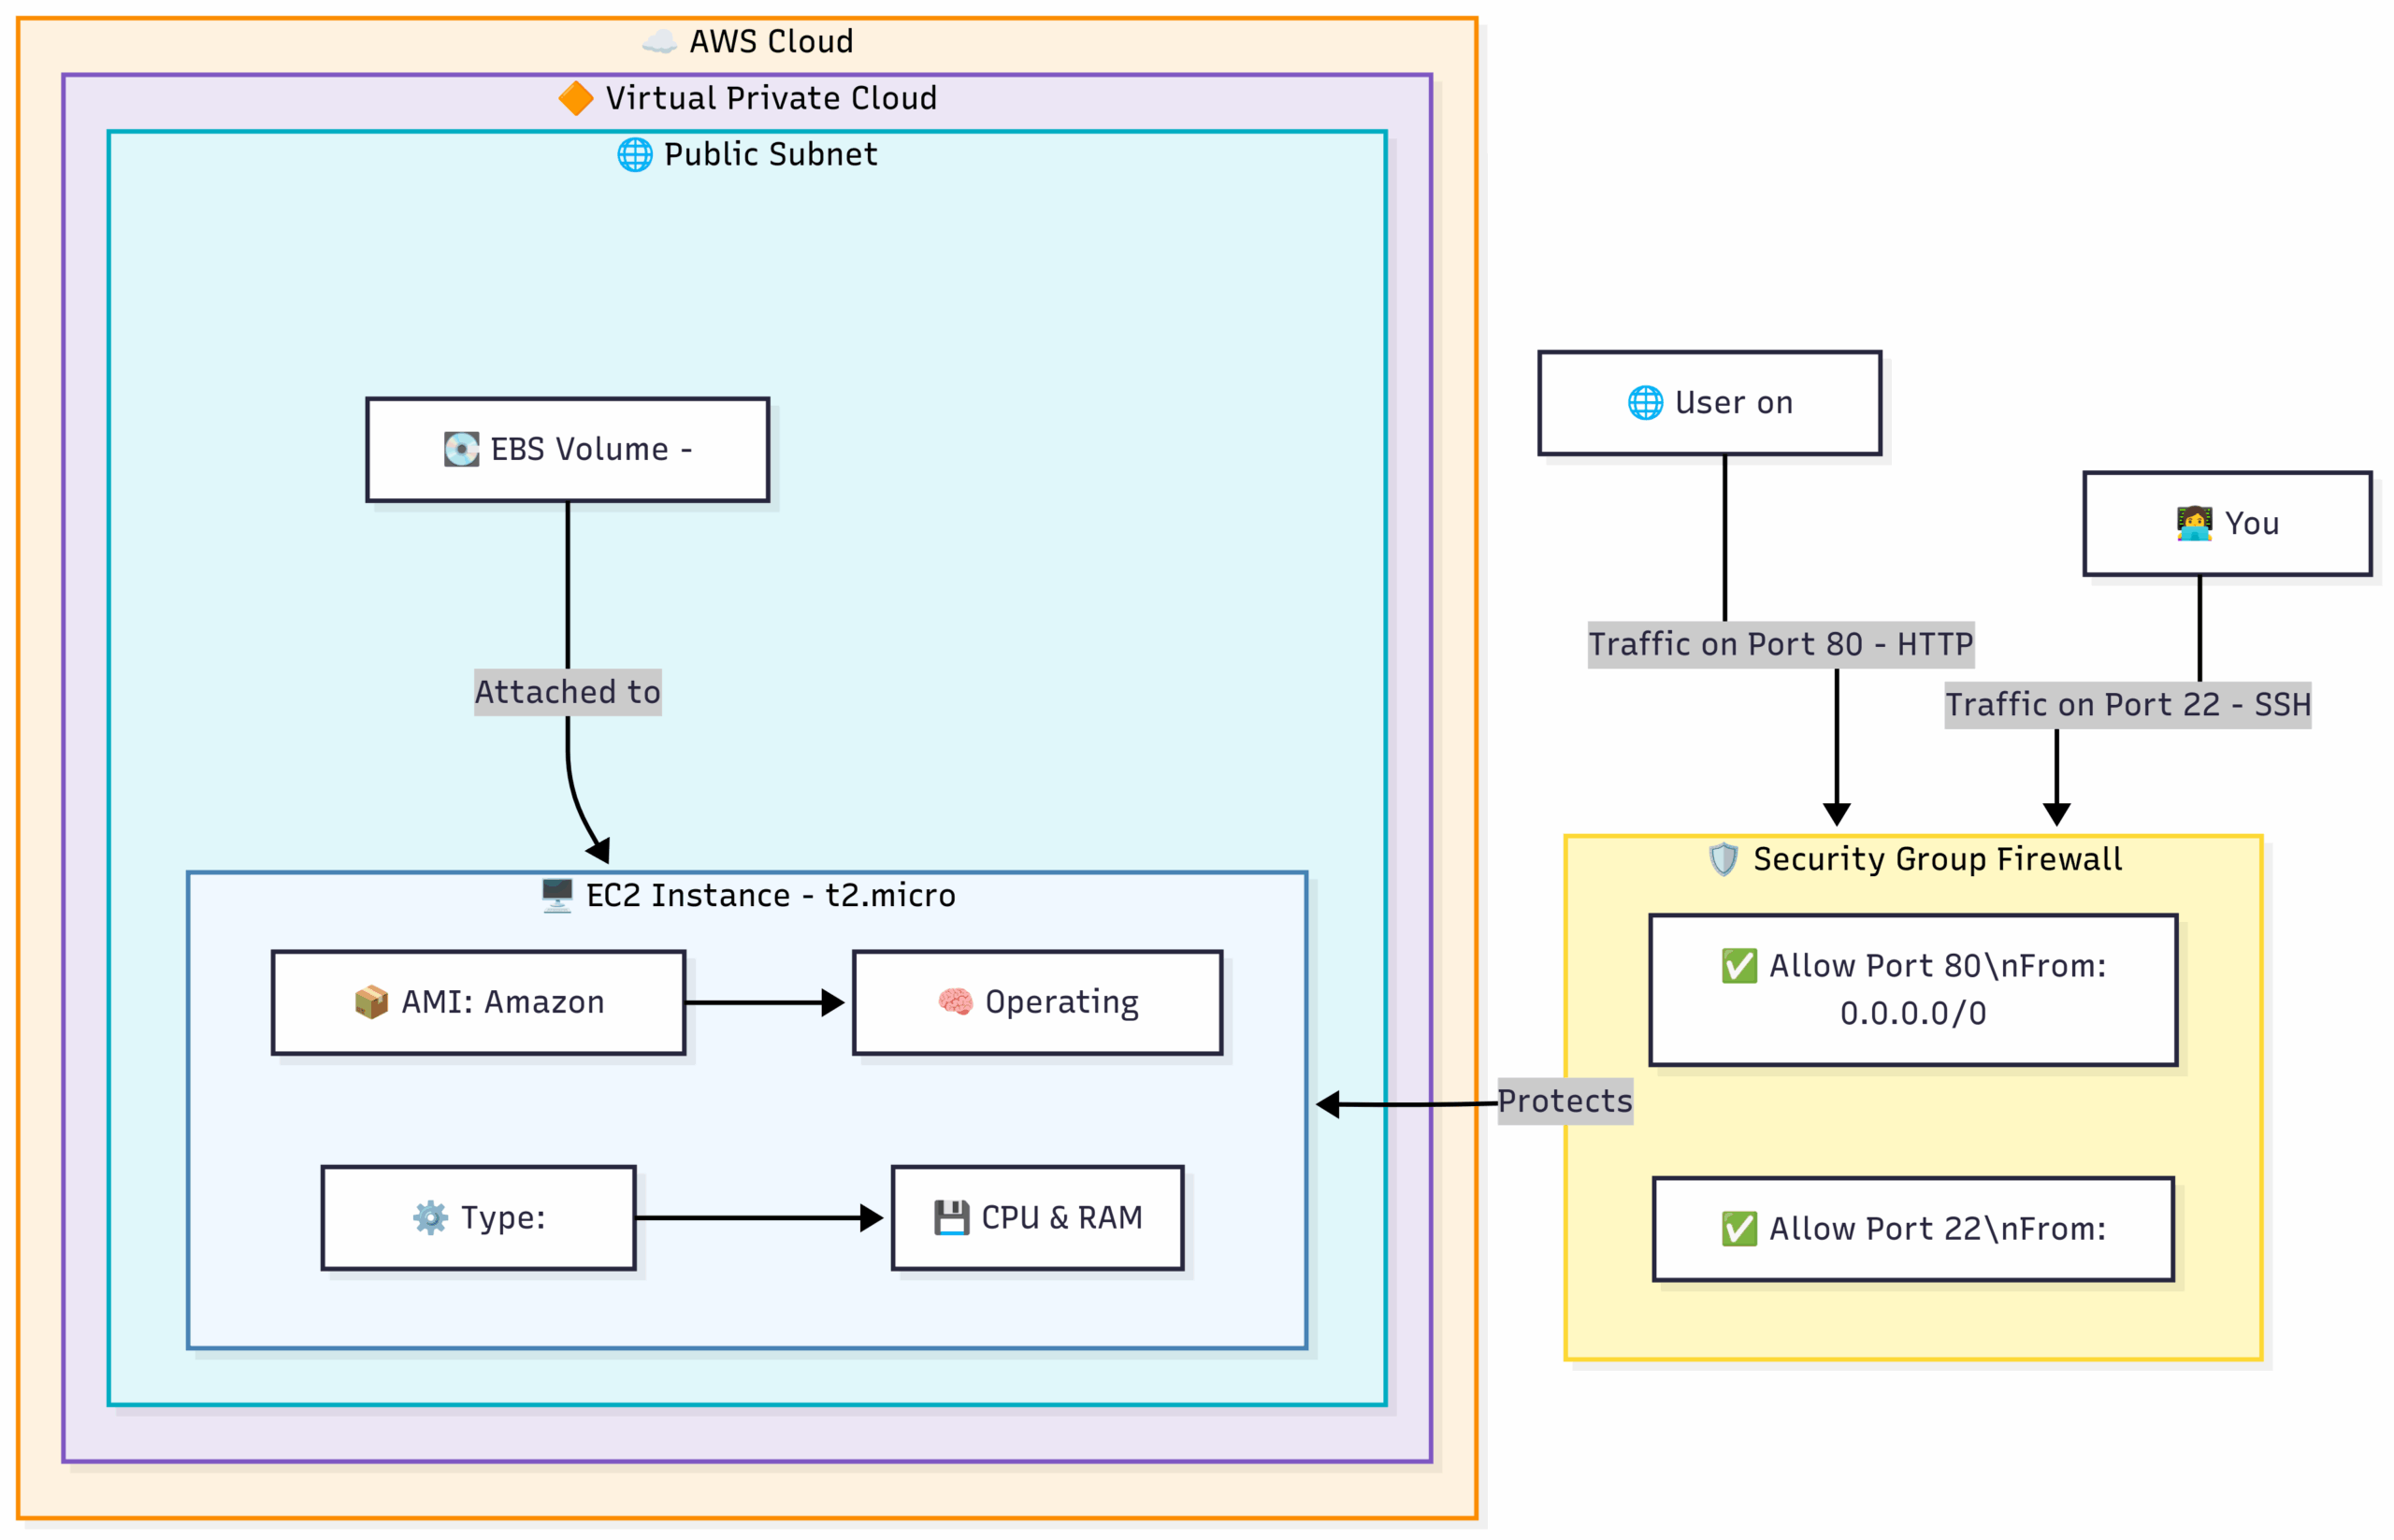
echo "Onboarding complete. 'alice' now has developer permissions."4.1 What is an EC2 Instance? The Computer You Rent
At its heart, Amazon EC2 (Elastic Compute Cloud) is a service that provides secure, resizable compute capacity in the cloud.
Analogy: Renting a Computer. Imagine you need a computer for a specific task, like running a website or processing a large data file. Instead of buying a physical machine, you go to a massive warehouse (AWS) that has millions of computers of all shapes and sizes. You tell the clerk:
- “I need a computer with a basic processor and a little bit of RAM.” (This is your Instance Type).
- “Please install the Linux operating system on it, along with a web server.” (This is your Amazon Machine Image – AMI).
- “I need a 10 GB hard drive to go with it.” (This is your Elastic Block Store – EBS Volume).
- “Only allow people to access it on the web port, and only let me log in.” (This is your Security Group).
- “Here’s my special key, so only I can unlock it.” (This is your Key Pair).
A few minutes later, the clerk gives you an IP address. You can now remotely access and use this computer as if it were sitting on your own desk. When you’re done, you tell the clerk to shut it down and destroy it. You only pay for the time you used it, down to the second.
That “rented computer” is an EC2 instance. It’s a virtual server that gives you complete control, just like a physical machine.
4.2 The Five Core Components of an EC2 Instance
To launch an EC2 instance, you must define these five key components.
- AMI (Amazon Machine Image): The Blueprint/Software Template An AMI is a pre-configured template for your instance. It includes the operating system (e.g., Amazon Linux, Ubuntu, Windows Server) and can also include pre-installed application software (e.g., a database, a web server). You can use AMIs provided by AWS, from the AWS Marketplace (third-party vendors), or you can even create your own custom AMIs.
- In English: It’s the master installation disk you use to set up the computer’s software.
- Instance Type: The Hardware Power The Instance Type determines the hardware of your host computer. This includes the CPU (Central Processing Unit), memory (RAM), storage, and networking capacity. AWS offers a huge variety of instance types optimized for different tasks. The naming convention gives you a clue:
t2.micro: T for “Tiny” or “Burstable” – great for low-traffic websites or development.m5.large: M for “Main/General Purpose” – a good balance of CPU and RAM.c5.xlarge: C for “Compute Optimized” – lots of CPU power for intensive tasks.r5.xlarge: R for “RAM Optimized” – lots of memory for databases or caches.
- EBS (Elastic Block Store) Volume: The Detachable Hard Drive An EBS volume is a durable, block-level storage device that you can attach to a single EC2 instance.
- Analogy: Think of it as a high-performance USB hard drive. You plug it into your EC2 instance to act as its main drive (C: drive or
/dev/sda1). - The most important feature is that it’s persistent. If you shut down or terminate your EC2 instance, the data on the attached EBS volume remains safe. You can even detach the volume and re-attach it to a different EC2 instance, just like moving a hard drive from one computer to another.
- Analogy: Think of it as a high-performance USB hard drive. You plug it into your EC2 instance to act as its main drive (C: drive or
- Security Group: The Instance-Level Firewall A Security Group acts as a virtual firewall for your EC2 instance to control inbound and outbound traffic. It is not a physical firewall, but a set of rules applied to your instance.
- Analogy: It’s a bouncer standing at the door of your instance. The rules you define are the guest list.
- For example, a rule might say: “ALLOW inbound traffic from ANY IP address (
0.0.0.0/0) on TCP port80(for HTTP/web traffic).” Another rule might say: “ALLOW inbound traffic from ONLY my office IP address (203.0.113.5/32) on TCP port22(for SSH/login).” - Security Groups are stateful. This means if you allow an inbound connection (e.g., a user visiting your website), the return traffic is automatically allowed out, regardless of outbound rules.
- Key Pair: The Key to the Front Door AWS uses public-key cryptography to secure the login information for your instance. A key pair consists of:
- A public key that AWS stores on the instance.
- A private key that you store on your computer.
- You use your private key to prove your identity when you connect to the instance. You must download and save your private key file (e.g.,
my-key.pem) when you create it. If you lose this file, you cannot generate it again and will lose access to your instance. Guard it carefully!
The Process of Launching and Connecting to an EC2 Instance

4.3 Practical AWS CLI Commands
Let’s walk through the flowchart using the AWS CLI.
# PREREQUISITE: You need your VPC's default subnet ID.
# This command gets the default VPC ID first, then uses it to find a subnet ID.
VPC_ID=$(aws ec2 describe-vpcs --filters "Name=isDefault,Values=true" --query "Vpcs[0].VpcId" --output text)
SUBNET_ID=$(aws ec2 describe-subnets --filters "Name=vpc-id,Values=$VPC_ID" --query "Subnets[0].SubnetId" --output text)
echo "Will use Subnet ID: $SUBNET_ID in VPC: $VPC_ID"

# 1. Create a Security Group to act as our firewall
echo "Creating security group..."
SG_ID=$(aws ec2 create-security-group --group-name my-web-server-sg --description "SG for my web server" --vpc-id $VPC_ID --query 'GroupId' --output text)
echo "Security Group created with ID: $SG_ID"

# 2. Add rules to the Security Group
# Rule 1: Allow SSH access (port 22) from your current IP address
MY_IP=$(curl -s http://checkip.amazonaws.com)
echo "Allowing SSH from your IP: $MY_IP"
aws ec2 authorize-security-group-ingress --group-id $SG_ID --protocol tcp --port 22 --cidr $MY_IP/32
# Rule 2: Allow HTTP access (port 80) from anywhere in the world
echo "Allowing HTTP from anywhere"
aws ec2 authorize-security-group-ingress --group-id $SG_ID --protocol tcp --port 80 --cidr 0.0.0.0/0

# 3. Create a Key Pair
# The command outputs the private key material. We MUST save it to a file.
# We then restrict permissions on the file, as required by SSH.
echo "Creating key pair..."
aws ec2 create-key-pair --key-name my-ec2-key --query 'KeyMaterial' --output text > my-ec2-key.pem
chmod 400 my-ec2-key.pem
echo "Key Pair 'my-ec2-key.pem' created and secured."

# 4. Find the latest Amazon Linux 2 AMI ID
# This is a robust way to always get the latest version.
echo "Finding latest Amazon Linux 2 AMI..."
AMI_ID=$(aws ec2 describe-images --owners amazon --filters "Name=name,Values=amzn2-ami-hvm-*-x86_64-gp2" --query "sort_by(Images, &CreationDate)[-1].ImageId" --output text)
echo "Using AMI ID: $AMI_ID"

# 5. Launch the EC2 instance!
# We bring together all the components: AMI, instance type, key, security group, and subnet.
echo "Launching EC2 instance..."
INSTANCE_ID=$(aws ec2 run-instances \
    --image-id $AMI_ID \
    --instance-type t2.micro \
    --key-name my-ec2-key \
    --security-group-ids $SG_ID \
    --subnet-id $SUBNET_ID \
    --query "Instances[0].InstanceId" \
    --output text)
echo "Instance launched with ID: $INSTANCE_ID"

# 6. Wait for the instance to be in the 'running' state
echo "Waiting for instance to enter 'running' state..."
aws ec2 wait instance-running --instance-ids $INSTANCE_ID

# 7. Get the Public IP address of our new instance
PUBLIC_IP=$(aws ec2 describe-instances --instance-ids $INSTANCE_ID --query "Reservations[0].Instances[0].PublicIpAddress" --output text)
echo "Instance is running at Public IP: $PUBLIC_IP"

# 8. You can now connect!
echo "To connect, run this command in your terminal:"
echo "ssh -i my-ec2-key.pem ec2-user@$PUBLIC_IP"5.1 What is S3? It’s Not a Hard Drive
Amazon Simple Storage Service (S3) is a service that provides secure, durable, and highly-scalable object storage.
This is a very important distinction. The EBS volume we attached to our EC2 instance in the last chapter was block storage. A hard drive is block storage. It’s designed to have an operating system installed on it and to run applications. It’s fast for small, frequent read/write operations.
S3 is object storage. It is not a hard drive you can install an OS on. Instead, it’s designed to store and retrieve files (which it calls “objects”).
Analogy: The Magic Digital Filing Cabinet. Imagine you have a magic filing cabinet.
- It’s infinitely large. You can put as many files in it as you want, and you’ll never run out of space.
- It’s indestructible. When you put a file in it, the cabinet automatically makes 11 copies of it and stores them in different, secret, secure locations. The chance of you ever losing a file is astronomically small (99.999999999% durability).
- It’s accessible from anywhere. You can upload or download a file from this cabinet from anywhere in the world with an internet connection, using a simple web address.
- It’s pay-as-you-go. You only pay for the amount of stuff you’re storing and for how often you access it.
- You can’t run programs inside it. It’s a filing cabinet, not a computer. It’s meant for storing things, not for processing them.
This magic filing cabinet is Amazon S3. It’s perfect for storing website images and videos, backups, application assets, logs, and large datasets for analysis.
5.2 The Core Concepts of S3
S3 has a very simple and flat structure, built on these key concepts.
- Objects: The Files An object is the fundamental entity stored in S3. It’s simply the file itself (e.g.,
photo.jpg,document.pdf,backup.zip). An object consists of two main parts:- Data: The actual content of the file.
- Metadata: Information about the file, such as the content type, last modified date, and any custom tags you want to add. Objects can be anywhere from 0 bytes to 5 Terabytes in size.
- Buckets: The Top-Level Folders A bucket is a container for objects. You must create a bucket before you can store any data in S3.
- Analogy: A bucket is the top-level drawer of your filing cabinet.
- Globally Unique Name: The name you give your bucket must be unique across ALL of AWS, worldwide. No two customers can have a bucket named
my-bucket. This is because buckets can be accessed via a DNS name, likehttp://my-unique-bucket-name.s3.amazonaws.com. So, you’ll need to choose a name likemy-company-annual-reports-2023. - Region-Specific: Although the name is global, you create the bucket in a specific AWS Region (e.g.,
us-east-1). Storing data in a region closer to your users will reduce latency.
- Keys: The Full Path to the File The “key” is the unique identifier for an object within a bucket. It’s essentially the full file name, which can include a path-like structure.
- For example, if you upload a file
cat.jpginto a “folder” namedimages, the bucket ismy-bucket, and the key isimages/cat.jpg. - Important: S3 doesn’t actually have folders! It’s a flat structure. The
/in the key just helps us organize things logically and mimics a folder structure. The full name of the object is the key.
- For example, if you upload a file
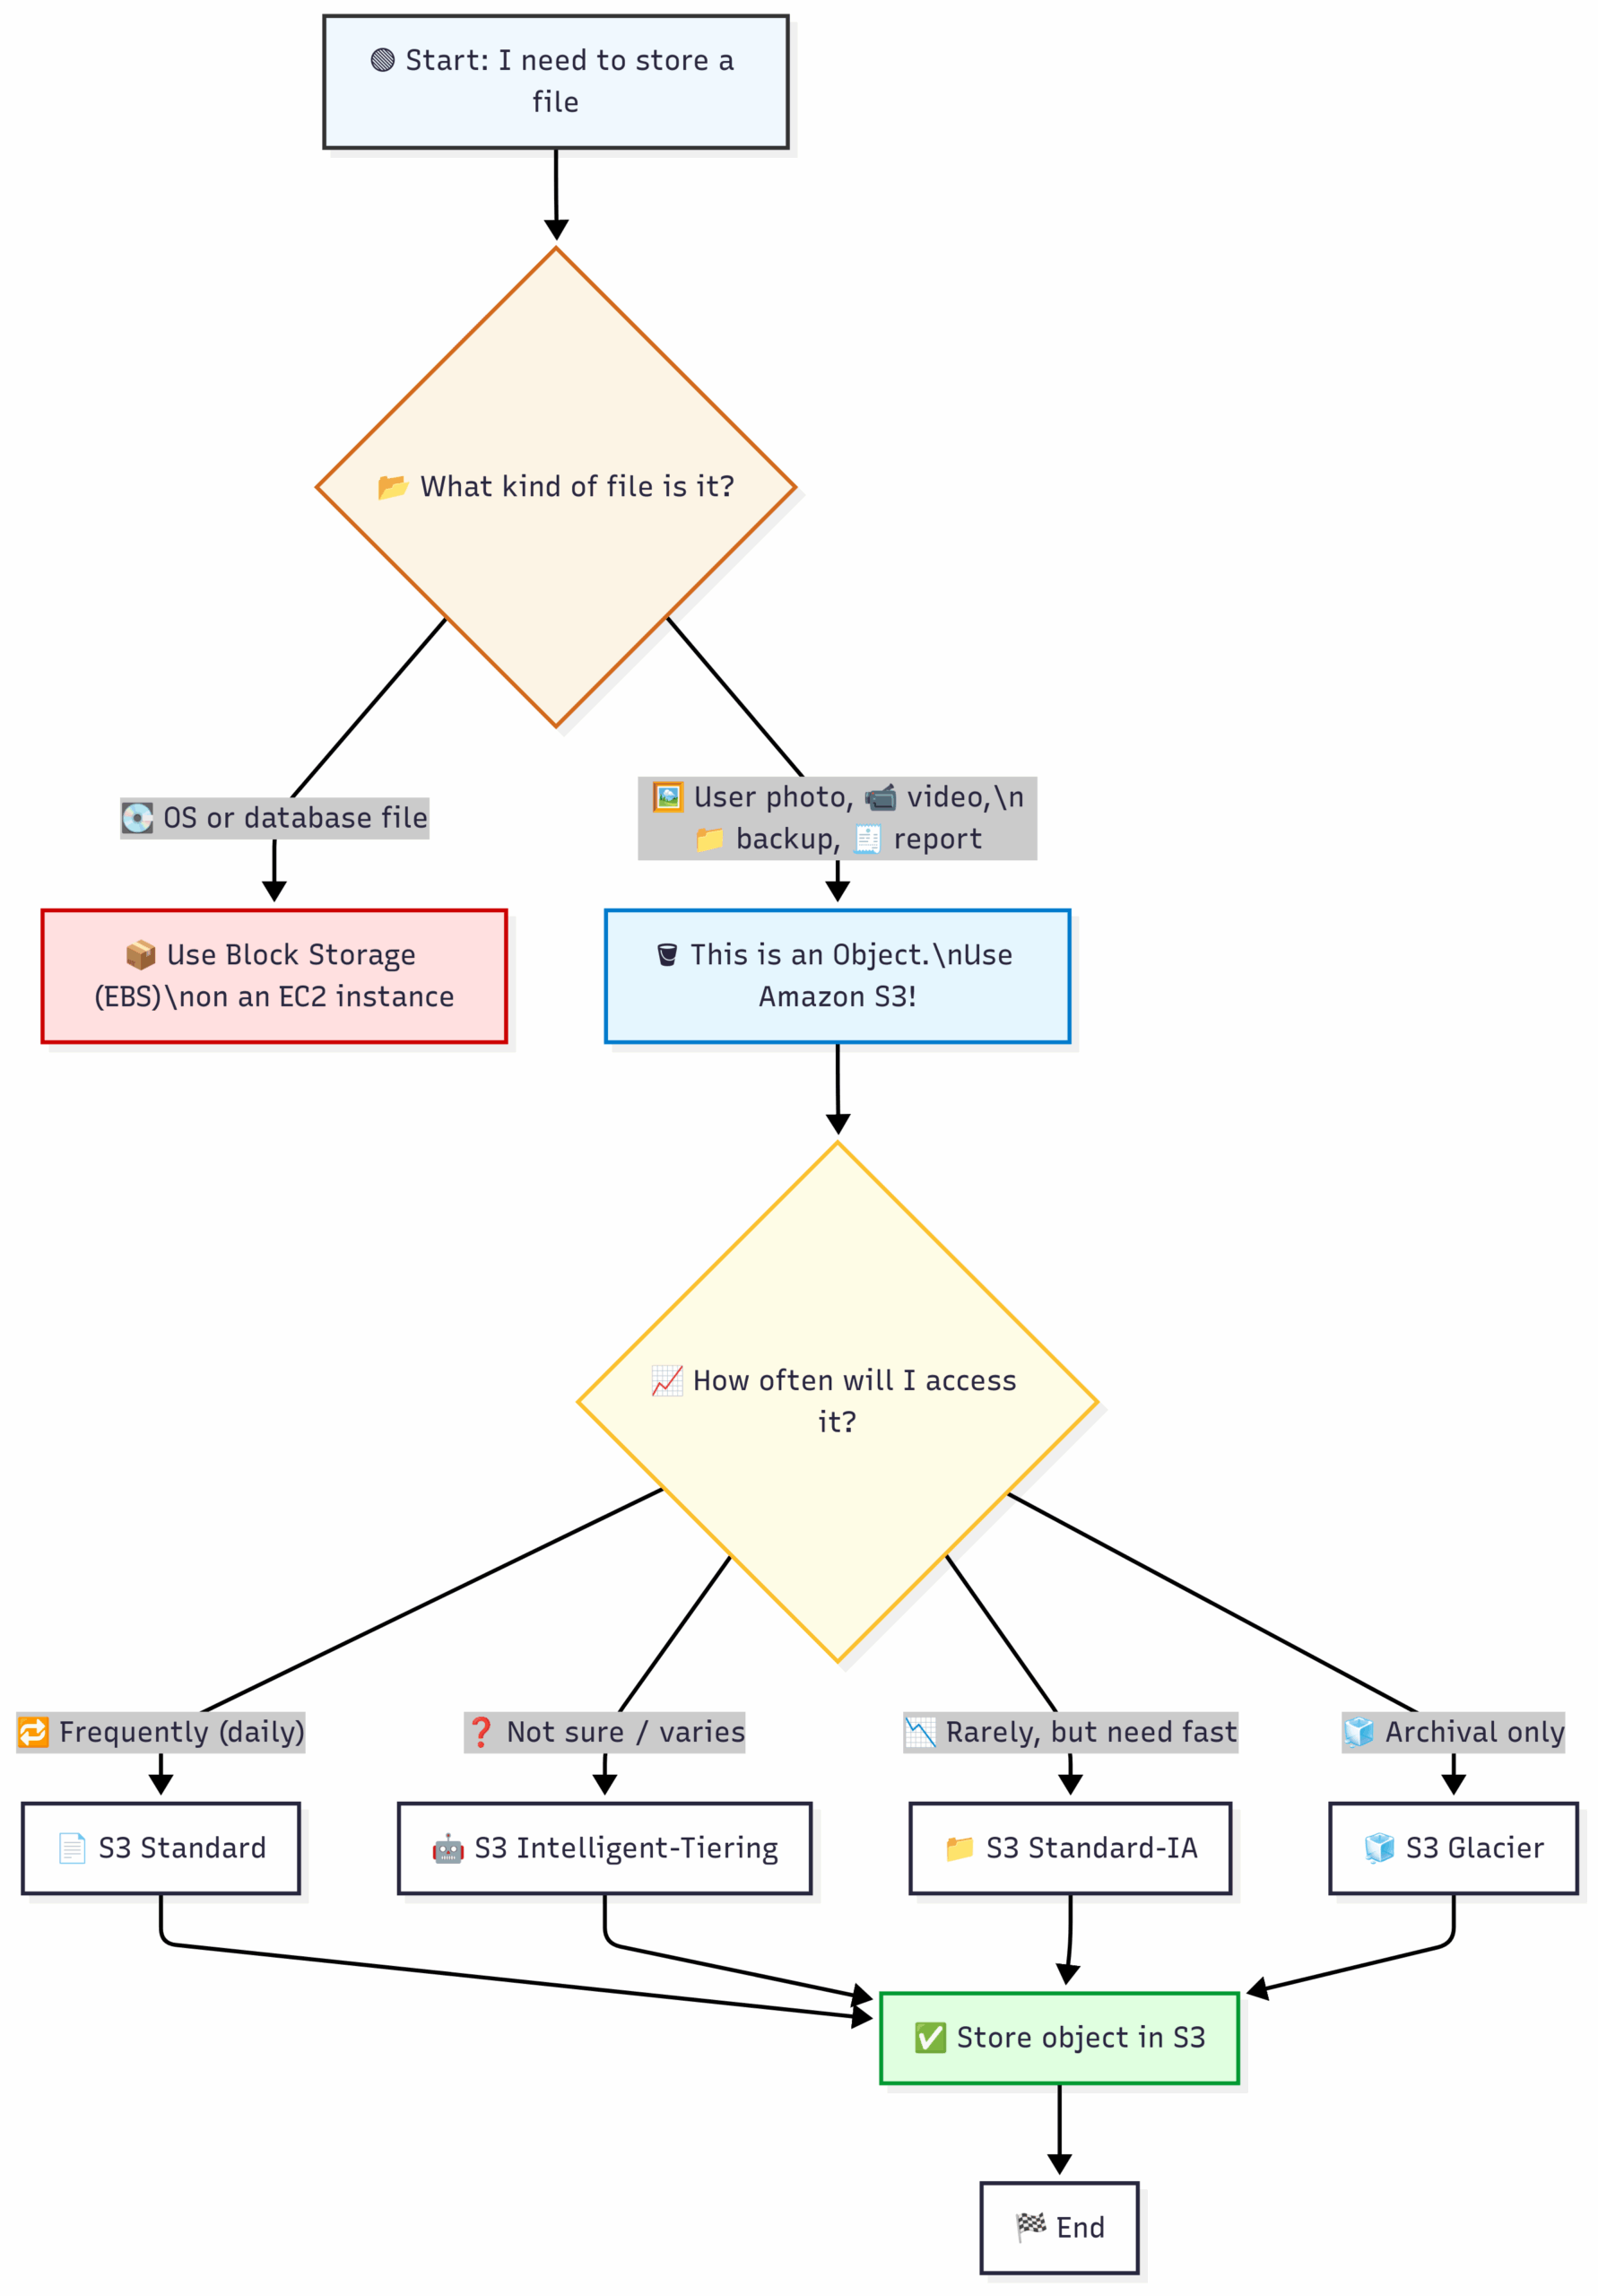
- S3 Storage Classes: Hot vs. Cold Storage Not all data is accessed with the same frequency. AWS allows you to choose a storage class for your objects to save money.
- Analogy: Think of this as different types of filing cabinets. One is on your desk for things you need daily, another is in the basement for archives.
- S3 Standard: The default. For frequently accessed data (“hot” data). Offers high durability, availability, and performance. Most expensive.
- S3 Intelligent-Tiering: Automatically moves your data to the most cost-effective tier based on your access patterns. A great “set it and forget it” option.
- S3 Standard-IA (Infrequent Access): For data that is accessed less often but requires rapid access when needed (e.g., long-term backups). Cheaper storage price, but you pay a small fee to retrieve the data.
- S3 Glacier (Instant, Flexible, Deep Archive): Extremely low-cost storage designed for archiving and long-term backup (“cold” data). Retrieval can take anywhere from milliseconds (Glacier Instant) to minutes or hours (Glacier Flexible/Deep Archive).
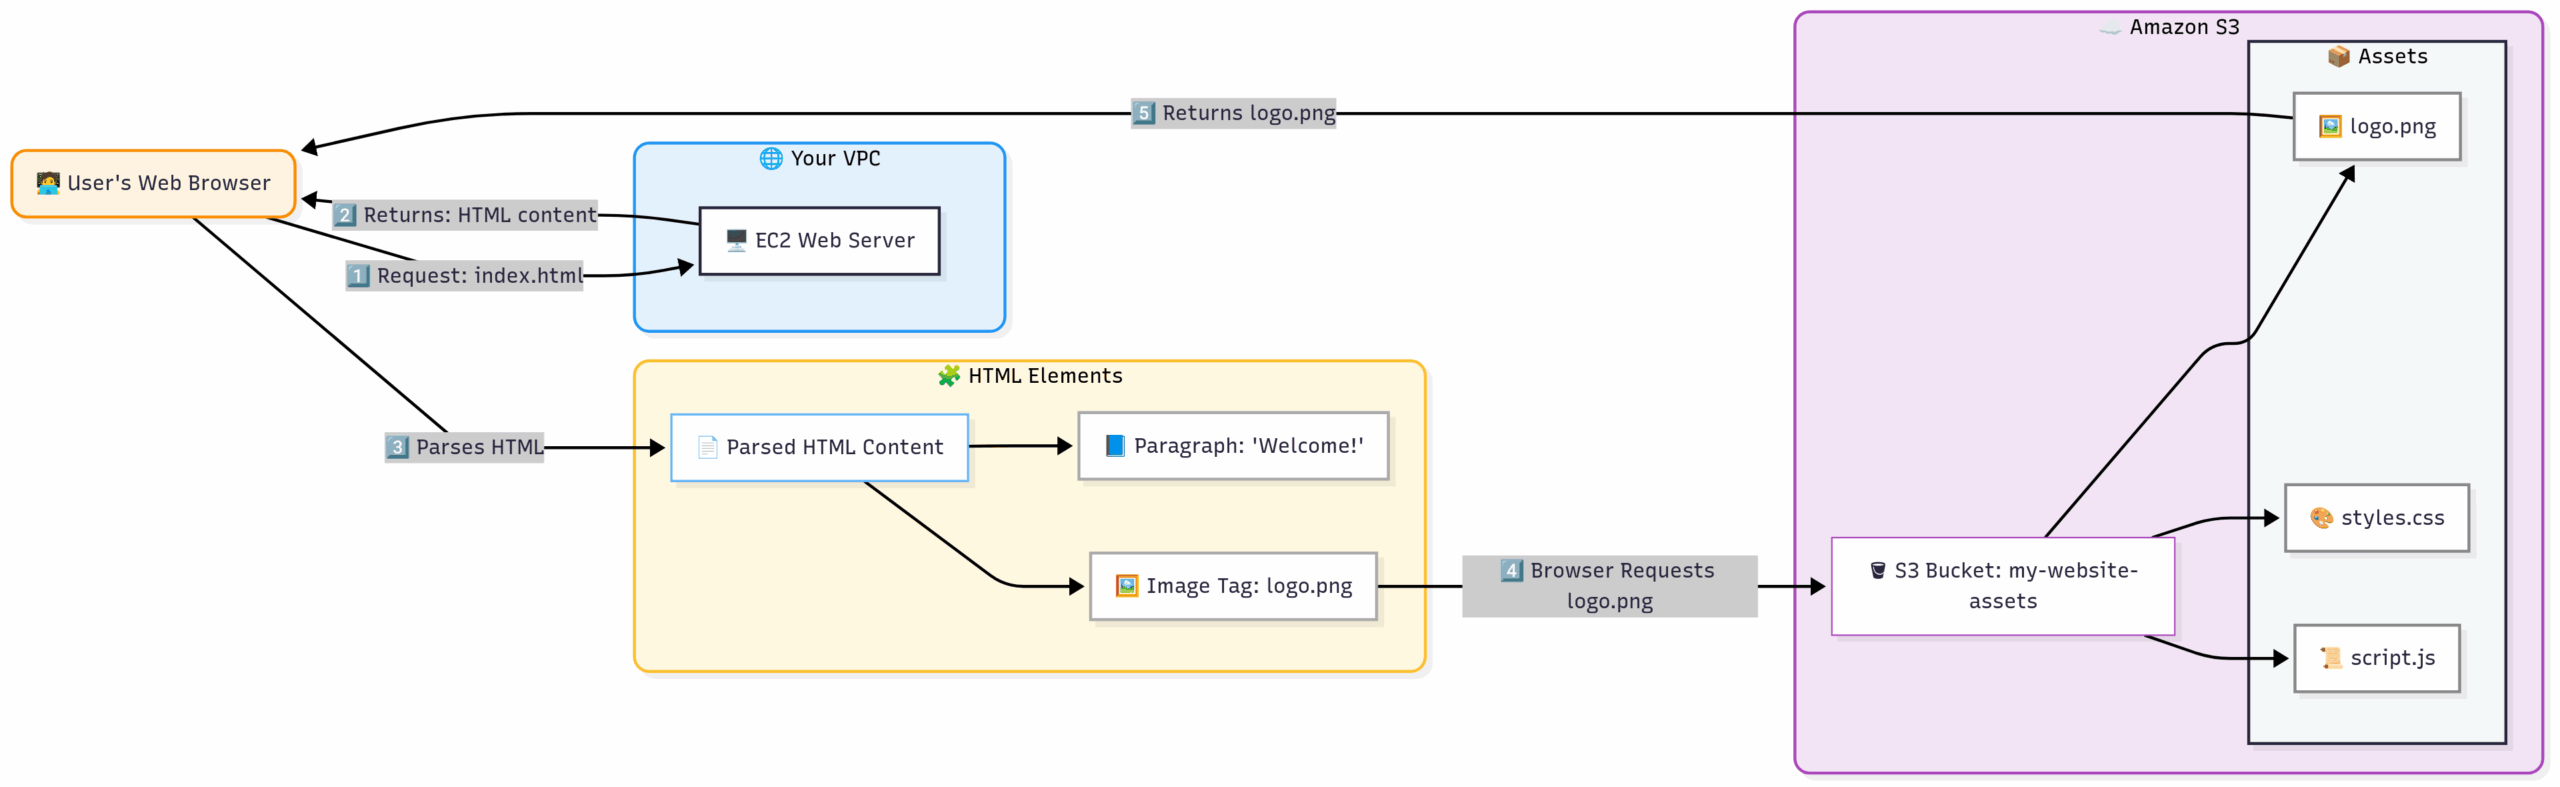
Flow: The user’s browser first asks the EC2 server for the main webpage. The server sends back the HTML. The HTML contains links to images (logo.png) that point directly to S3. The browser then fetches these images from S3, taking the load off the EC2 server.
Deciding to Use S3:
5.3 Practical AWS CLI Commands
Let’s interact with S3 from the command line. Remember to pick a bucket name that is truly unique!
# Set a variable for your unique bucket name. Replace 'your-name-and-date' with something unique.
# Bucket names can only contain lowercase letters, numbers, and hyphens.
BUCKET_NAME="my-unique-app-assets-$(date +%s)"
echo "Using bucket name: $BUCKET_NAME"

# 1. Create (make) a bucket.
# We specify the region where the bucket will physically reside.
echo "Creating S3 bucket..."
aws s3 mb s3://$BUCKET_NAME --region us-east-1

# 2. Create a dummy file to upload
echo "Creating a sample file..."
echo "Hello, S3!" > sample.txt

# 3. Copy the file into the S3 bucket
# The 'cp' command works just like on Linux.
echo "Uploading file to S3..."
aws s3 cp sample.txt s3://$BUCKET_NAME/

# 4. We can also create a "folder" and upload to it
echo "Hello again!" > another-file.txt
aws s3 cp another-file.txt s3://$BUCKET_NAME/documents/

# 5. List the objects in the bucket
# The '--recursive' flag shows all objects, even those inside "folders".
echo "Listing objects in the bucket..."
aws s3 ls s3://$BUCKET_NAME/ --recursive

# 6. Download the file from S3 back to our local machine
echo "Downloading file from S3..."
aws s3 cp s3://$BUCKET_NAME/sample.txt downloaded-sample.txt
cat downloaded-sample.txt

# 7. Clean up by deleting the objects and then the bucket
# The '--recursive' flag is required to delete a bucket that is not empty.
echo "Cleaning up..."
aws s3 rm s3://$BUCKET_NAME/ --recursive
aws s3 rb s3://$BUCKET_NAME/

echo "S3 operations complete."6.1 What is a VPC? Your Private Slice of the AWS Cloud
Amazon VPC (Virtual Private Cloud) lets you provision a logically isolated section of the AWS Cloud where you can launch AWS resources in a virtual network that you define. You have complete control over your virtual networking environment.
Analogy: Renting a Fenced-Off Plot of Land. Imagine AWS is a vast, open continent. When you get an AWS account, you’re given a huge, undefined territory. This is a bit chaotic and insecure.
A VPC is like telling AWS: “I want to rent a 10-acre plot of land on this continent. Please put a secure fence around it for me.”
- You define the boundaries: You choose the size and IP address range for your plot of land. This is your private space. Nothing gets in or out unless you allow it.
- You can subdivide your land: Inside your fenced-off plot, you can create smaller, internal plots. Some of these plots can have a gate that leads directly to the main public highway (the Internet). These are Public Subnets. Other plots have no direct access to the outside world; they can only talk to other plots within your main fence. These are Private Subnets.
This is the foundation of network security in AWS. You place your public-facing resources, like web servers, in Public Subnets. You place your sensitive backend resources, like databases, in Private Subnets, shielding them completely from the internet.
6.2 The Core Components of a VPC
Building a VPC involves assembling several networking components. Let’s break them down.
- VPC (Virtual Private Cloud): The Fenced Land This is the main container. You define it by giving it a name and an IP address range in CIDR (Classless Inter-Domain Routing) notation. For example,
10.0.0.0/16. This range provides 65,536 private IP addresses (10.0.0.0to10.0.255.255) for you to use exclusively within your VPC. - Subnets: The Subdivided Plots A subnet is a range of IP addresses within your VPC. You must create at least one subnet in each Availability Zone where you want to launch resources, for high availability.
- Public Subnet: A subnet is “public” if its traffic is routed through an Internet Gateway. Resources in a public subnet can be assigned a public IP address and can communicate directly with the internet.
- Private Subnet: A subnet is “private” if it does not have a direct route to the internet. Resources here cannot be reached from the internet.
- Internet Gateway (IGW): The Gate to the Public Highway An IGW is a horizontally scaled, redundant, and highly available VPC component that allows communication between your VPC and the internet. You attach one IGW to your VPC, and it serves as the main entry/exit point for public traffic.
- Route Tables: The GPS and Road Signs A route table contains a set of rules, called routes, that are used to determine where network traffic from your subnet is directed.
- A Public Subnet’s route table will have a route that says: “For any traffic destined for the internet (
0.0.0.0/0), send it to the Internet Gateway.” - A Private Subnet’s route table will not have this route.
- A Public Subnet’s route table will have a route that says: “For any traffic destined for the internet (
- NAT Gateway (Network Address Translation): The Escorted Trip to Town What if a resource in a Private Subnet (like a database server) needs to download a security patch from the internet? It can’t go directly. A NAT Gateway solves this.
- You place a NAT Gateway in a Public Subnet.
- You add a route to the Private Subnet’s route table that says: “For any traffic destined for the internet (
0.0.0.0/0), send it to the NAT Gateway.” - The private instance sends its request to the NAT Gateway. The NAT Gateway, using its public IP, forwards the request to the internet. When the response comes back, the NAT Gateway sends it back to the correct private instance.
- This allows instances in a private subnet to initiate outbound connections to the internet, but the internet cannot initiate inbound connections to them.
- NACLs (Network Access Control Lists): The Neighborhood Security Guard A NACL is an optional layer of security for your VPC that acts as a firewall for controlling traffic in and out of one or more subnets. It’s like a guard standing at the entrance to a whole neighborhood (the subnet).
- NACLs are stateless. This means you must create explicit rules for both inbound and outbound traffic. If you allow inbound port 80, you must also allow outbound on a high-numbered port for the response traffic.
- They operate at the subnet level. Security Groups (Chapter 4) operate at the instance level. It’s best practice to rely primarily on Security Groups and leave the default NACL settings unless you have a specific need.
A Classic VPC with Public and Private Subnets:
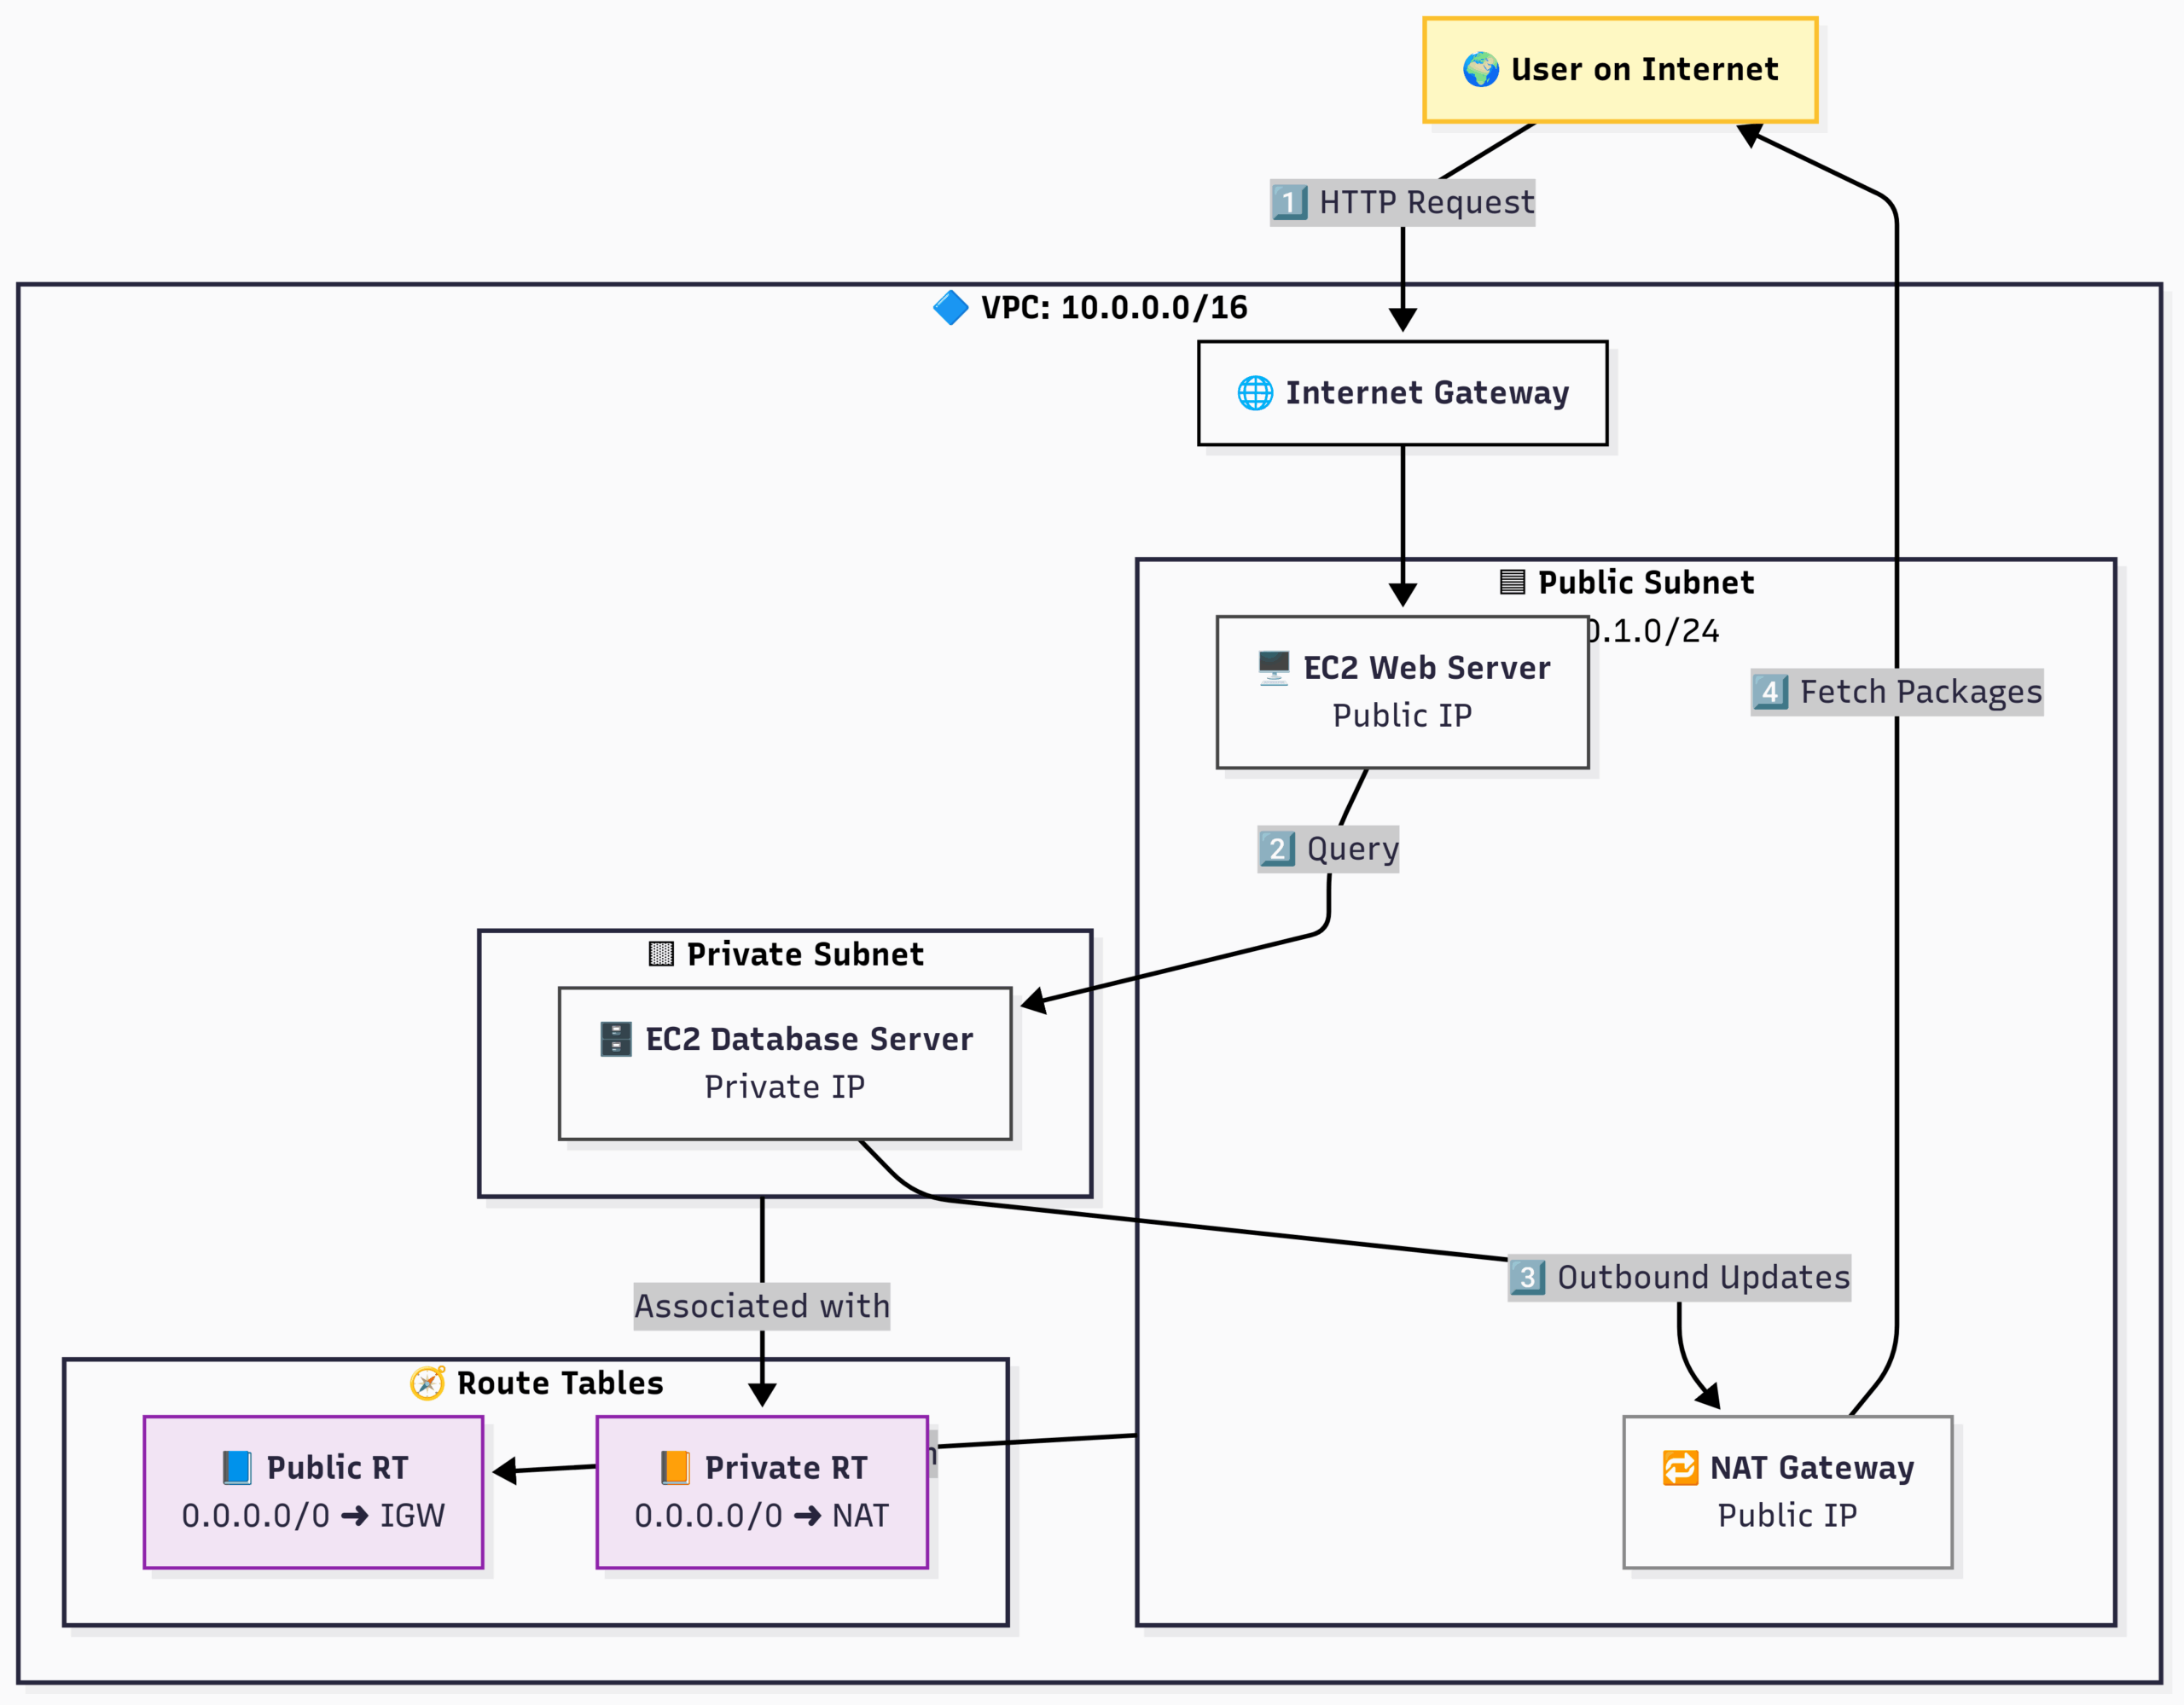
Flow:
- A user’s request hits the Internet Gateway.
- The IGW routes it to the Web Server in the Public Subnet.
- The Web Server needs data, so it connects to the Database Server in the Private Subnet using its private IP address.
- The Database Server needs to download a security patch. It sends the request to the NAT Gateway (as defined in its route table).
- The NAT Gateway forwards the request to the Internet and returns the response, protecting the Database Server from any direct inbound connections.
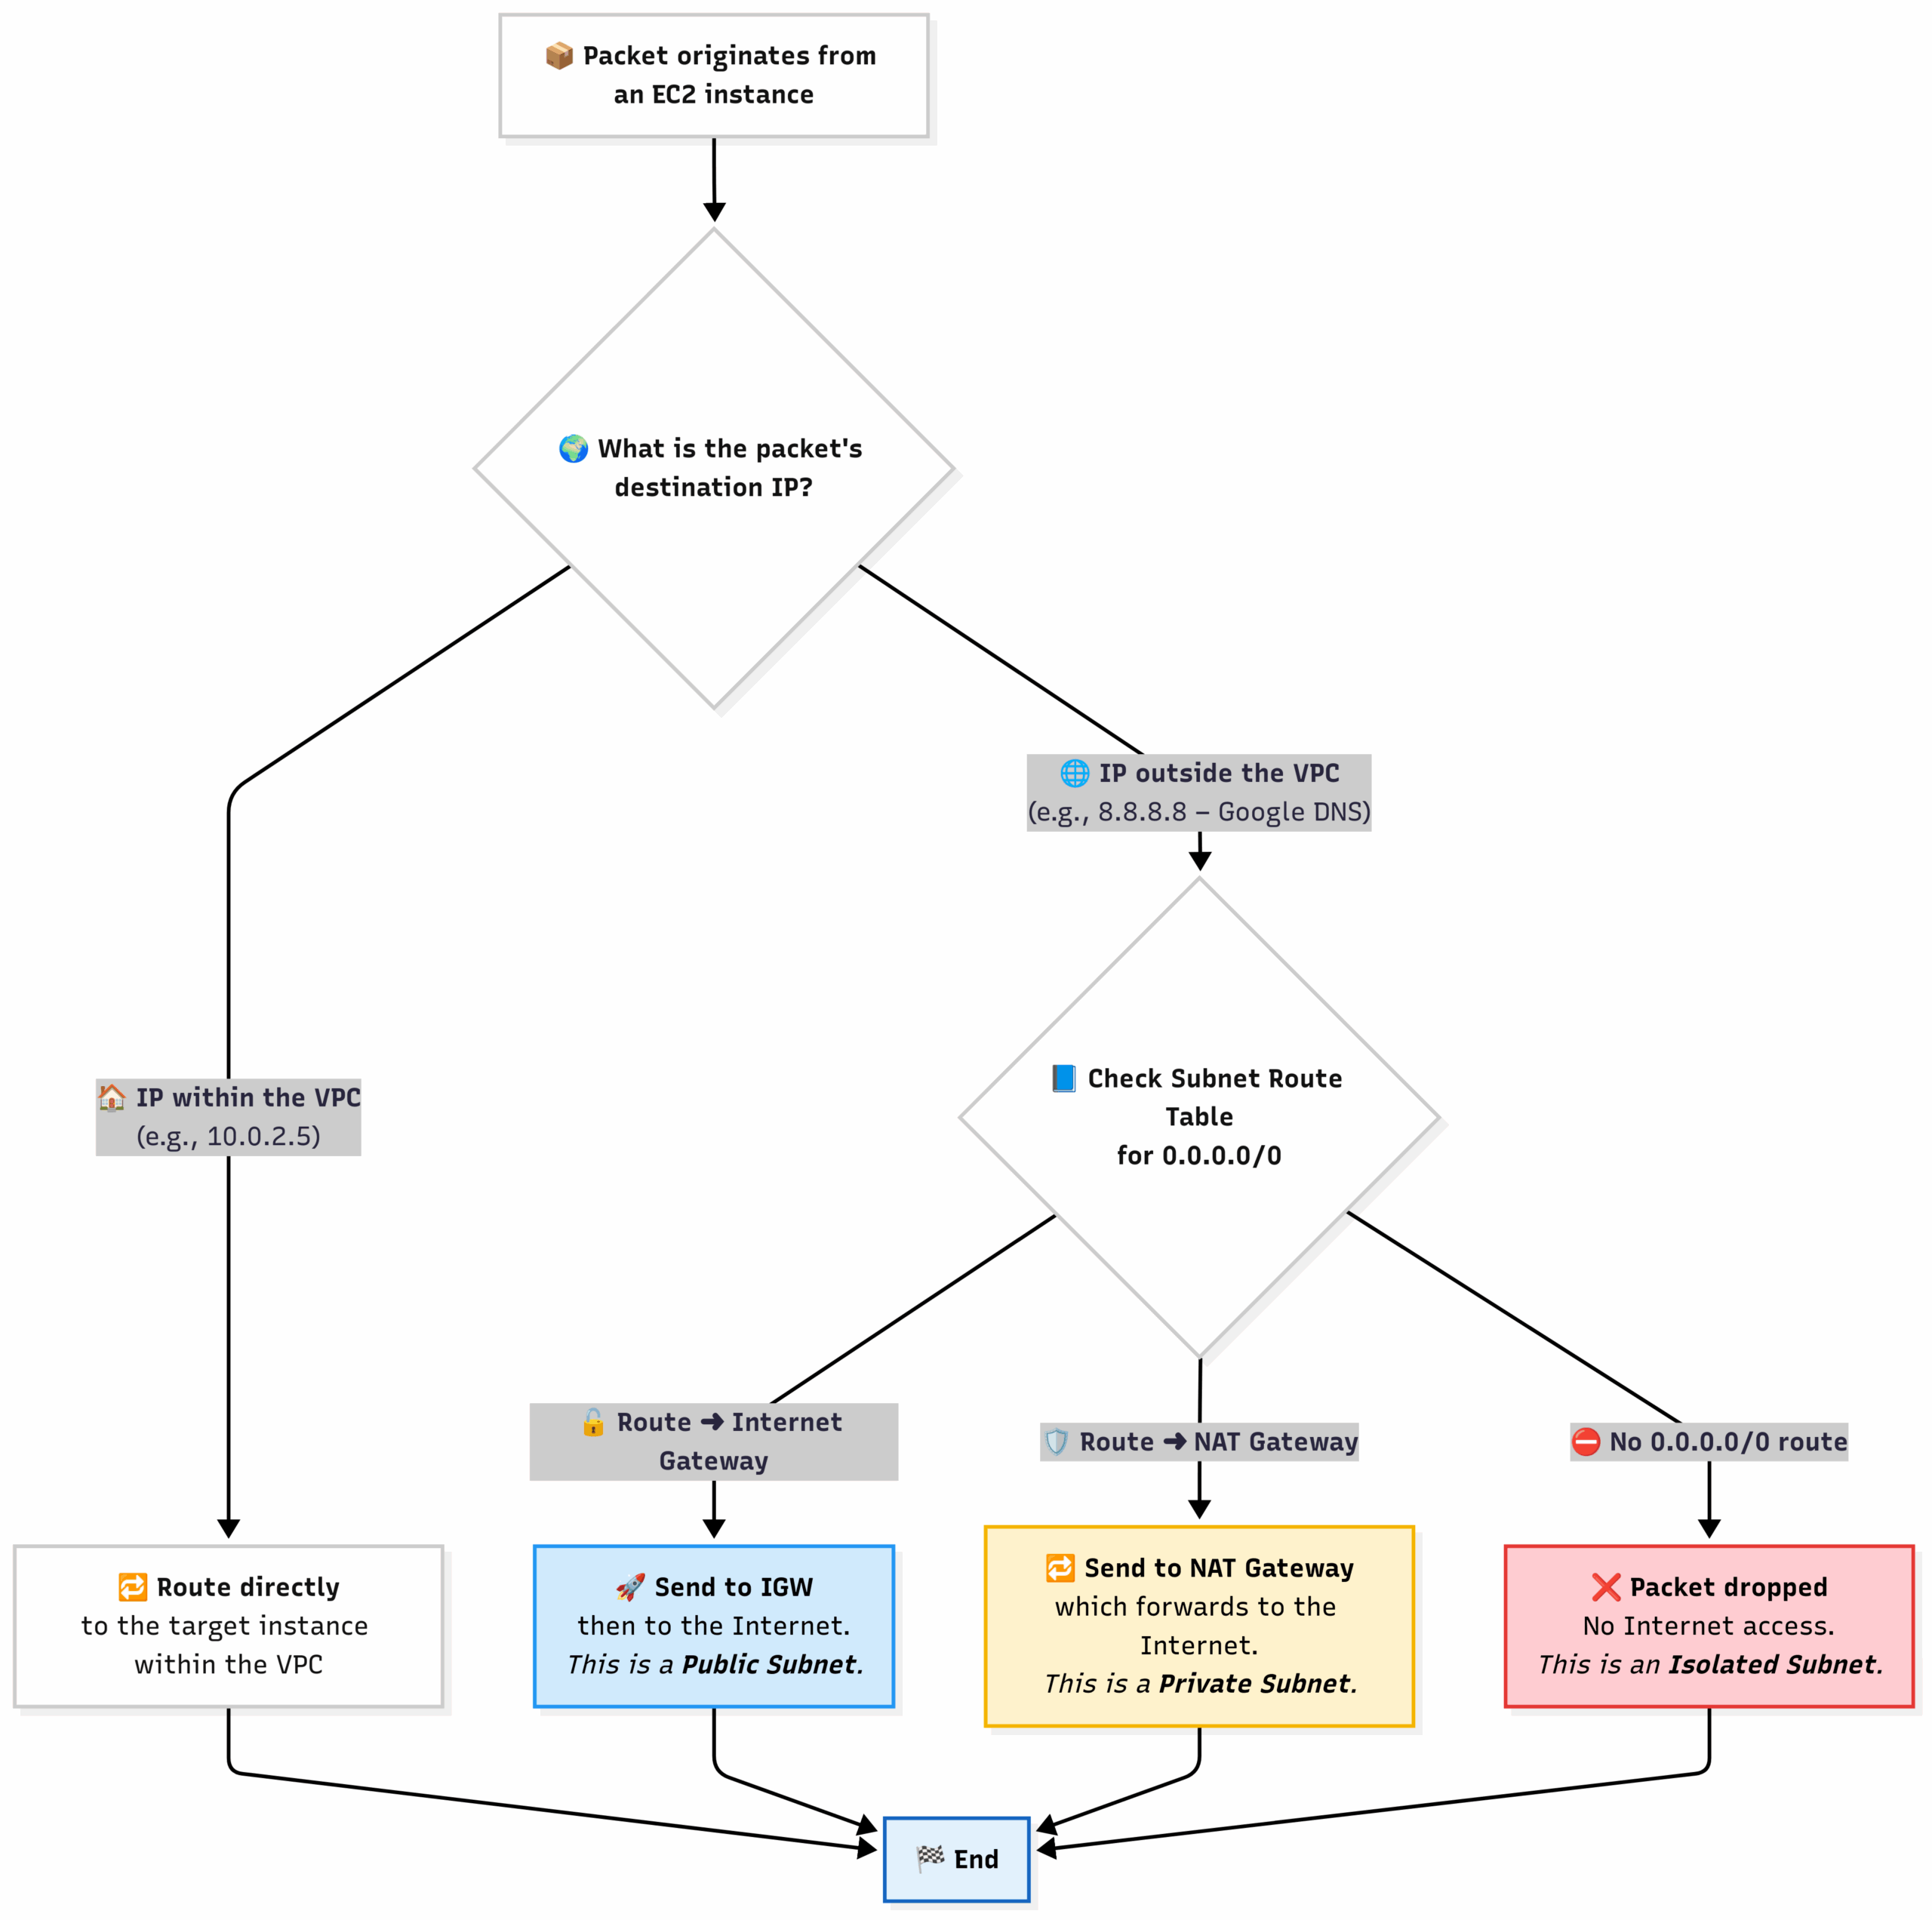
VPC Traffic Flow Decision:
This chart shows how a VPC decides where to send a packet of data.
6.3 Practical AWS CLI Commands
Building a VPC from scratch via the CLI is an excellent way to learn the components. Note: For simplicity, this won’t include the NAT Gateway, which requires an Elastic IP.
# 1. Create the VPC
echo "Creating VPC..."
VPC_ID=$(aws ec2 create-vpc --cidr-block 10.0.0.0/16 --query 'Vpc.VpcId' --output text)
aws ec2 create-tags --resources $VPC_ID --tags Key=Name,Value=my-cli-vpc
echo "VPC created with ID: $VPC_ID"

# 2. Create a Public Subnet
echo "Creating Public Subnet..."
PUBLIC_SUBNET_ID=$(aws ec2 create-subnet --vpc-id $VPC_ID --cidr-block 10.0.1.0/24 --query 'Subnet.SubnetId' --output text)
aws ec2 create-tags --resources $PUBLIC_SUBNET_ID --tags Key=Name,Value=my-public-subnet
echo "Public Subnet created with ID: $PUBLIC_SUBNET_ID"

# 3. Create an Internet Gateway
echo "Creating Internet Gateway..."
IGW_ID=$(aws ec2 create-internet-gateway --query 'InternetGateway.InternetGatewayId' --output text)
aws ec2 create-tags --resources $IGW_ID --tags Key=Name,Value=my-igw
echo "IGW created with ID: $IGW_ID"

# 4. Attach the Internet Gateway to the VPC
echo "Attaching IGW to VPC..."
aws ec2 attach-internet-gateway --vpc-id $VPC_ID --internet-gateway-id $IGW_ID

# 5. Create a Route Table for the public subnet
echo "Creating Route Table..."
ROUTE_TABLE_ID=$(aws ec2 create-route-table --vpc-id $VPC_ID --query 'RouteTable.RouteTableId' --output text)
aws ec2 create-tags --resources $ROUTE_TABLE_ID --tags Key=Name,Value=my-public-rt
echo "Route Table created with ID: $ROUTE_TABLE_ID"

# 6. Create a route in the Route Table that points internet-bound traffic to the IGW
echo "Creating public route..."
aws ec2 create-route --route-table-id $ROUTE_TABLE_ID --destination-cidr-block 0.0.0.0/0 --gateway-id $IGW_ID

# 7. Associate the Route Table with our Public Subnet
echo "Associating Route Table with Subnet..."
aws ec2 associate-route-table --subnet-id $PUBLIC_SUBNET_ID --route-table-id $ROUTE_TABLE_ID

# 8. Tell the subnet to auto-assign public IP addresses to instances launched in it
echo "Enabling auto-assign public IP on subnet..."
aws ec2 modify-subnet-attribute --subnet-id $PUBLIC_SUBNET_ID --map-public-ip-on-launch

echo "VPC setup is complete! You can now launch an EC2 instance into subnet $PUBLIC_SUBNET_ID"7.1 The Pain of Managing Your Own Database
Before we dive into the AWS services, let’s understand the problem they solve. If you were to run a database (like MySQL or PostgreSQL) on your own EC2 instance, you would be responsible for:
- Installation and Patching: Installing the database software and constantly applying security patches to the OS and the database engine.
- Backups: Scripting and managing regular backups, testing them, and storing them securely.
- High Availability: If your EC2 instance fails, your database goes down. You would need to set up a complex primary/standby replication system yourself.
- Scalability: If your database gets slow, you’d have to manually resize the EC2 instance (scaling up) or set up complex read replicas (scaling out).
- Security: Configuring encryption, network access, and user permissions correctly.
This is a full-time job for a Database Administrator (DBA). AWS offers managed services that handle almost all of this for you, so you can focus on your application.
7.2 Amazon RDS: Your Relational Database Butler
Amazon RDS (Relational Database Service) is a managed service that makes it easy to set up, operate, and scale a relational database in the cloud.
Analogy: Hiring a Professional Butler for Your Library. Imagine your data is a massive, meticulously organized library where every book (data point) has a specific shelf and a relationship to other books (e.g., this book is part of the “History” series). This is a relational database.
Instead of managing this library yourself, you hire a professional butler (RDS). You tell the butler:
- “I want a library built on the ‘MySQL’ organizational system, with a ‘medium-sized’ main desk.” (This is the DB Engine and Instance Class).
- “Please keep the library in my private, secure back room.” (Deploying into a Private Subnet in your VPC).
- “Every night, please make a complete copy of the library and store it in a vault.” (This is Automated Backups).
- “If there’s a fire in this room, automatically activate a duplicate library I’ve built in the room next door.” (This is Multi-AZ High Availability).
- “If the library gets too busy, please set up a ‘read-only’ copy in the lobby for people who just want to browse.” (These are Read Replicas for scaling).
You never have to worry about the lighting, the shelving, or sweeping the floors. The butler (RDS) handles all the maintenance, so you can just focus on adding and reading books (your application data).
Supported Engines: RDS supports popular relational database engines:
- MySQL
- PostgreSQL
- MariaDB
- Oracle
- Microsoft SQL Server
- Amazon Aurora: AWS’s own high-performance, cloud-native database that is compatible with MySQL and PostgreSQL but offers significantly better performance and availability.
RDS in a High-Availability VPC:
This architecture demonstrates the power of RDS for resilience and scalability.
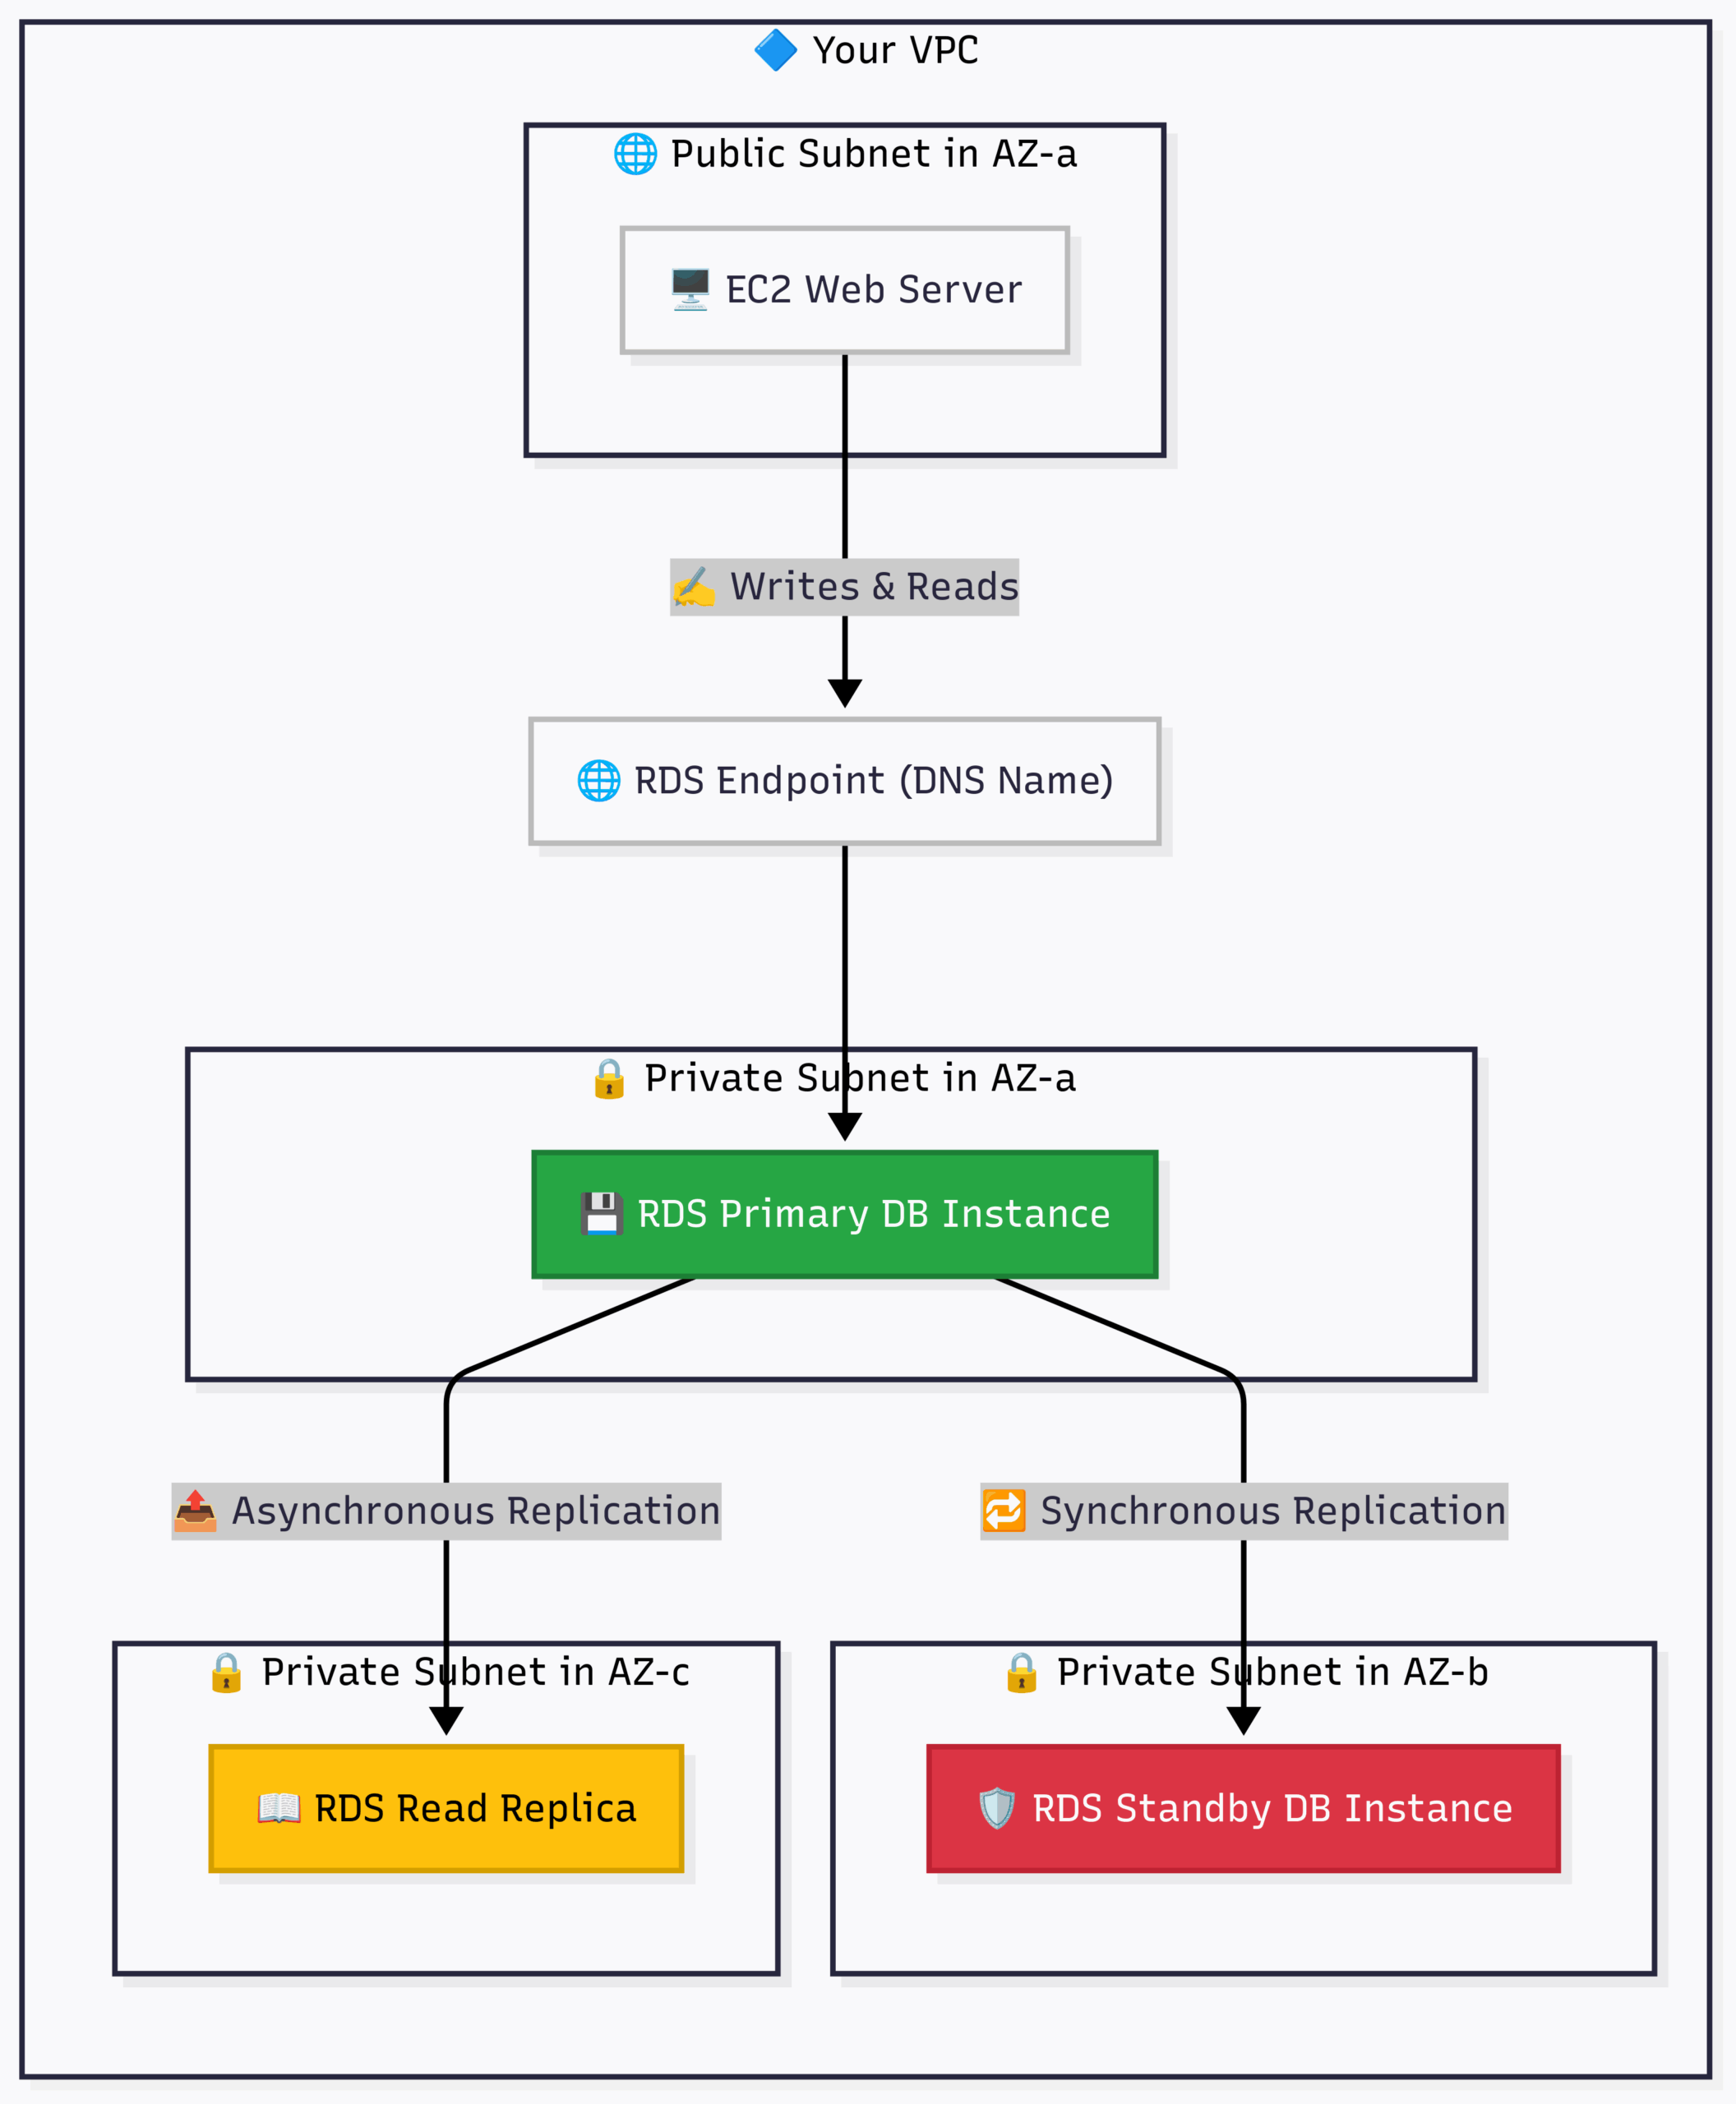
Flow:
- Your Web Server doesn’t connect to an IP address. It connects to an RDS Endpoint, which is a DNS name that always points to the active, primary database.
- All write operations go to the RDS Primary instance in AZ-a.
- RDS automatically and synchronously replicates that data to the RDS Standby in AZ-b. If the primary instance fails, RDS automatically promotes the standby to be the new primary and updates the DNS endpoint. This is Multi-AZ for High Availability.
- Data is also asynchronously replicated to one or more Read Replicas. Your application can direct read-heavy traffic (like
SELECTqueries) to these replicas to reduce the load on the primary database. This is for Scalability.
7.3 Amazon Aurora: The Cloud-Native Supercharged Database
While RDS is a fantastic service for running standard open-source and commercial databases, AWS saw an opportunity to build something even better, designed from the ground up for the cloud. The result is Amazon Aurora.
Aurora is not a new database engine itself; rather, it’s a wire-compatible drop-in replacement for MySQL and PostgreSQL. This means your application, which was written to talk to MySQL, can connect to an Aurora-MySQL cluster and work perfectly without any code changes. But under the hood, it’s a completely different beast.
Analogy: Upgrading from a Car Engine to a Jet Engine. Running standard MySQL on RDS is like having a finely tuned, reliable V8 car engine. It’s powerful and does the job well.
Amazon Aurora is like replacing that car engine with a state-of-the-art jet engine, while keeping the same steering wheel and pedals.
- Massive Performance Boost: It’s up to 5x faster than standard MySQL and 3x faster than standard PostgreSQL running on similar hardware.
- Self-Healing, Hyper-Durable Storage: This is Aurora’s secret sauce. The storage layer is separate from the compute layer. Your data is replicated six times across three Availability Zones. It can withstand the failure of an entire AZ plus another node without any data loss and with zero interruption to write operations. This is far more resilient than standard RDS Multi-AZ, which only has two copies.
- Incredible Read Scalability: You can have up to 15 low-latency read replicas (compared to 5 for standard RDS), and they all read from the same shared storage volume, which minimizes replication lag.
- Fast Failover: Automatic failover to a replica typically completes in under 30 seconds.
When to Choose Aurora: If you are starting a new project and require a relational database, you should almost always choose Aurora over standard RDS MySQL/PostgreSQL. The only reasons not to are if you have a specific feature requirement that only the standard engines provide or if you’re on a very tight budget where a tiny t3.micro RDS instance is sufficient. For any production application, Aurora’s resilience and performance are worth the slightly higher cost.
The Aurora Cluster:
Notice the key difference from the standard RDS diagram: the storage is a single, shared volume, not separate replicated disks.
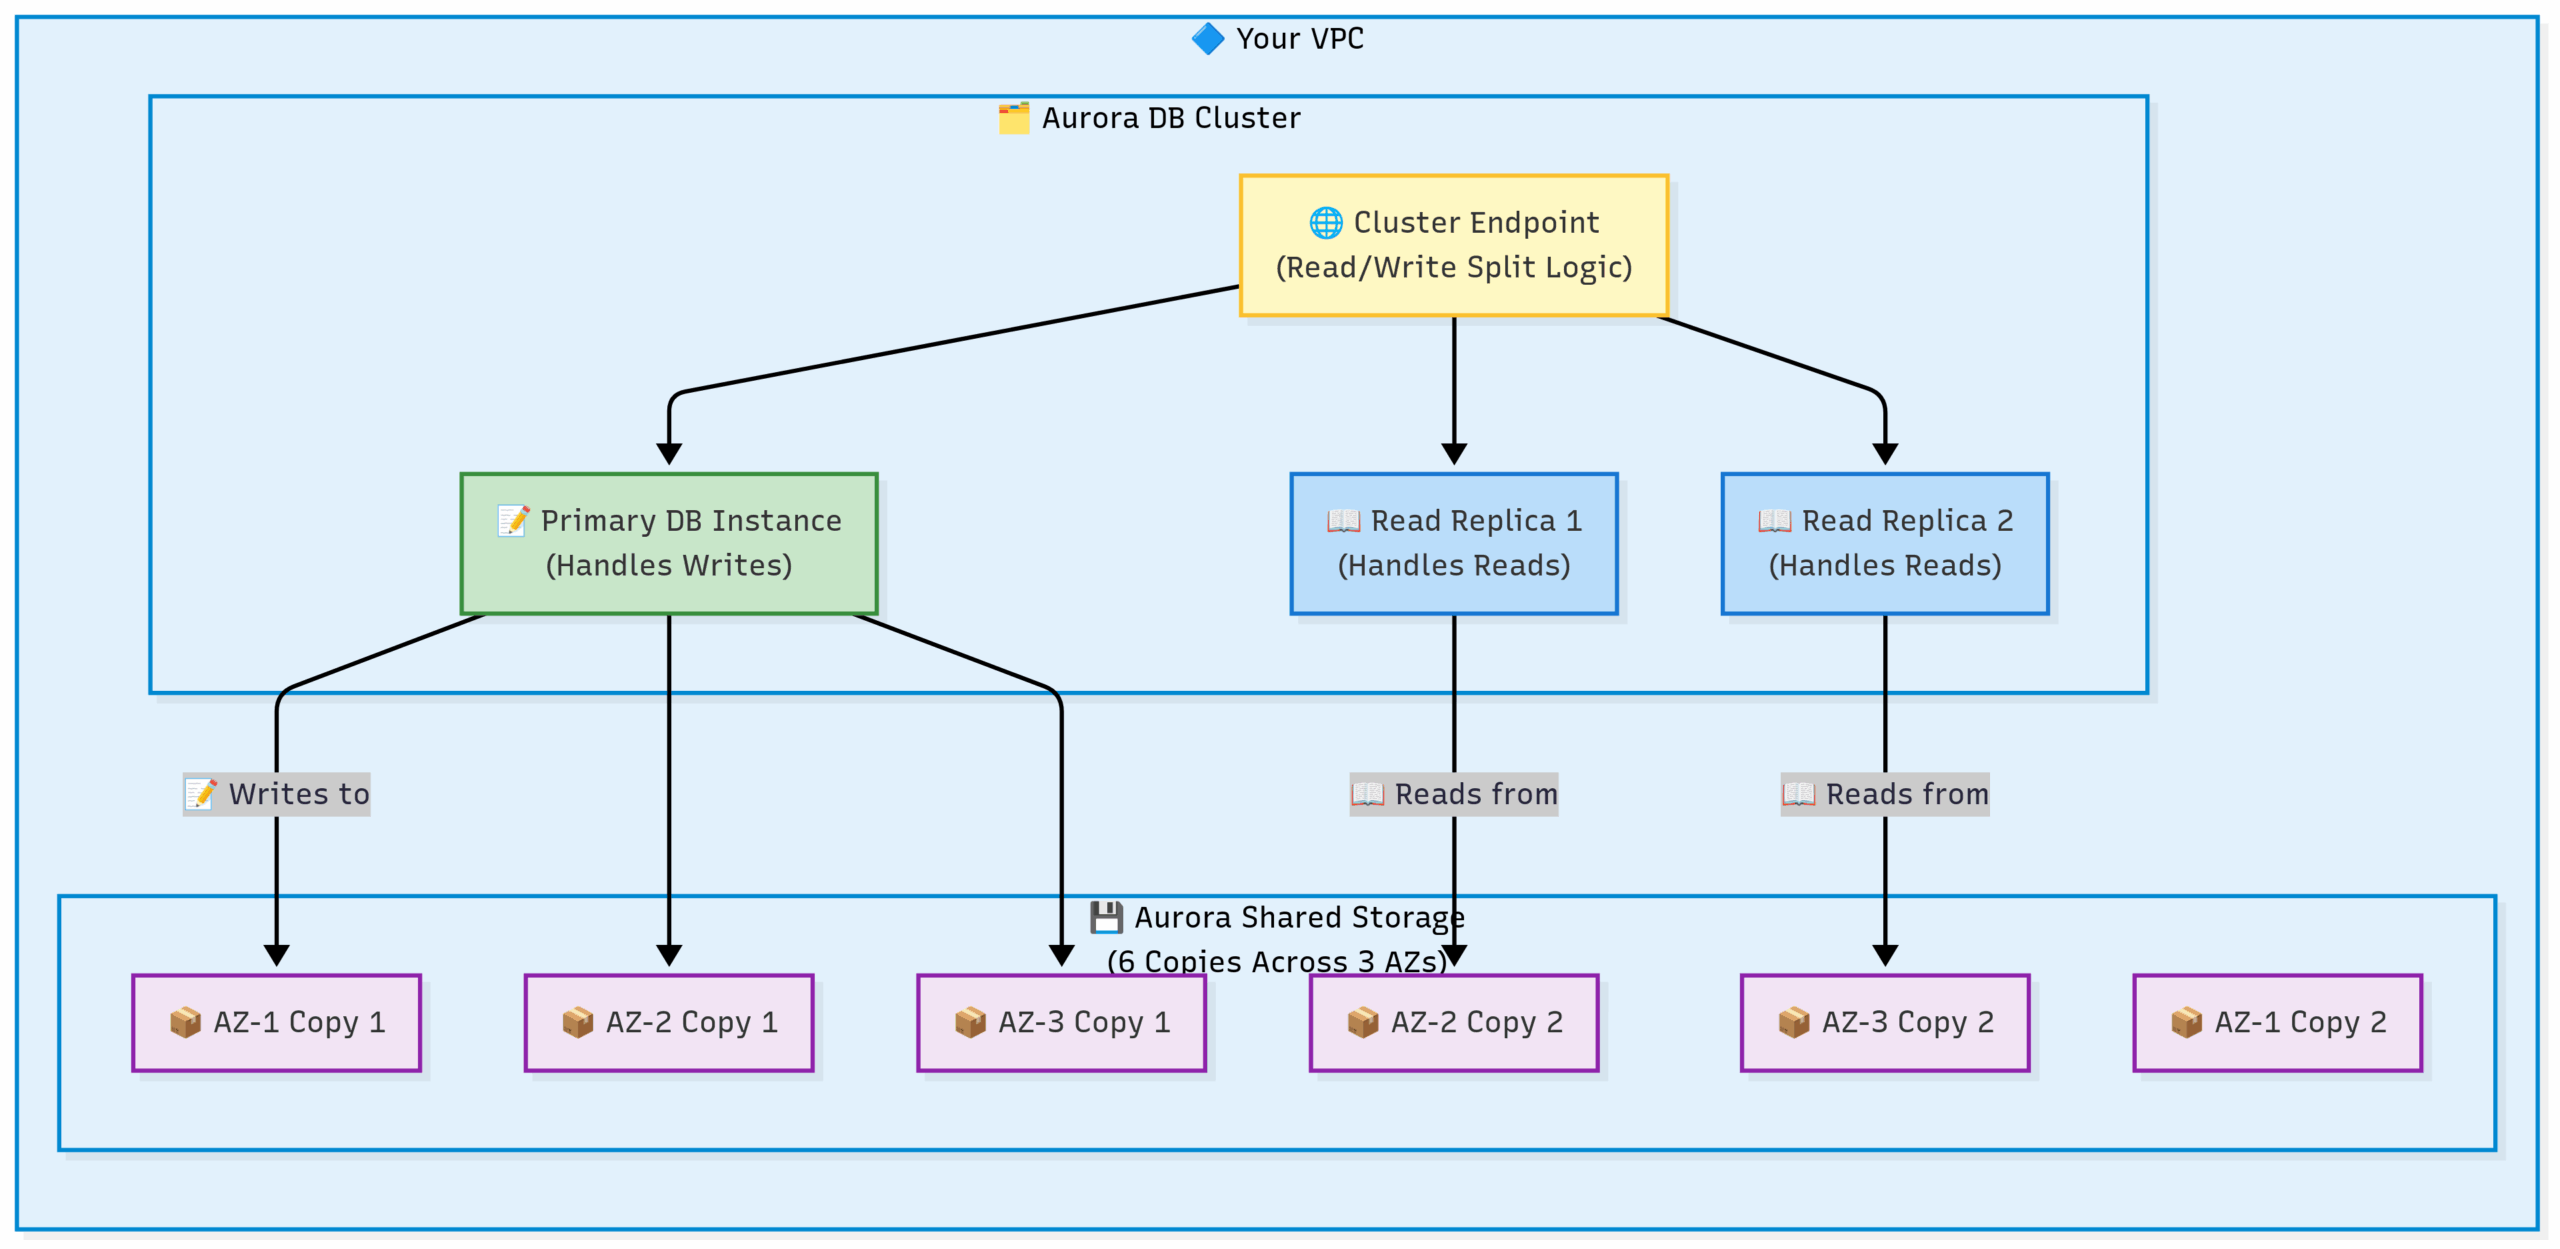
Flow: All instances in the cluster (the primary and the replicas) read and write to the same underlying intelligent storage volume. This makes replication nearly instantaneous and failover incredibly fast.
7.4 Global Databases: Surviving a Regional Disaster
Multi-AZ and Aurora provide incredible protection against the failure of a data center or even an entire Availability Zone. But what happens if an entire AWS Region (e.g., all of us-east-1) has a catastrophic, widespread outage? Or what if you have a global user base in both the US and Europe and need fast read performance for everyone?
This is where Cross-Region Replication comes in.
1. RDS Cross-Region Read Replicas You can create a Read Replica of your primary RDS or Aurora database in a completely different AWS Region.
- Use Case: Disaster Recovery (DR).
- How it Works: Your primary database in
us-east-1(N. Virginia) asynchronously replicates its data over the secure AWS backbone to a read-only replica ineu-west-1(Ireland). - In a Disaster: If the N. Virginia region goes offline, you can perform a manual process to promote the Read Replica in Ireland to become a new, standalone primary database. You would then need to update your application’s connection strings to point to the new endpoint in Ireland. There will be some data loss, equal to the replication lag at the time of the disaster (usually seconds to a few minutes).
2. Amazon Aurora Global Database Aurora takes this concept to the next level with a purpose-built solution for global applications.
- Use Cases: Disaster Recovery AND Low-Latency Global Reads.
- How it Works: An Aurora Global Database consists of one primary AWS Region (which handles all writes) and up to five secondary, read-only AWS Regions. The replication from the primary to the secondary regions is done at the storage layer using dedicated infrastructure, resulting in a typical lag of less than one second.
- Low-Latency Reads: Your users in Europe can be directed to read from the secondary cluster in Ireland, while your US users read from the primary in N. Virginia. This gives everyone a fast experience.
- Disaster Recovery: Failover to a secondary region is much faster and more efficient than with standard RDS. It can be done in less than a minute, with minimal data loss (due to the <1 second lag). This provides a much lower Recovery Point Objective (RPO) and Recovery Time Objective (RTO).
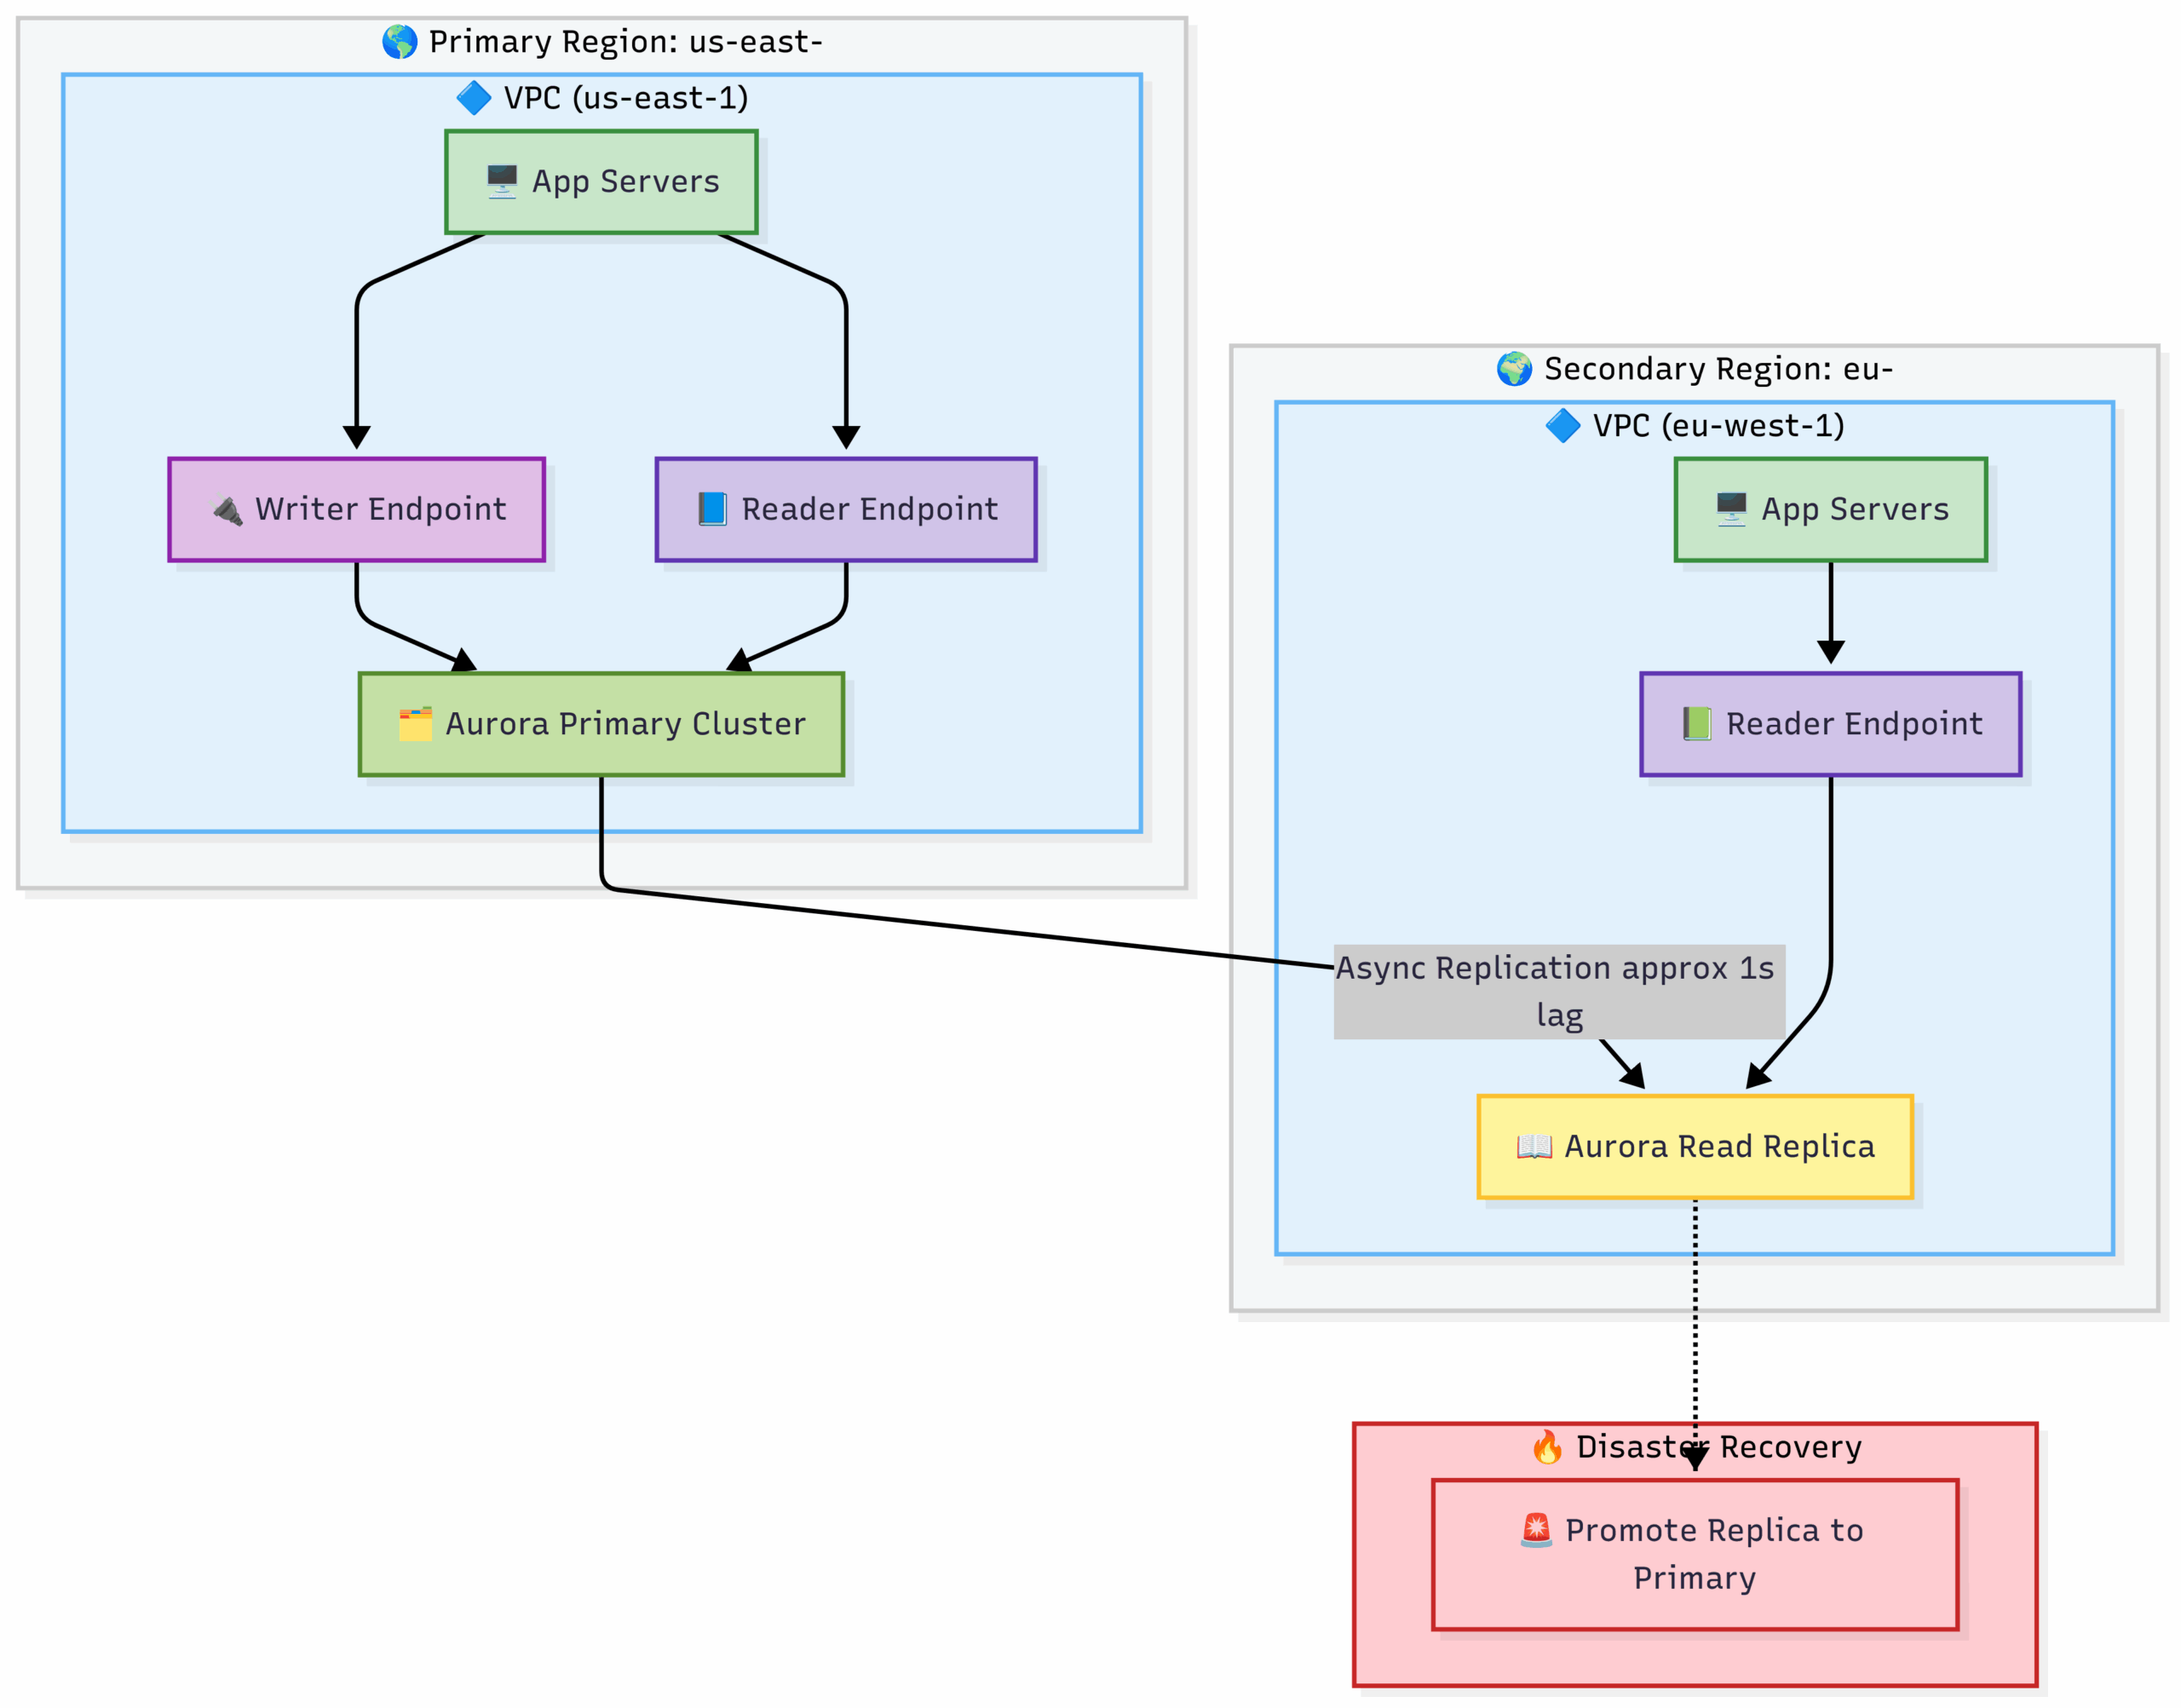
Aurora Global Database for DR and Global Reads
High-Level Overview
This architecture is designed for two primary goals:
- High-Performance Global Reads: Allowing users close to each region to read data with very low latency.
- Disaster Recovery (DR): Ensuring the application can survive a complete failure of the primary AWS region.
The system operates in two main modes: Normal Operation and Disaster Recovery.
Part A: Normal Operation Flow
This is the state of the system during day-to-day activities.
- Write Operations (Data Creation/Modification):
- A request that needs to change data (e.g., a new user signing up, an item being added to a cart) is directed to the
App Serversin thePrimary Region: us-east-1. - The application code is configured to send all write queries (
INSERT,UPDATE,DELETE) to theWriter Endpoint. - The
Writer Endpointis a specific DNS name that always points to the single, active primary instance within theAurora Primary Cluster. This is how Aurora ensures all writes go to the correct place. - The data is written to the primary cluster’s storage volume.
- A request that needs to change data (e.g., a new user signing up, an item being added to a cart) is directed to the
- Read Operations (Data Retrieval in the Primary Region):
- A request from a US-based user to view data is handled by the
App Serversinus-east-1. - The application code is configured to send all read queries (
SELECT) to theReader Endpoint. - The
Reader Endpointacts as a load balancer, distributing the read traffic across all available instances in theAurora Primary Cluster(this includes the primary instance and any replicas within that cluster). This prevents read queries from overwhelming the primary write instance.
- A request from a US-based user to view data is handled by the
- Cross-Region Replication:
- As soon as data is successfully written to the
Aurora Primary Cluster, theAsync Replicationprocess begins. - Aurora uses a highly efficient, physical replication mechanism at the storage layer to copy the changes from the primary cluster in
us-east-1to theAurora Read Replicain theSecondary Region: eu-west-1. - As your diagram correctly notes, this process is incredibly fast, with a typical lag of approximately 1 second.
- As soon as data is successfully written to the
- Read Operations (Data Retrieval in the Secondary Region):
- A request from a European user to view data is directed to the
App Serversineu-west-1. - These
App Serversare configured to send their read queries to their localReader Endpoint. - This
Reader Endpointdirects the read queries to the localAurora Read Replica. - Because the replica is in the same region as the app servers, the query is extremely fast, giving the European user a low-latency, high-performance experience. They are reading data that is only about 1 second old from the primary.
- A request from a European user to view data is directed to the
Part B: Disaster Recovery Flow
This flow is initiated when the entire Primary Region: us-east-1 becomes unavailable.
- Detection: Automated monitoring (e.g., Amazon CloudWatch alarms) detects that the
App Serversand database endpoints inus-east-1are unreachable. - Initiate Disaster Recovery: An administrator or an automated runbook triggers the
Disaster Recoveryprocess. - Promote the Replica: The core action is to
Promote Replica to Primary. This is a command sent to theAurora Read Replicain theeu-west-1region. This single action achieves the following:- It severs the replication link from the old (now failed) primary cluster.
- It converts the read-only replica into a fully independent, read/write primary cluster. This process is very fast, typically completing in under a minute.
- Application Reconfiguration:
- The
App Serversineu-west-1must be reconfigured. They now need to send both their read and write traffic to the newly promoted Aurora cluster in their own region. A newWriter Endpointbecomes available in the promoted cluster for this purpose.
- The
- Redirect Users:
- Global DNS (e.g., Amazon Route 53) is updated to route all user traffic, including traffic from US users, to the
App Serversin theeu-west-1region.
- Global DNS (e.g., Amazon Route 53) is updated to route all user traffic, including traffic from US users, to the
- Service Restored:
- The application is now fully operational and serving all users from the
eu-west-1region. - Data Loss (RPO): The amount of data lost is limited to the replication lag at the moment of the disaster (the ~1 second shown in your diagram).
- Downtime (RTO): The total downtime is the time it took to detect the failure, promote the replica (~1 minute), and update DNS to redirect users.
- The application is now fully operational and serving all users from the
This architecture, as you’ve diagrammed it, provides an elegant solution for both enhancing global user performance and ensuring business continuity in the face of a regional disaster.
7.5 Amazon DynamoDB: The Infinite Key-Value Store
While RDS is perfect for structured, relational data, many modern applications require a different model. Amazon DynamoDB is a fast, flexible, and fully managed NoSQL database service.
Analogy: A Magical Coat Check Room. Imagine a coat check room at a giant event.
- You hand over your coat (the Value). Your coat can be anything—a jacket, a bag, a hat. It doesn’t have a rigid structure.
- You get a unique ticket number (the Key). This ticket is the only way to get your specific coat back.
- It’s infinitely fast. No matter if there are 10 coats or 10 million coats in the room, it takes the same tiny fraction of a second for the attendant to retrieve your coat once you provide your ticket number.
- It’s infinitely large and never closes. The room automatically expands as more coats are checked in, and it’s always open.
- You can’t ask complex questions. You can’t ask the attendant, “Find all coats that are black and made of leather.” You can only ask, “Give me the coat for ticket #12345.”
This is DynamoDB. It’s a key-value database. You store an item (a JSON document, the “value”) and retrieve it using its unique primary key. It offers single-digit millisecond performance at any scale. It is perfect for applications like user profiles, session data, shopping carts, and gaming leaderboards where you need very fast lookups based on a known key.
Mermaid Architecture: DynamoDB in a Serverless Application
DynamoDB is a “serverless” database. It doesn’t live inside your VPC by default. You access it over the AWS API, making it a perfect fit for serverless applications.
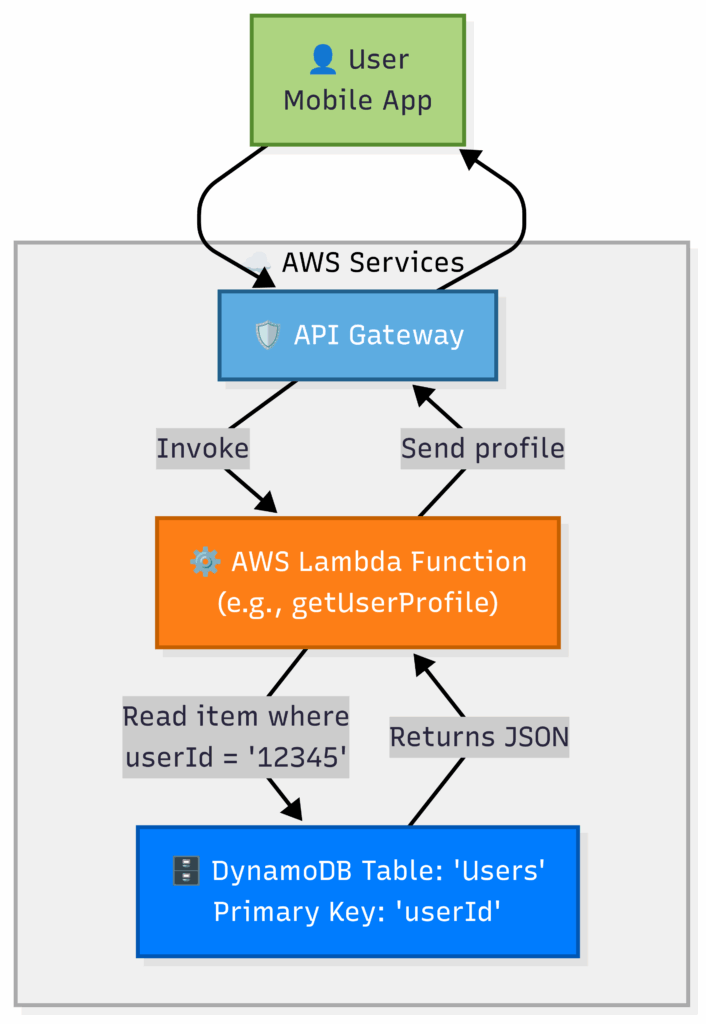
Flow:
- A user’s app makes an API call to API Gateway.
- API Gateway triggers a Lambda function.
- The Lambda function’s code queries the DynamoDB table using the
userIdas the primary key. - DynamoDB instantly returns the user’s data. There are no servers to manage, no VPCs to configure for the database. It just works.
DynamoDB Global Tables
Like Aurora, DynamoDB also has a seamless, fully managed solution for creating a global database. A DynamoDB Global Table is composed of multiple replica tables in different AWS Regions.
- Multi-Region, Multi-Master: This is the killer feature. Unlike Aurora Global Database, where only one region can handle writes, every replica in a DynamoDB Global Table is active and can handle both read and write traffic.
- How it Works: When your application writes a new item to the table in the Ireland region, DynamoDB automatically replicates that write to the tables in the N. Virginia and Tokyo regions, typically within a second or two. This is called multi-master replication.
- Use Case: Perfect for massively scaled global applications where users in any region need to have both fast reads and fast writes.
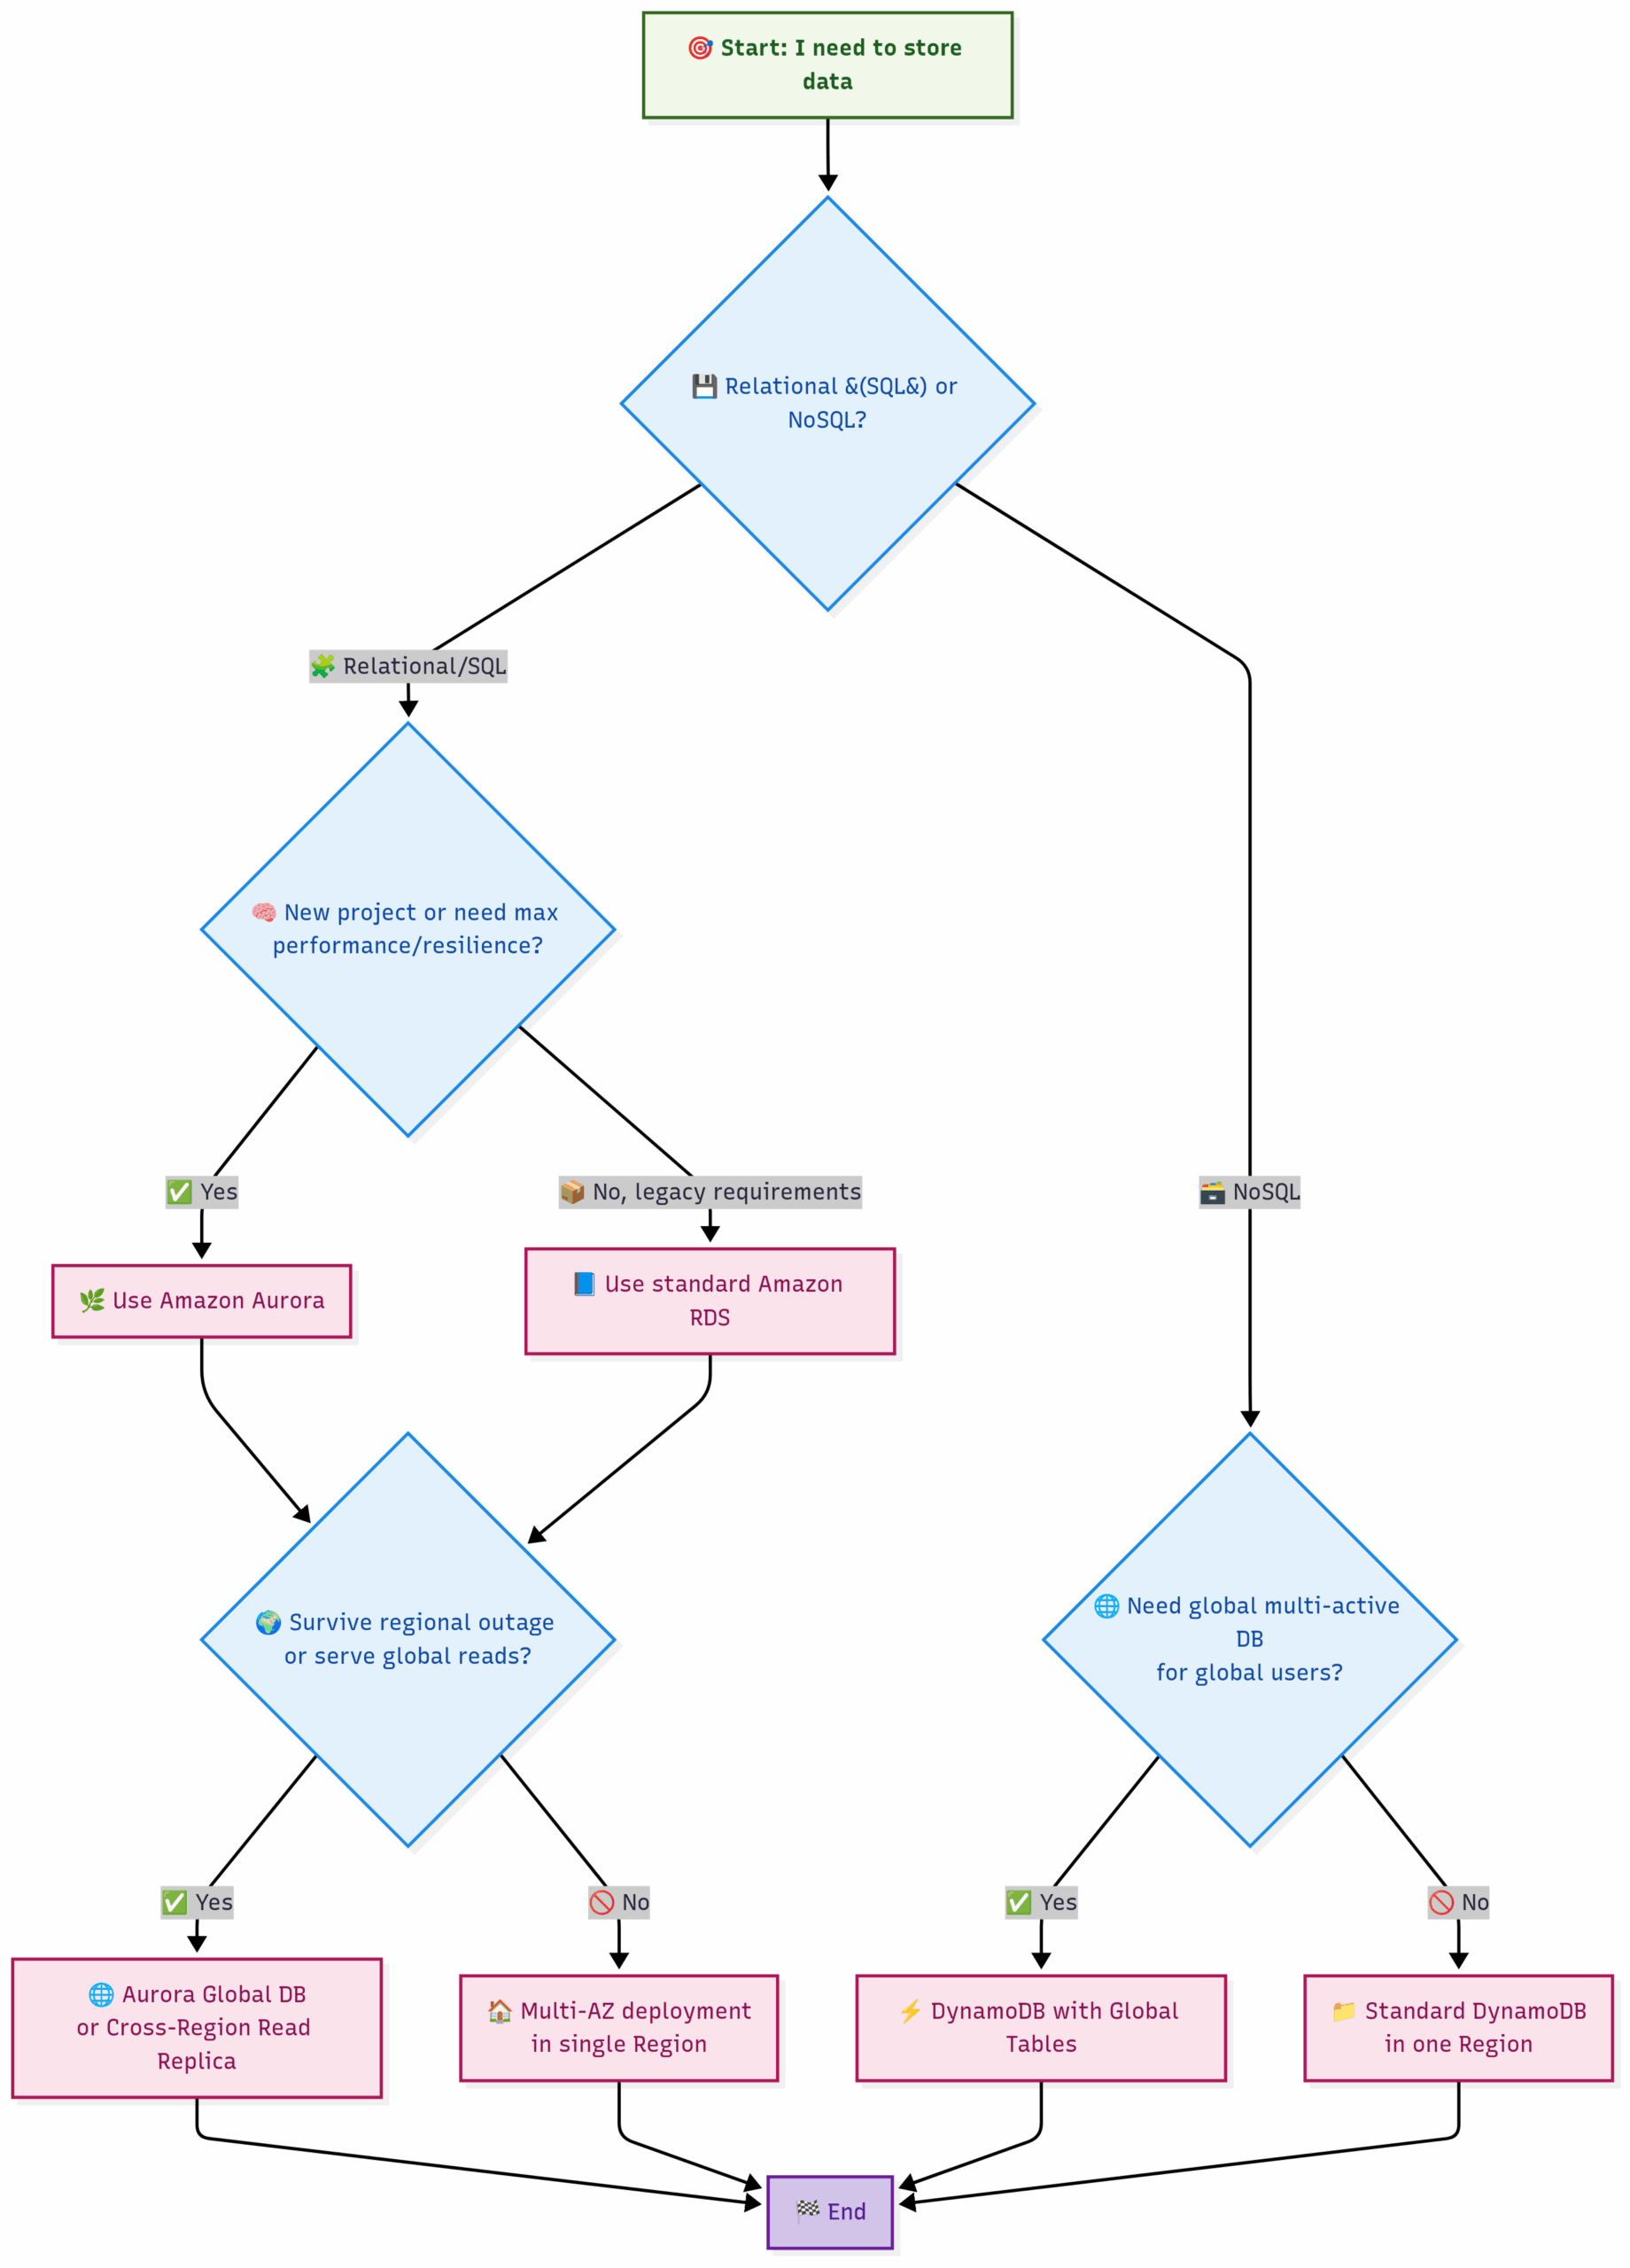
Choosing the Right Database Service:
This expanded flowchart now includes Aurora and global considerations.
7.7 Practical AWS CLI Commands (Revised)
Amazon Aurora Serverless v2 CLI Example
Aurora Serverless is a fantastic option that automatically scales the compute capacity based on your application’s load, which can be very cost-effective for variable workloads.
# Aurora is a "cluster" with one or more instances. First, we create the cluster.
# We are creating a PostgreSQL-compatible Aurora Serverless v2 cluster.
echo "Creating Aurora Serverless v2 cluster..."
aws rds create-db-cluster \
    --db-cluster-identifier my-aurora-cluster \
    --engine aurora-postgresql \
    --engine-version 13.7 \
    --master-username myadmin \
    --master-user-password "aVerySecurePassword123" \
    --db-subnet-group-name my-rds-subnet-group \
    --vpc-security-group-ids "sg-012345abcdef" \
    --serverless-v2-scaling-configuration "MinCapacity=0.5,MaxCapacity=4"

# Second, we create an instance INSIDE that cluster.
echo "Creating DB instance within the cluster..."
aws rds create-db-instance \
    --db-instance-identifier my-aurora-instance-1 \
    --db-instance-class db.serverless \
    --engine aurora-postgresql \
    --db-cluster-identifier my-aurora-cluster

# Check the cluster status
echo "Waiting for cluster to become available..."
aws rds wait db-cluster-available --db-cluster-identifier my-aurora-cluster
echo "Aurora cluster is now available!"8.1 The Problem: The Unpredictable Crowd and Single Points of Failure
Imagine you’ve launched a new e-commerce website on a single, powerful EC2 instance. You face two critical business risks:
- Scenario 1: The Crash. The application on your EC2 instance has a software bug and crashes. Your website is now offline, displaying an error message. Every second of downtime means lost revenue and damage to your brand’s reputation until you can manually log in and restart the server. This is a single point of failure.
- Scenario 2: The Viral Success. Your marketing campaign is a huge hit and your site is featured on a popular blog! Suddenly, thousands of users rush to your site. Your single EC2 instance is completely overwhelmed. Its CPU hits 100%, pages take forever to load, and the site becomes slow and unusable for everyone. You are losing customers not because of failure, but because you cannot handle the scale of your own success.
To build a professional-grade application, we must solve both problems. We need a system that is resilient to failure and can elastically scale to meet demand. This is achieved with two families of services working together: Elastic Load Balancing (ELB) and Auto Scaling.
8.2 The ELB Family: Choosing the Right Traffic Cop
The first step is to eliminate the single point of failure by running multiple EC2 instances. But how do you distribute traffic between them and handle failures? This is the job of Elastic Load Balancing (ELB). An ELB acts as the single front door for your application, intelligently distributing incoming traffic across your fleet of healthy instances.
However, not all traffic is the same. AWS provides a family of load balancers, each optimized for a specific job. Choosing the right one is critical.
1. Application Load Balancer (ALB) – The Smart Traffic Cop (Layer 7)
The ALB is the most common and flexible load balancer, designed for HTTP and HTTPS traffic. It operates at the Application Layer (Layer 7) of the OSI model, which means it can inspect the content of the request itself, like the URL path, hostname, or HTTP headers.
- Analogy: The ALB is a smart traffic cop at a complex intersection. It doesn’t just look at the type of car (the protocol); it reads the destination address written on the delivery package inside the car (the URL). It can say, “All cars going to
/apiturn left, and all cars going to/imagesturn right.” - When to Use It:
- HTTP/HTTPS Web Applications: This is the default choice for any standard website or web service.
- Microservices Architectures: A single ALB can intelligently route traffic to dozens of different backend services (e.g.,
api.example.com/users-> user-service,api.example.com/orders-> order-service). - Container-based Applications: It integrates seamlessly with Amazon ECS and EKS.
- Key Features:
- Content-Based Routing: Routes traffic based on hostname (e.g.,
blog.example.comvs.shop.example.com) or URL path (/loginvs./cart). - Redirects & Fixed Responses: Can be configured to issue redirects (e.g., HTTP to HTTPS) or return fixed responses directly, without needing a backend server.
- Native HTTP/2 and WebSocket support.
- Deep integration with AWS WAF (Web Application Firewall).
- Content-Based Routing: Routes traffic based on hostname (e.g.,
2. Network Load Balancer (NLB) – The High-Speed Mail Sorter (Layer 4)
The NLB is built for one thing: extreme performance and ultra-low latency. It operates at the Transport Layer (Layer 4), meaning it only looks at the protocol (TCP/UDP) and port numbers. It forwards traffic with minimal processing.
- Analogy: The NLB is a massive, automated mail sorting facility. It doesn’t read the letter inside; it just looks at the ZIP code (the port number) and instantly routes the package to the correct destination bin. It’s incredibly fast and can handle millions of packages per second.
- When to Use It:
- Extreme Performance Needs: When you need to handle millions of requests per second with the lowest possible latency.
- Non-HTTP Traffic: For load balancing TCP or UDP traffic, such as real-time gaming servers, IoT device communication, or financial trading applications.
- When a Static IP is Required: The NLB can be assigned a static Elastic IP address for each AZ it operates in. This is useful when a client or firewall needs to whitelist a specific, stable IP address.
- Key Features:
- Ultra-Low Latency.
- Handles Volatile Traffic Patterns and scales to millions of requests/sec.
- Static IP Support per Availability Zone.
- Preserves the Source IP Address of the client, which is automatically passed through to your backend instances.
3. Gateway Load Balancer (GWLB) – The Security Checkpoint (Layer 3/4)
The GWLB is a highly specialized service designed to help you deploy, scale, and manage third-party virtual network appliances, like firewalls, Intrusion Detection/Prevention Systems (IDS/IPS), and deep packet inspection systems.
- Analogy: The GWLB is a mandatory security checkpoint on a highway. It doesn’t decide the final destination. Its only job is to force every car to detour through a central inspection station (your firewall appliances) before allowing it to continue on its journey. It makes it easy to insert a “bump-in-the-wire” for all traffic.
- When to Use It: When you need to deploy virtual appliances from AWS Marketplace partners (e.g., Palo Alto, Fortinet, Cisco) in a highly available and scalable way. It allows you to create a central “security VPC” that inspects traffic for many other VPCs.
- Key Features:
- Transparent Traffic Insertion: Inserts security appliances without the client or server needing to be aware of it.
- Centralized Security: Simplifies deploying and managing security appliances for your entire AWS environment.
- Operates at Layer 3 (IP Packet).
Mention: Classic Load Balancer (CLB) This was the original, previous generation of load balancer. While you may still see it in older AWS accounts, it is considered legacy. You should not use the Classic Load Balancer for any new applications. The ALB and NLB have superseded it with far greater functionality and performance.
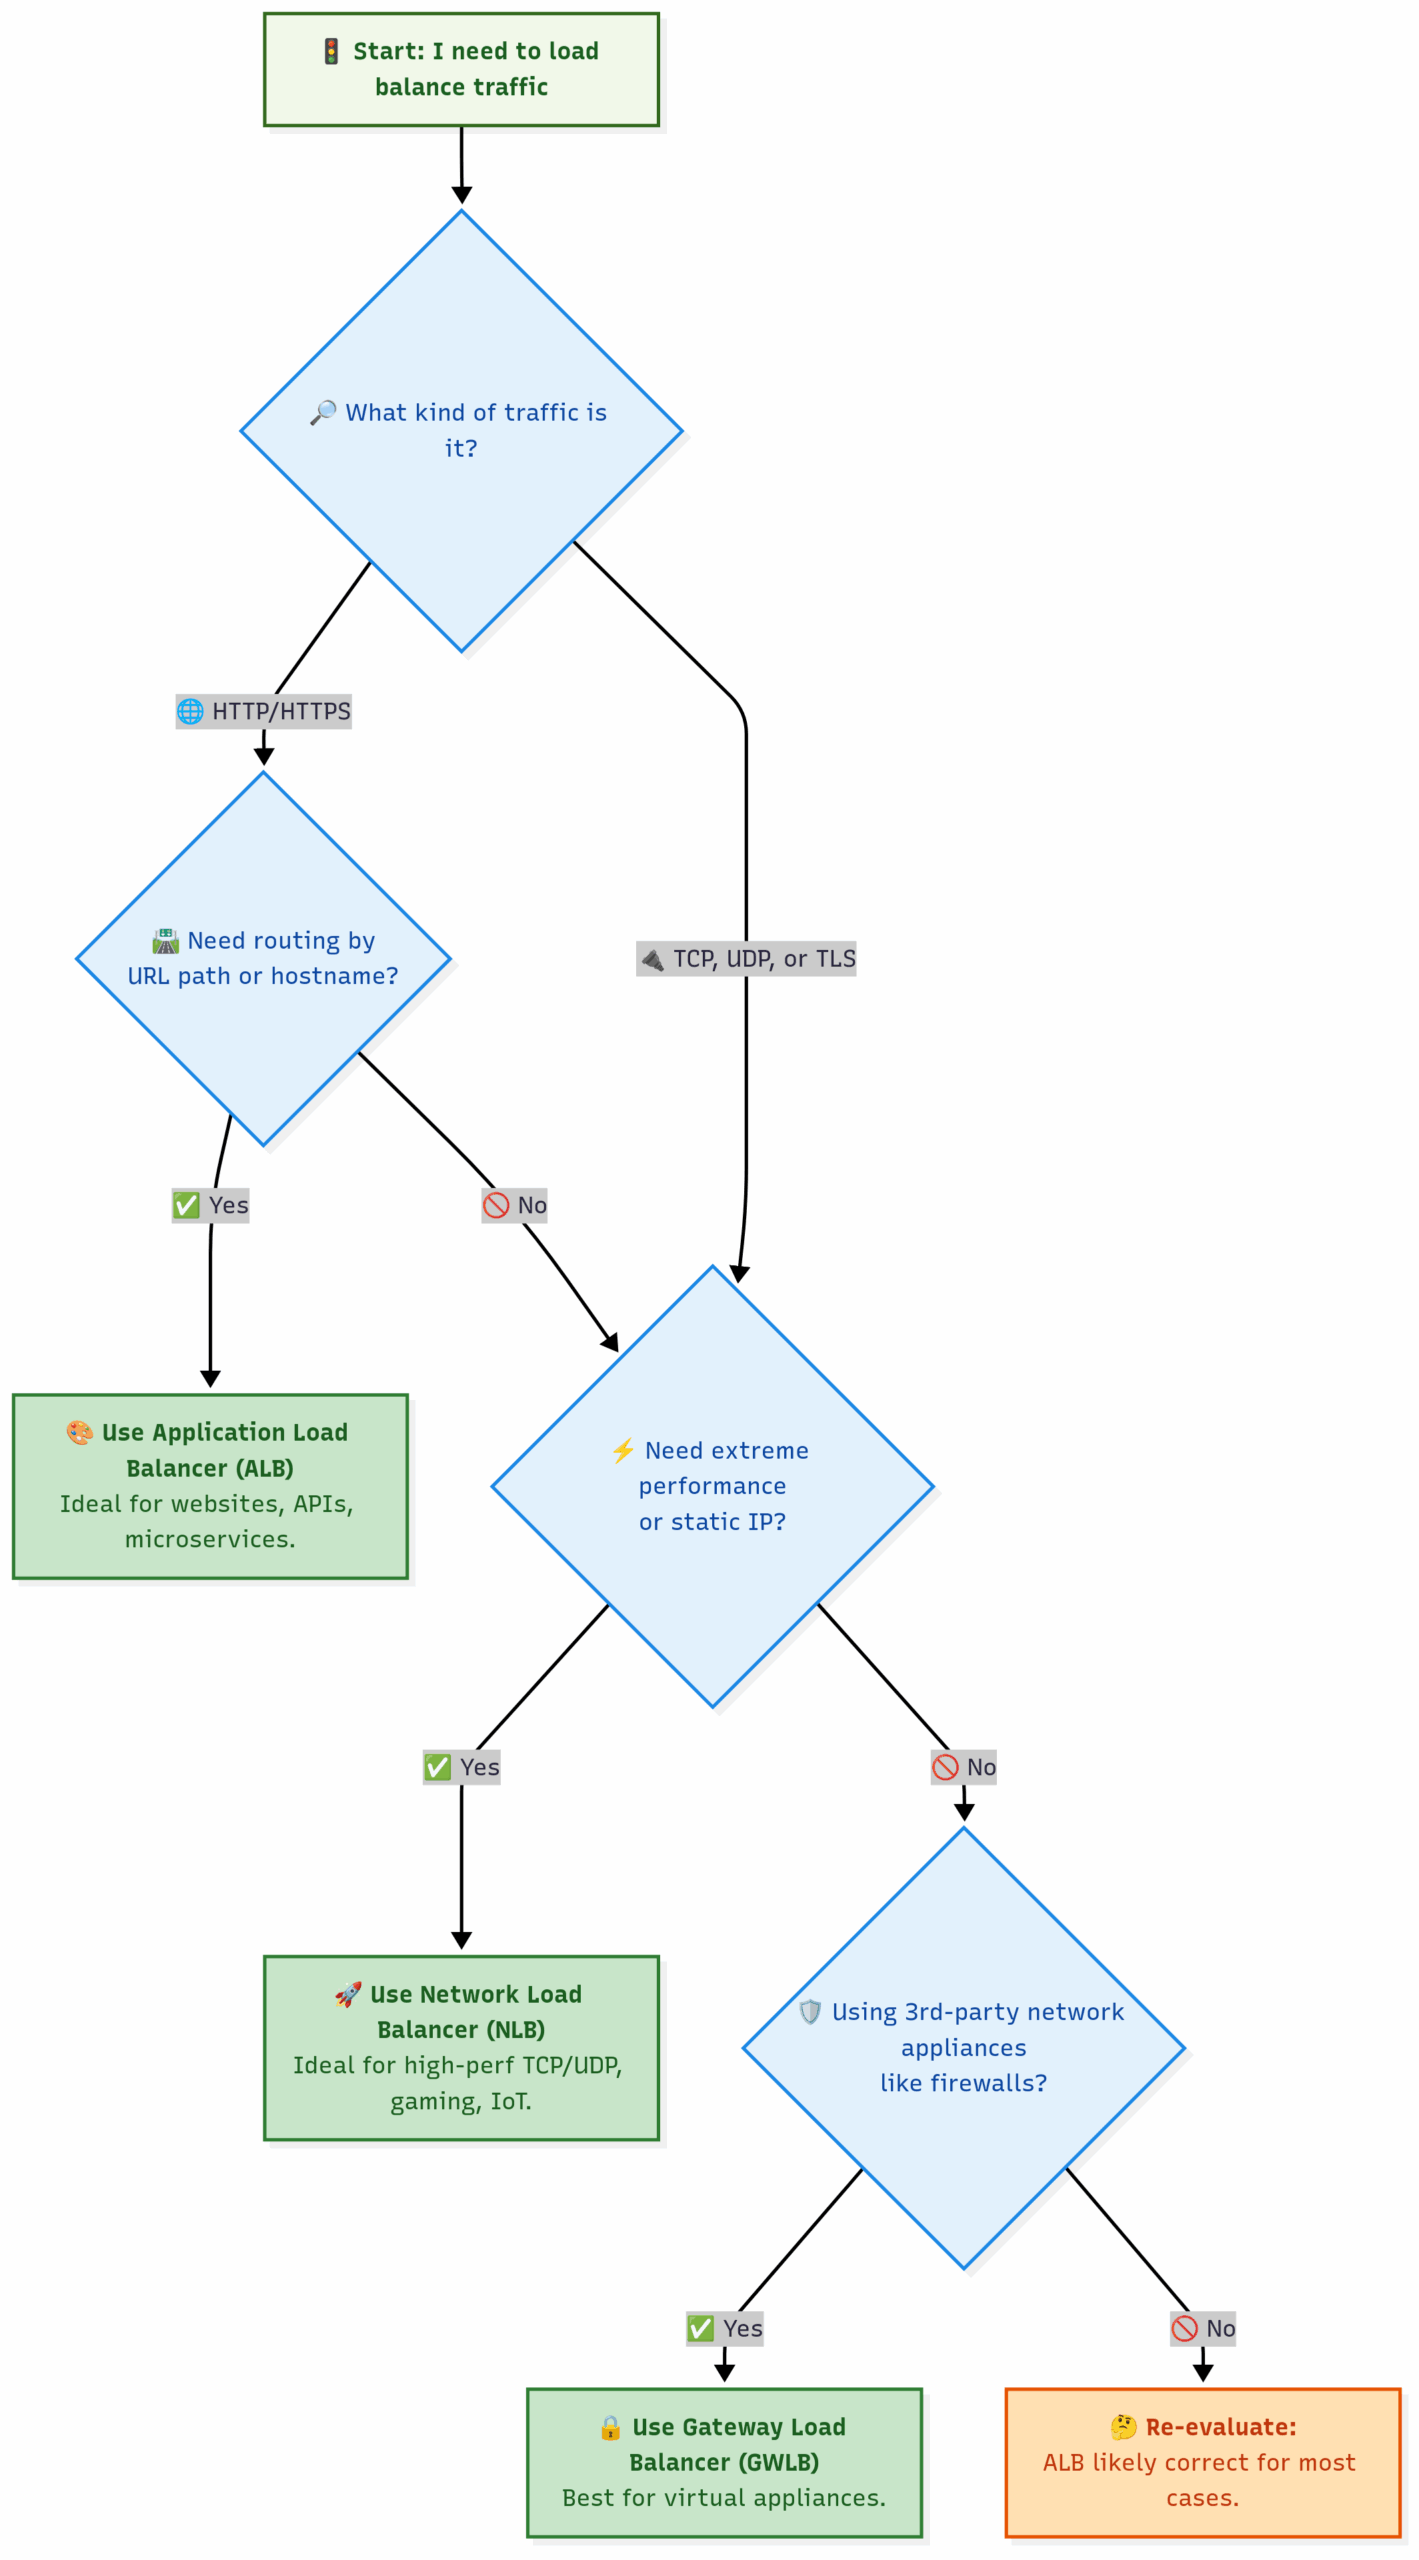
Choosing the Right Load Balancer:
8.3 Auto Scaling Group (ASG): The On-Demand Workforce
A load balancer is fantastic at distributing traffic across a fixed fleet of servers. But what if all your checkout lanes are full and the lines are still growing? You need a way to magically open new lanes on demand and close them when the rush is over. This is precisely what an Auto Scaling Group (ASG) does.
An ASG manages a collection of EC2 instances, treating them as a logical grouping for the purposes of automatic scaling and self-healing.
Analogy: The Supermarket’s On-Call Staff. The supermarket’s general manager (your ASG) has a set of rules and a list of on-call staff to manage the checkout lanes:
- Self-Healing (Desired Capacity): The manager’s primary rule: “I always want to have 2 checkout lanes open during normal hours.” If a cashier suddenly gets sick and goes home (an instance fails a health check), the manager immediately terminates the “sick” instance and calls in a replacement from the on-call list to launch a new one, always maintaining the desired number of 2.
- Cost Control (Minimum/Maximum Size): The manager has budget rules: “No matter how quiet it gets, I will always keep at least 1 lane open. And no matter how busy, I will never open more than 10 lanes.”
- Elasticity (Scaling Policies): The manager has rules for handling rushes: “If the average line length at all open lanes grows to more than 5 people (High CPU), open a new checkout lane. If the average line length drops to just 1 person (Low CPU), send one of the extra cashiers home to save money.”
8.4 The Brains of the Operation: Understanding Scaling Policies
An Auto Scaling Group without a scaling policy is like having a team of on-call cashiers but no manager to tell them when to come to work. The ASG will maintain the Desired Capacity and replace unhealthy instances, but it won’t react to changes in load. Scaling Policies are the rules that tell the ASG when to launch or terminate instances.
There are three main types of dynamic scaling policies.
1. Target Tracking Scaling: The “Set it and Forget it” Thermostat
This is the simplest, most popular, and often most effective type of scaling policy. You pick a performance metric and set a target value for it. The ASG then creates the necessary alarms and logic to keep the metric at, or close to, that target value.
- Analogy: It’s like a thermostat in your house. You set the target temperature to 70°F (21°C). You don’t tell it how to cool or heat; you just give it the target, and it figures out the rest.
- Most Common Metric:
ASGAverageCPUUtilization. If you set a target of50%, the ASG will automatically add or remove instances to keep the average CPU load across the fleet at that level.
2. Step Scaling: The “If-This-Then-That” Rule Book
Step Scaling provides more granular and aggressive control. You define a set of steps that change the ASG’s capacity based on the size of an alarm breach.
- Analogy: This is a more hands-on manager with a specific rule book for emergencies: “If CPU > 75%, add 3 new servers. If CPU > 90%, add 5 servers immediately.”
- When to use it: When you anticipate sudden, massive traffic spikes where a gradual response might be too slow.
3. Scheduled Scaling: The Predictable Rush Hour
This type of scaling is based on time, not on real-time metrics. If you know your traffic patterns are predictable, you can schedule changes to your ASG’s capacity in advance.
- Analogy: A restaurant manager who knows they get a huge lunch rush every weekday from 12 PM to 2 PM. They schedule extra staff to come in at 11:45 AM every day to prepare.
- When to use it: For applications with a very predictable daily or weekly cycle, like a business reporting tool. This allows you to “pre-warm” your fleet before the rush begins.
8.5 The Complete Architecture: Bringing It All Together
This diagram shows the gold-standard architecture for a resilient web application, combining all the concepts we’ve discussed.
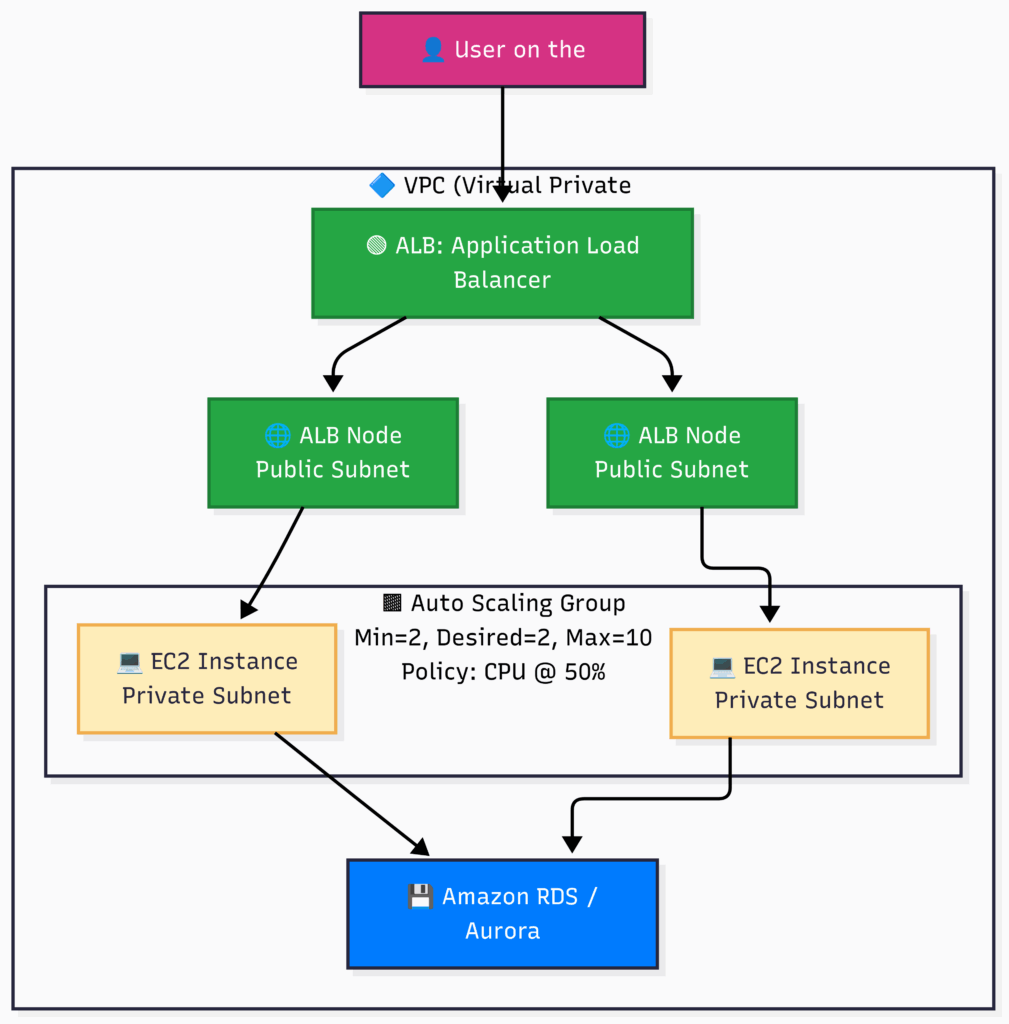
Flow:
- A user’s request hits the single DNS name of the Application Load Balancer.
- The ELB itself is highly available, with nodes automatically managed by AWS in multiple AZs.
- The ELB forwards the request to one of the healthy EC2 instances running in a Private Subnet for security.
- The Auto Scaling Group constantly monitors the average CPU of all instances. Based on its Scaling Policy, it will launch new instances (scaling out) or terminate existing ones (scaling in).
- If an instance fails its health check, the ELB stops sending it traffic, and the ASG terminates it and launches a healthy replacement, creating a self-healing system.
8.6 Practical AWS CLI Commands
Setting this up requires a Launch Template, an Auto Scaling Group, and a Scaling Policy.
# PREREQUISITES:
# - An existing Application Load Balancer's Target Group ARN: TG_ARN="..."
# - IDs for at least two private subnets in different AZs: SUBNET_IDS="subnet-abc,subnet-xyz"
# - An AMI ID for our web server: AMI_ID="..."
# - The Security Group ID for our instances: SG_ID="..."
# - The name of an EC2 Key Pair: KEY_NAME="..."

# 1. Create a Launch Template
# This is a reusable blueprint for our EC2 instances.
echo "Creating Launch Template..."
aws ec2 create-launch-template \
    --launch-template-name my-web-app-template \
    --version-description "Version 1" \
    --launch-template-data "{
        \"ImageId\": \"$AMI_ID\",
        \"InstanceType\": \"t2.micro\",
        \"SecurityGroupIds\": [\"$SG_ID\"],
        \"KeyName\": \"$KEY_NAME\"
    }"

# 2. Create the Auto Scaling Group
# This command ties everything together: the template, subnets, sizes, and the load balancer target group.
echo "Creating Auto Scaling Group..."
aws autoscaling create-auto-scaling-group \
    --auto-scaling-group-name my-web-app-asg \
    --launch-template "LaunchTemplateName=my-web-app-template" \
    --min-size 1 \
    --max-size 4 \
    --desired-capacity 2 \
    --vpc-zone-identifier "$SUBNET_IDS" \
    --target-group-arns "$TG_ARN"

# 3. Create a Target Tracking Scaling Policy (Recommended)
# This policy will automatically manage scaling to keep the average CPU at 50%.
echo "Creating Target Tracking Scaling Policy..."
aws autoscaling put-scaling-policy \
    --auto-scaling-group-name my-web-app-asg \
    --policy-name my-cpu-target-tracking-policy \
    --policy-type TargetTrackingScaling \
    --target-tracking-configuration '{
        "PredefinedMetricSpecification": {
            "PredefinedMetricType": "ASGAverageCPUUtilization"
        },
        "TargetValue": 50.0,
        "DisableScaleIn": false
    }'

echo "Highly available and auto-scaling architecture is now configured!"9.1 The “Problem” with Servers
The architecture we built in Chapter 8 is powerful, but let’s be honest about the work involved:
- OS Patching: You are still responsible for patching the operating system (e.g., Linux or Windows) on your EC2 instances.
- Runtime Management: You have to install and maintain your application’s runtime (e.g., Node.js, Python, Java).
- Idle Capacity: Even with Auto Scaling, you are often paying for idle time. Your ASG’s minimum size might be 2 instances, but if you only get traffic for 8 hours a day, those servers are sitting idle and costing you money for the other 16 hours.
- Scaling Speed: It can take a few minutes for a new EC2 instance to boot up, install software, and join the load balancer fleet.
Serverless computing aims to eliminate these burdens entirely.
9.2 What is AWS Lambda? Functions, Not Servers.
AWS Lambda is a serverless, event-driven compute service that lets you run code for virtually any type of application or backend service without provisioning or managing servers. You can trigger Lambda functions from over 200 AWS services and SaaS applications, and only pay for what you use.
Analogy: The On-Demand Specialist Contractor.
- The Old Way (EC2): You hire a full-time employee (an EC2 instance). You have to provide them with an office, a computer, and a salary. They are on your payroll 24/7, even when they have no work to do. When you get busy, you have to go through a hiring process to bring on another full-time employee.
- The Lambda Way: You have a specific task, like “process this new image.” Instead of hiring an employee, you call a specialist contractor (a Lambda function).
- They show up instantly. The moment the work appears, the contractor is there.
- They bring their own tools. The Lambda environment comes pre-packaged with the runtime you need.
- They do one job and one job only. The function executes your code to process the image.
- They leave immediately after. As soon as the job is done, the contractor vanishes.
- You only pay for the time they were actively working, down to the millisecond.
- If 1,000 jobs appear at once, 1,000 contractors show up instantly to work in parallel, without you having to do anything.
This is the essence of Lambda. You upload your code as a “function,” and AWS handles everything else: provisioning, patching, scaling, and availability. You only think about your code.
9.3 The Three Pillars of a Lambda Application
A serverless application built with Lambda is defined by three things:
- The Event Source: The Trigger Something has to happen to invoke your function. This is the event source. It’s the “when” of your application. Examples include:
- An HTTP request from a user hitting an API Gateway.
- A new image being uploaded to an S3 bucket.
- A new message arriving in an SQS queue.
- A new record being written to a DynamoDB table.
- A scheduled event from Amazon EventBridge (e.g., run this function every hour).
- The Lambda Function: The Code This is your application logic, written in a supported language like Node.js, Python, Go, Java, Ruby, or .NET. The function receives an
eventobject (containing data about what triggered it) and acontextobject (with runtime information). Your code does its work and can optionally return a result.- Key Constraints: Functions are stateless (they shouldn’t rely on storing data on the local disk between invocations) and have a maximum execution time (currently 15 minutes).
- The Downstream Resources: The Action What does your function do? It almost always interacts with other AWS services.
- Writes data to a DynamoDB table.
- Reads a file from an S3 bucket.
- Sends a message to an SQS queue.
- Calls another third-party API.
- Returns a result to the original caller (e.g., API Gateway).
A Classic Serverless Image Processing Pipeline:
This is a canonical example of a powerful, event-driven serverless workflow.
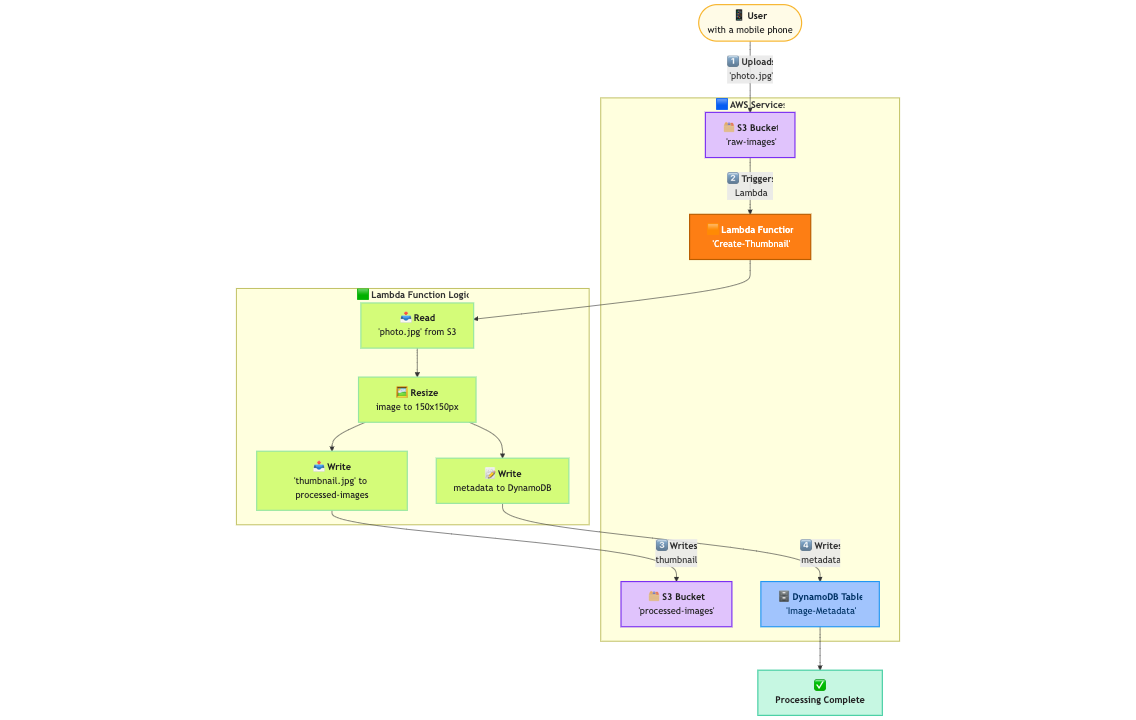
Flow:
- A user uploads an image (
photo.jpg) to theraw-imagesS3 bucket. - S3 automatically detects this
s3:ObjectCreated:Putevent and invokes ourCreate-ThumbnailLambda function, passing it the bucket name and the object key. - The Lambda function’s code executes: it uses the AWS SDK to read the new image from S3, uses an image processing library to create a thumbnail, and writes the new thumbnail to a different S3 bucket (
processed-images). - Finally, it writes metadata about the image (like its name and the S3 path to its thumbnail) into a DynamoDB table.
This entire, powerful workflow happens with zero servers to manage and scales automatically. If 1,000 users upload photos at the same time, AWS will simply run 1,000 parallel invocations of your Lambda function.
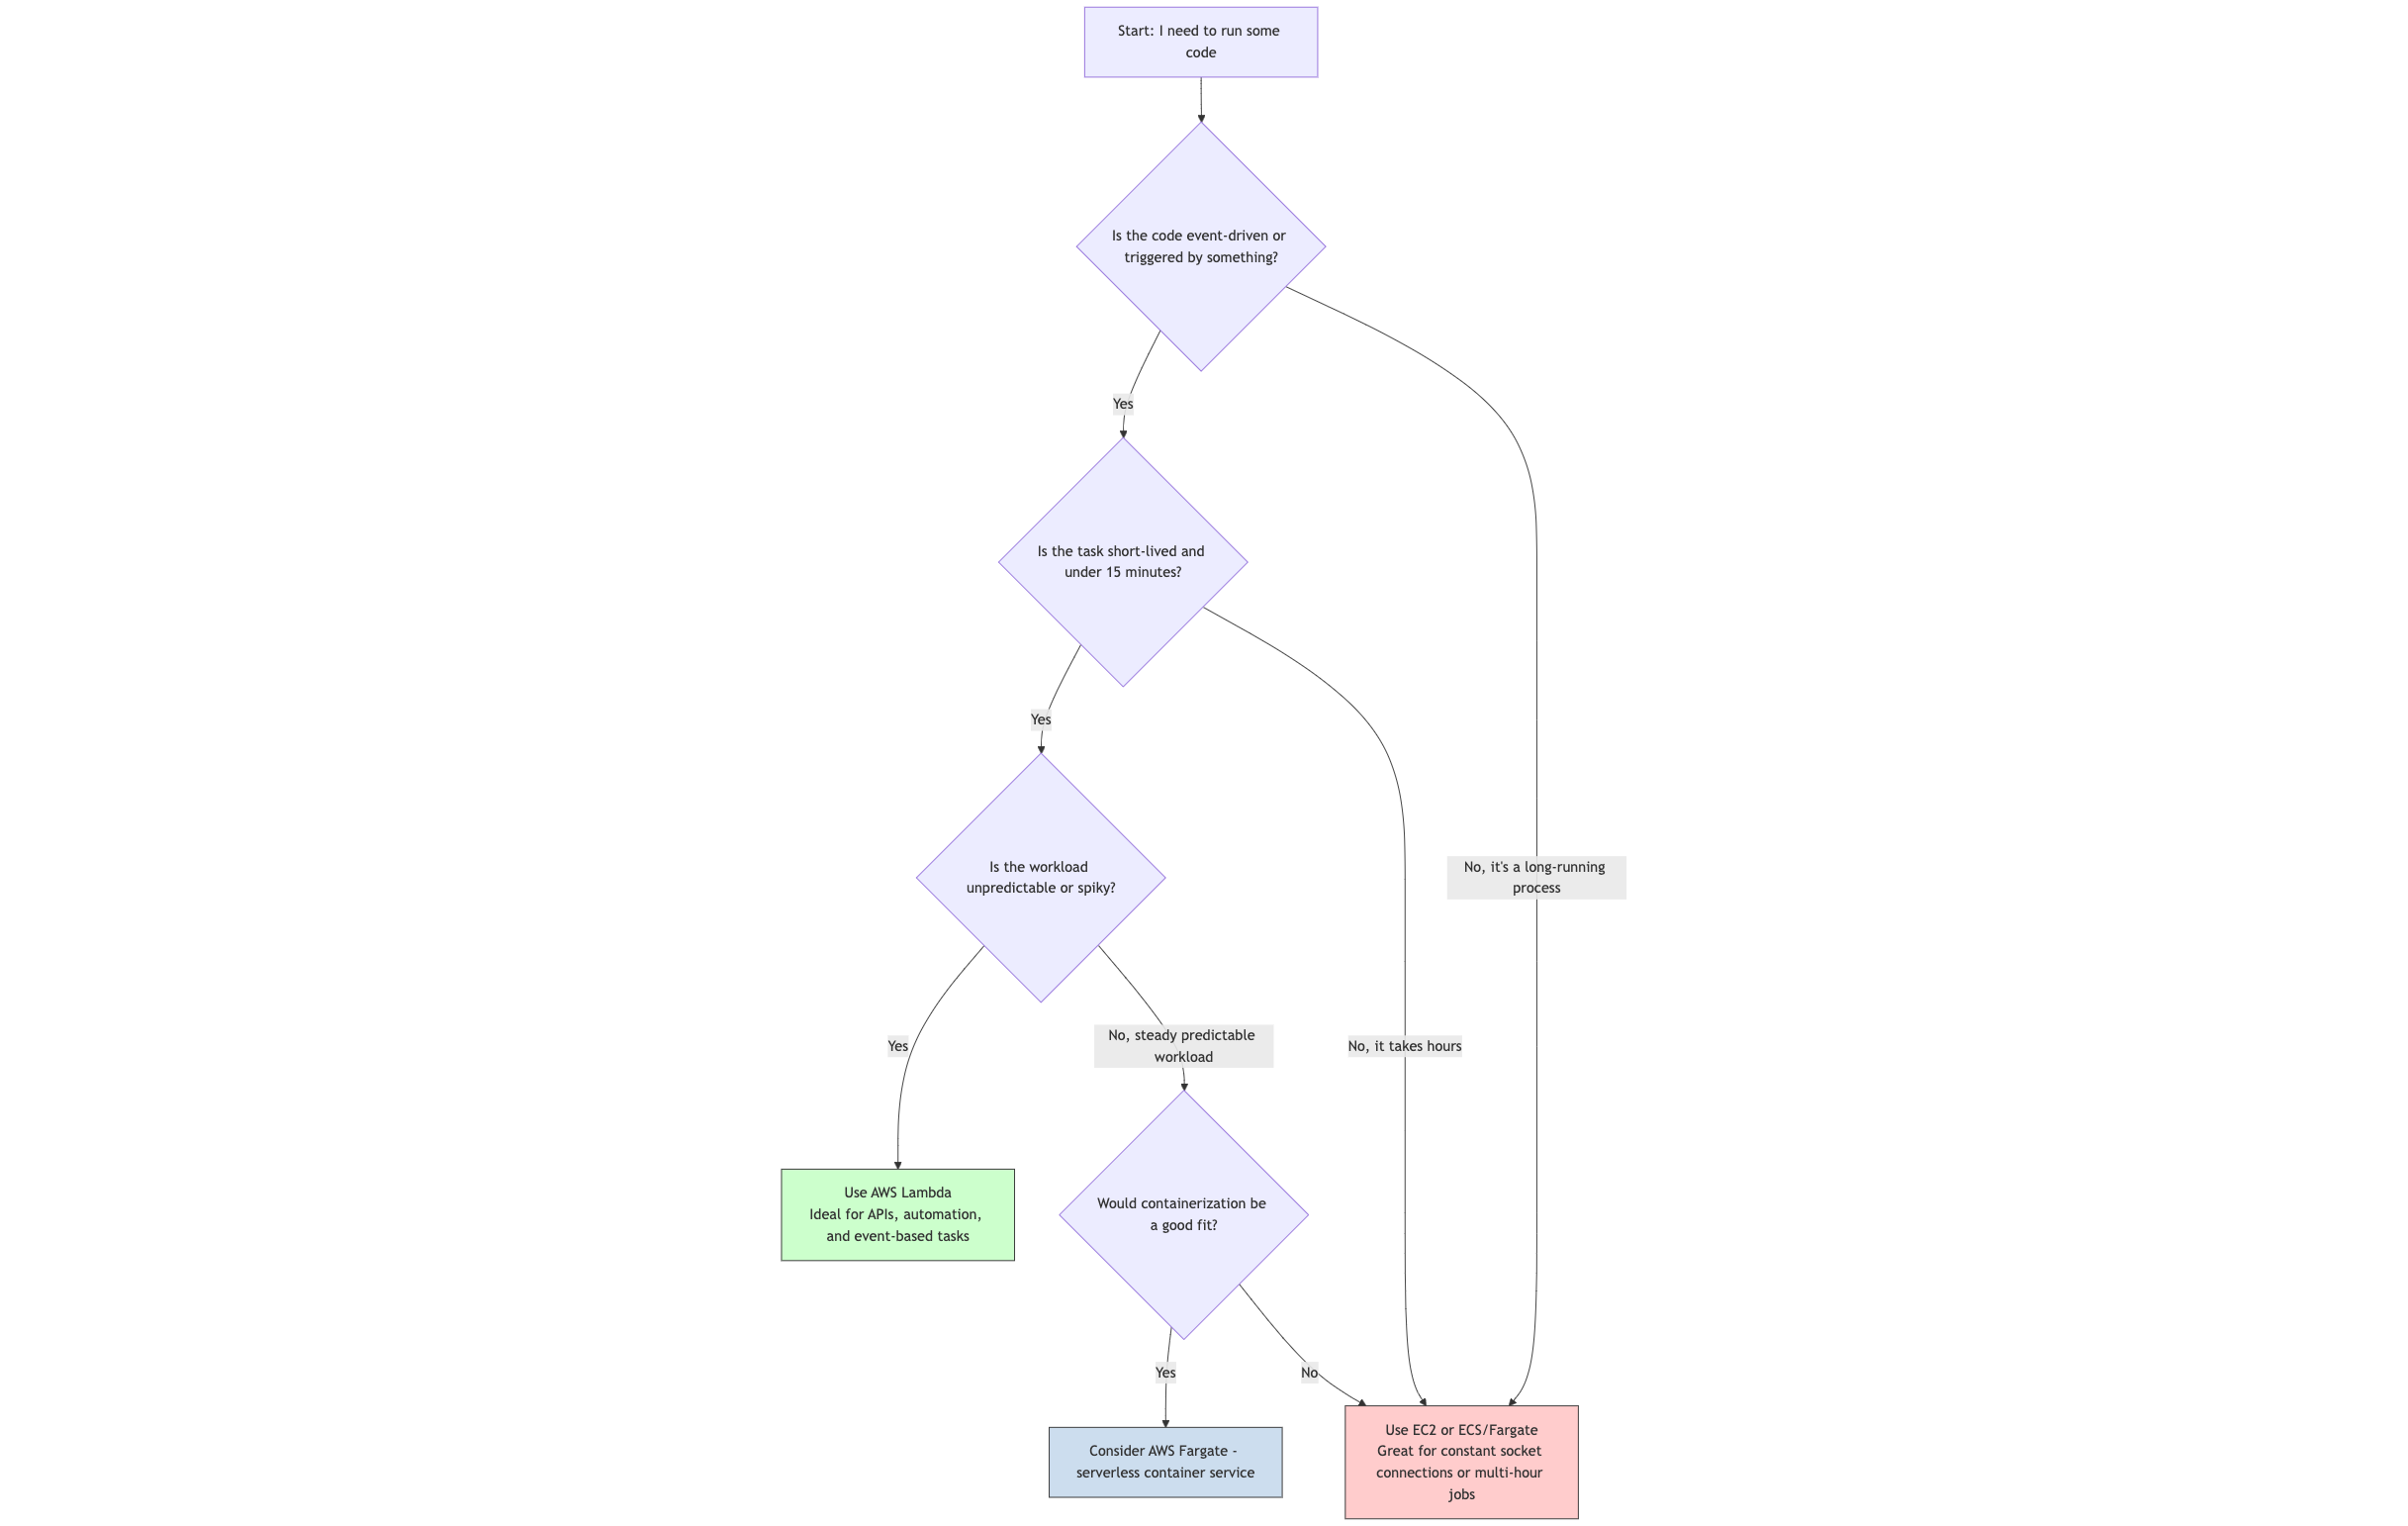
Should I Use Lambda?
9.4 Practical AWS CLI Commands
Let’s create a very simple Lambda function from the CLI. This function will be triggered manually and will simply log the event it receives.
# 1. Create the function code. Save this as 'index.js'.
# This is a simple Node.js function.
echo "Creating function code file..."
cat > index.js <<EOF
exports.handler = async (event) => {
    console.log("Event Received: ", JSON.stringify(event, null, 2));
    const response = {
        statusCode: 200,
        body: JSON.stringify('Hello from Lambda! Your message was: ' + (event.message || 'No message found')),
    };
    return response;
};
EOF

# 2. Create the IAM Role for the Lambda function.
# The function needs permission to run and write logs to CloudWatch.
echo "Creating IAM Role for Lambda..."
TRUST_POLICY='{
  "Version": "2012-10-17",
  "Statement": [
    {
      "Effect": "Allow",
      "Principal": {
        "Service": "lambda.amazonaws.com"
      },
      "Action": "sts:AssumeRole"
    }
  ]
}'
ROLE_ARN=$(aws iam create-role --role-name my-lambda-role --assume-role-policy-document "$TRUST_POLICY" --query 'Role.Arn' --output text)

# Attach the AWS-managed policy that allows writing logs.
aws iam attach-role-policy --role-name my-lambda-role --policy-arn arn:aws:iam::aws:policy/service-role/AWSLambdaBasicExecutionRole

echo "IAM Role created with ARN: $ROLE_ARN"
# It can take a few seconds for the IAM role to be usable.
sleep 10

# 3. Zip the code file. Lambda needs a .zip deployment package.
echo "Zipping function code..."
zip function.zip index.js

# 4. Create the Lambda function in AWS
echo "Creating Lambda function..."
aws lambda create-function \
    --function-name my-first-lambda \
    --runtime nodejs18.x \
    --role $ROLE_ARN \
    --handler index.handler \
    --zip-file fileb://function.zip

# 5. Invoke the function manually
# We are passing a simple JSON payload with a 'message' key.
echo "Invoking Lambda function..."
aws lambda invoke \
    --function-name my-first-lambda \
    --cli-binary-format raw-in-base64-out \
    --payload '{"message": "Hello World"}' \
    response.json

# 6. View the output and logs
# The response from the function is saved in 'response.json'.
echo "Function response:"
cat response.json
echo ""
echo "You can view the 'console.log' output in the Amazon CloudWatch console under Log Groups."10.1 The Problem: Manual Deployments are Brittle and Unrepeatable
Imagine you’ve spent two days in the AWS Console, carefully clicking through wizards and configuring settings to build the scalable web application from Chapter 8. You’ve created the VPC, subnets, route tables, internet gateway, NAT gateway, load balancer, launch template, and auto scaling group. It’s a masterpiece of cloud engineering, and it works perfectly.
Now, your boss comes to you with a series of requests:
- “This is fantastic! Now, deploy an identical copy of this entire environment for our staging team.”
- “We’ve just secured funding for our European expansion. We need this exact same architecture deployed in the
eu-west-1(Ireland) region by next week.” - “The application was working last Tuesday, but someone changed something and now it’s broken. What did the security group rules look like three weeks ago?“
You’re faced with a professional nightmare. You have to repeat the entire manual process, praying you don’t miss a single checkbox or command-line flag. You have no reliable record of previous configurations. This manual approach is:
- Slow: It takes days to replicate.
- Error-Prone: Humans make mistakes.
- Inconsistent: The staging environment will inevitably drift from the production environment.
- Not Auditable: You have no history of who changed what, and when.
To build like a modern cloud professional, we must treat our infrastructure with the same rigor and discipline we treat our application code. We need a blueprint. This is the world of Infrastructure as Code (IaC).
10.2 What is AWS CloudFormation? Infrastructure as a Blueprint
AWS CloudFormation is a service that allows you to model, provision, and manage your entire cloud infrastructure by writing a simple, declarative text file. It turns the complex art of cloud setup into a repeatable science.
Analogy: The Architectural Blueprint for a Skyscraper.
- The Old Way (Manual): You hire a construction crew and give them vague verbal instructions: “Build me a big building over there.” They start laying bricks, but without a plan, chaos ensues. The plumbing doesn’t line up, the electrical wiring is a tangled mess, and every floor is slightly different. If you want to build another one, you have to start from scratch and hope for the best.
- The CloudFormation Way (IaC): You hire a team of architects to create a detailed blueprint (a CloudFormation template). This single document specifies everything: the foundation’s depth, the exact dimensions of every room, the location of every electrical outlet, and the type of every window.
- Automation: You hand this blueprint to a master builder (the CloudFormation service). The builder reads the plan and automatically provisions all the materials and constructs the entire skyscraper exactly as specified, in the correct order.
- Consistency & Repeatability: If you want an identical skyscraper next door or in another city, you just give the same blueprint to another builder. You get a perfect, consistent copy every single time.
- Version Control & Auditing: The blueprint is a text file. You can store it in a Git repository alongside your application code. This means you can see every change ever made, who made it, and when. You can
git blameyour infrastructure! - Safety (Rollbacks): If the builder encounters a critical error halfway through (e.g., they can’t acquire the specified grade of steel), they will safely tear down everything they’ve built so far and roll back to the previous stable state, leaving you with no half-finished, broken mess.
10.3 The Anatomy of a CloudFormation Template
A CloudFormation template is a text file written in either YAML (highly recommended for its readability) or JSON. It has several key sections:
AWSTemplateFormatVersion(Optional): The version of the template format.Description(Optional): A human-readable description of your template’s purpose.Parameters(Optional): The inputs that make your template reusable. Instead of hardcodingt2.micro, you can create a parameter calledWebServerInstanceTypethat lets the user choose from a list of approved instance types at deployment time.Mappings(Optional): A lookup table for simple key-value pairs. A common use is to map AWS Regions to the correct AMI ID, ensuring your template works everywhere.Resources(Required): The heart and soul of the template. This is where you declare the AWS resources you want to create, such asAWS::EC2::Instance,AWS::S3::Bucket, orAWS::IAM::Role. You define their properties and the relationships between them.Outputs(Optional): The values you want to be able to easily view after the infrastructure is created. This is where the blueprint tells you important information, like theWebsiteURLof your new load balancer or theBucketNameof your new S3 bucket.
The Blueprint and the Building
This diagram illustrates the relationship between the template (the plan) and the stack (the result).
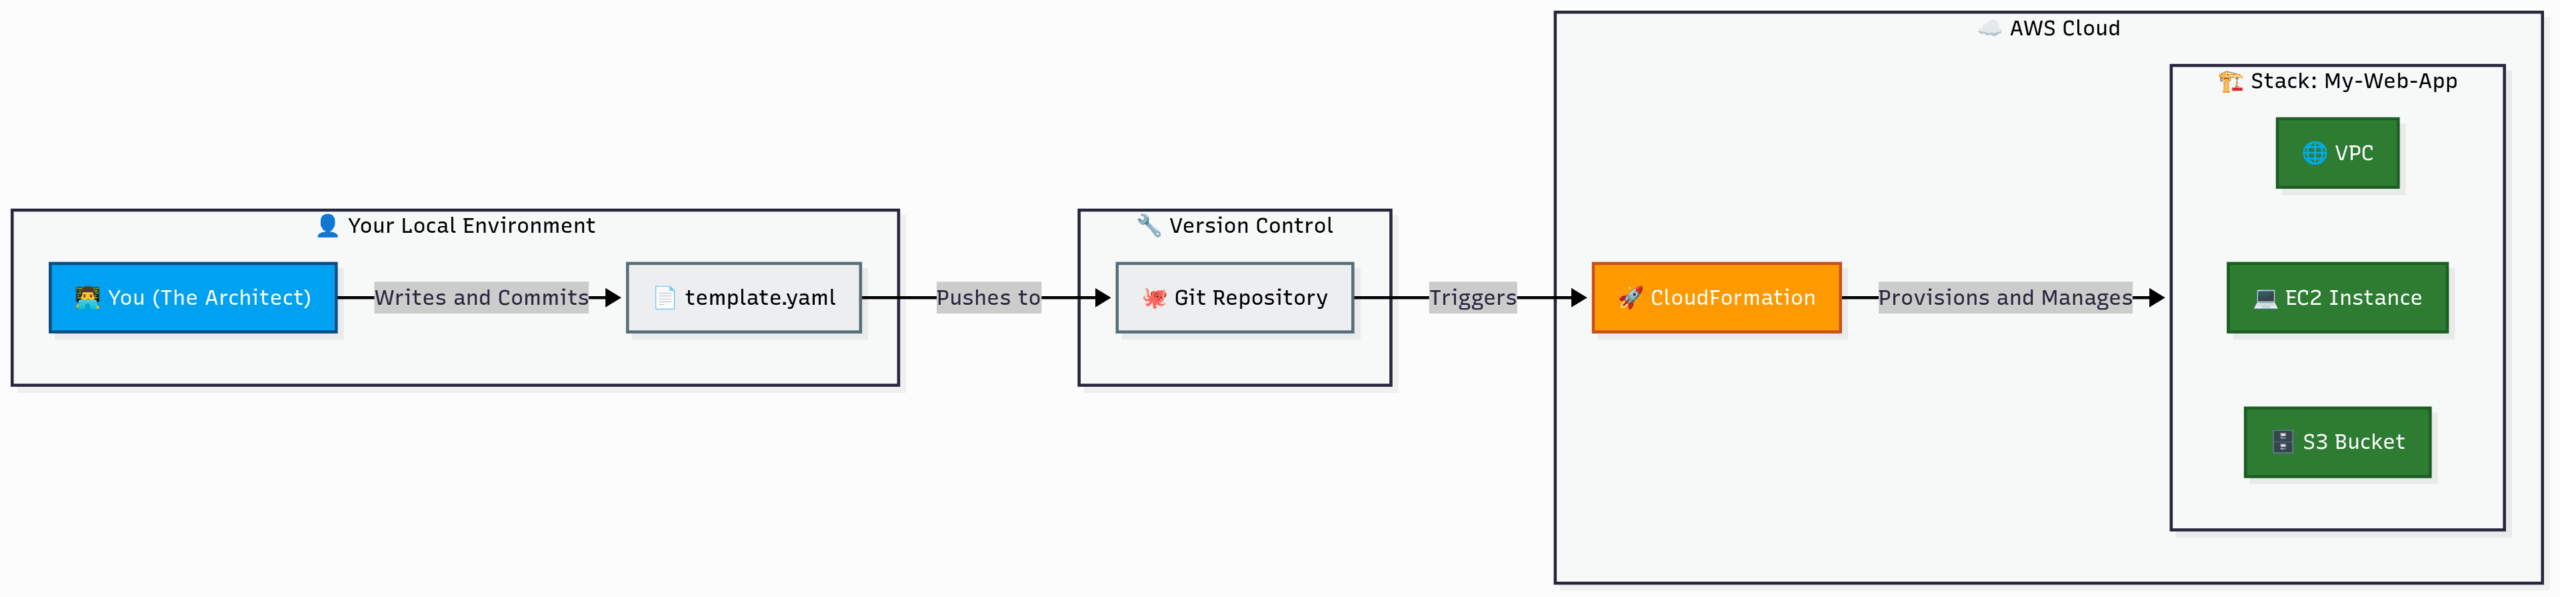
- Template: The
YAMLorJSONfile that defines what you want. It’s the blueprint. - Stack: A single, manageable unit containing all the resources created from a template. It’s the actual building constructed from the blueprint. You can update the stack by providing an updated template, or delete the stack to cleanly remove all of its resources.
The CloudFormation Deployment Lifecycle
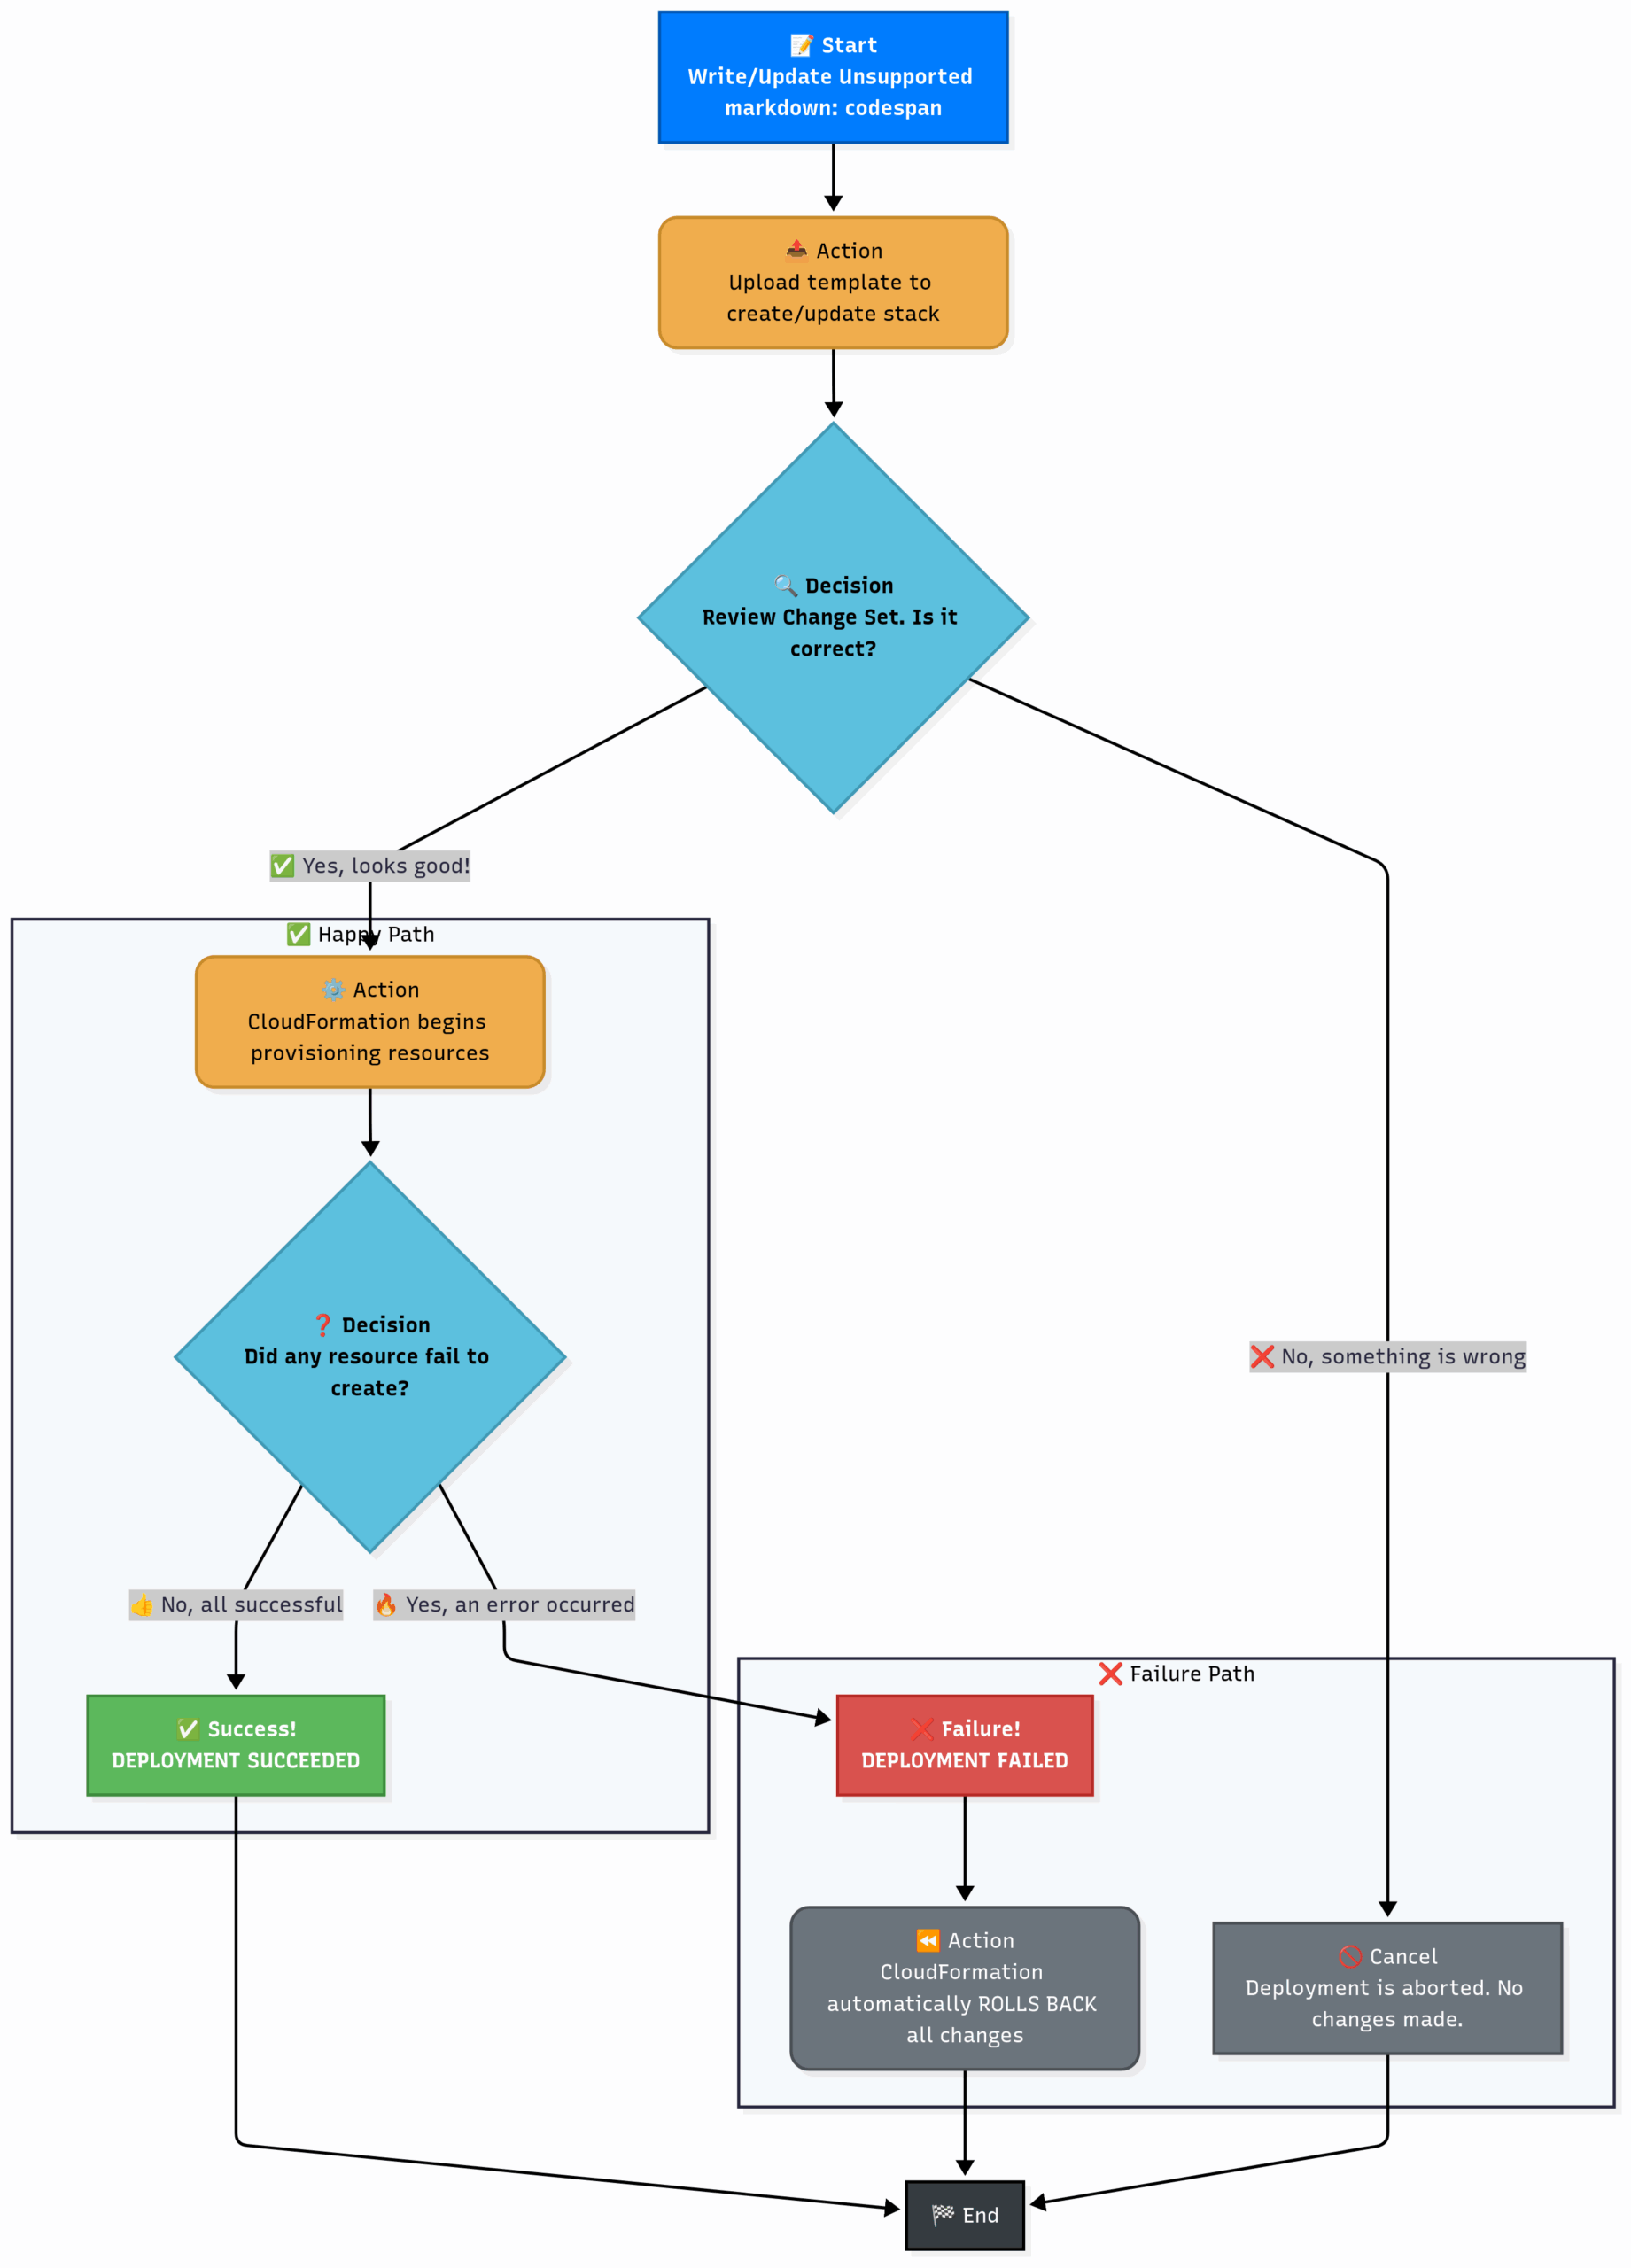
10.4 Practical Example: A Simple CloudFormation Template
Let’s write a simple YAML template to create an S3 bucket. This demonstrates the core concepts of parameters, resources, and outputs.
Save this file as s3-template.yaml:
AWSTemplateFormatVersion: '2010-09-09'
Description: A simple CloudFormation template to create a private S3 bucket for application data.

# Parameters allow this template to be reusable and customizable at deploy time.
Parameters:
  BucketNameSuffix:
    Type: String
    Description: A unique suffix (e.g., your initials and date) to ensure the S3 bucket name is globally unique.
    MinLength: 3

# Resources are the core of the template, defining the AWS components to create.
Resources:
  # This is the logical ID of our resource. We'll use this to refer to it elsewhere.
  MyS3Bucket:
    Type: 'AWS::S3::Bucket' # This tells CloudFormation what kind of resource to create.
    Properties:
      # The !Sub function substitutes variables into a string.
      # Here, it creates a name like 'my-app-data-johndoe2023'.
      BucketName: !Sub 'my-app-data-${BucketNameSuffix}'

      # This is a critical security configuration to ensure the bucket remains private.
      PublicAccessBlockConfiguration:
        BlockPublicAcls: true
        BlockPublicPolicy: true
        IgnorePublicAcls: true
        RestrictPublicBuckets: true

      # Tags are key-value pairs essential for organization and cost tracking.
      Tags:
        - Key: 'ManagedBy'
          Value: 'CloudFormation'
        - Key: 'Project'
          Value: 'WebAppV1'

# Outputs provide important information back to the user after a successful deployment.
Outputs:
  BucketName:
    Description: 'The full name of the newly created S3 bucket'
    Value: !Ref MyS3Bucket # The !Ref function gets the default reference value (the name for S3) of the resource.

  BucketARN:
    Description: 'The Amazon Resource Name (ARN) of the newly created S3 bucket'
Value: !GetAtt MyS3Bucket.Arn # The !GetAtt function gets a specific attribute of the resource.10.5 Practical AWS CLI Commands
Let’s use the AWS CLI to bring our blueprint to life.
# 1. Deploy the template to create a new stack.
# The `deploy` command is powerful because it can both create a new stack or update an existing one.
# We provide a value for the 'BucketNameSuffix' parameter to ensure a unique bucket name.
echo "Deploying CloudFormation stack..."
aws cloudformation deploy \
    --template-file s3-template.yaml \
    --stack-name my-s3-bucket-stack \
    --parameter-overrides BucketNameSuffix="myapp-$(date +%s)" \
    --tags Project=WebAppV1 Environment=Development

# The 'deploy' command will provide progress updates and wait until the stack creation is complete.

# 2. Describe the stack to see its status and, most importantly, its outputs.
echo "Describing stack outputs..."
aws cloudformation describe-stacks \
    --stack-name my-s3-bucket-stack \
    --query "Stacks[0].Outputs"

# 3. To update the stack, you would modify the YAML file (e.g., add another tag)
# and simply run the SAME 'deploy' command again. CloudFormation will calculate the
# difference (a "change set") and only update what is necessary.

# 4. To delete the stack and ALL the resources it created, leaving nothing behind.
echo "Deleting the stack and all of its resources..."
aws cloudformation delete-stack --stack-name my-s3-bucket-stack11.1 The Problem: Flying Blind
Imagine you’re the pilot of a sophisticated aircraft (your application). The engines are running, and you’re flying, but your entire cockpit is dark.
- You don’t know your altitude or speed (performance metrics).
- You can’t hear the radio chatter from air traffic control (logs).
- You don’t know if an engine is overheating until it’s on fire (no alarms).
- You have no flight recorder to analyze what happened after a crash (no audit trail).
Running an application in the cloud without a proper monitoring strategy is exactly like flying blind. It’s not a question of if something will go wrong, but when—and you will have no tools to understand why or how to fix it. This chapter introduces the “cockpit instruments” provided by AWS to give you complete observability.
12.2 Amazon CloudWatch: The Eyes and Ears of Your AWS Environment
Amazon CloudWatch is the central nervous system for monitoring in AWS. It’s a comprehensive service that collects monitoring and operational data in the form of logs, metrics, and events, giving you a unified view of your AWS resources, applications, and services.
Analogy: The Hospital’s Central Monitoring Station. Think of your application as a patient in a high-tech hospital. CloudWatch is the central monitoring station where a team of doctors and nurses can see all the vital signs on a big screen.
The station provides three key functions:
1. CloudWatch Metrics: The Vital Signs Monitor This is the heart monitor, the blood pressure cuff, the thermometer. It tracks key performance indicators as time-series data.
- What are they? A metric is a variable that is measured over time, like
CPUUtilization,NetworkIn, orDiskReadOps. - Standard Metrics: Nearly every AWS service automatically publishes its most important metrics to CloudWatch for free. EC2 publishes CPU, Disk, and Network metrics. ELB publishes request counts and latency. RDS publishes database connections and CPU.
- Custom Metrics: You can publish your own metrics from your application. For example, you could publish a metric for
NewUserSignupsorItemsInShoppingCartto track business-level performance.
2. CloudWatch Logs: The Patient’s Chart and Nurse’s Notes This is where all detailed, event-based information is recorded.
- What are they? CloudWatch Logs allows you to centralize logs from all your systems. Lambda function output (
console.log) goes here automatically. For EC2 instances, you can install the CloudWatch Agent to stream application logs (/var/log/app.log), system logs, and security logs into a central place. - Why is this critical? Instead of having to SSH into 10 different servers to find an error message, you can search, filter, and analyze all your logs in one place using CloudWatch Logs Insights, a powerful query engine.
3. CloudWatch Alarms: The Emergency Alert System This is the system that beeps loudly and flashes red when a vital sign goes outside the safe range.
- How they work: An alarm “watches” a single CloudWatch metric over a specified time period. You define a threshold (e.g.,
CPUUtilization > 80%) and a duration (e.g.,for 5 consecutive minutes). - Actions: If the alarm’s conditions are met, it changes state and triggers an action. This is the most powerful part. An action could be:
- Notify: Send a message to an Amazon SNS (Simple Notification Service) topic, which can then send you an email, a text message, or a Slack alert.
- Auto Scale: Trigger the Auto Scaling policy we created in Chapter 8 to launch a new EC2 instance.
- Remediate: Trigger a Lambda function to perform a corrective action.
The CloudWatch Ecosystem:
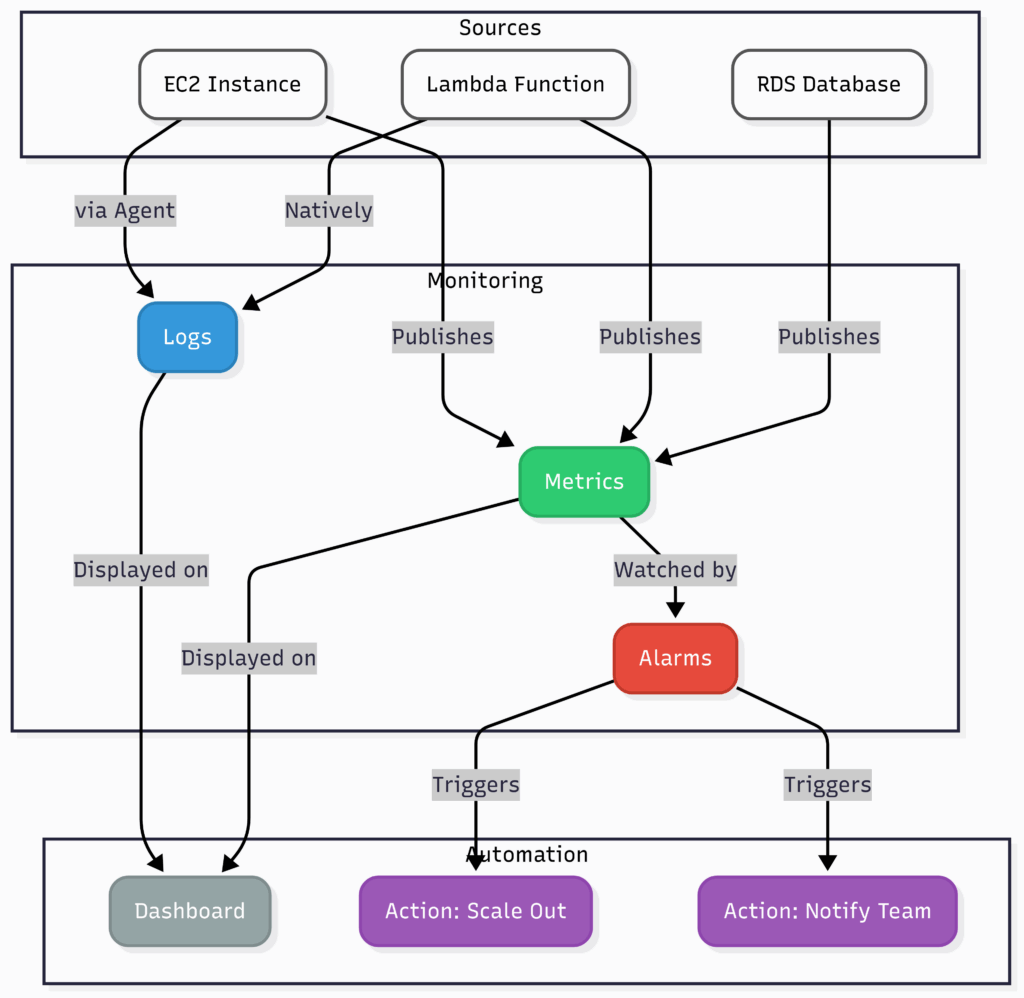
11.3 AWS CloudTrail: The Unchangeable Security Logbook
While CloudWatch tells you what your systems are doing, CloudTrail tells you who is doing what to your systems.
AWS CloudTrail is a service that provides event history of your AWS account activity, including actions taken through the AWS Management Console, AWS SDKs, command-line tools, and other AWS services.
Analogy: The Black Box Flight Recorder. Every commercial aircraft has a “black box” that records every command the pilot makes and every conversation in the cockpit. If the plane crashes, investigators retrieve this box to get an unchangeable, authoritative record of what happened leading up to the incident. CloudTrail is the black box for your AWS account.
- What it Records: Nearly every API call. For example:
iam:CreateUserby userAlicefrom IP1.2.3.4at14:32 UTC.ec2:TerminateInstancesby the roleEC2-Admin-Roleat15:01 UTC.s3:PutObjectto bucketmy-secret-dataat16:15 UTC.
- Why it’s Essential:
- Security Analysis: If an EC2 instance is terminated unexpectedly, CloudTrail is the first place you look to find out who or what did it.
- Compliance & Auditing: Many compliance frameworks (like PCI-DSS, HIPAA) require a complete audit trail of all access and changes to the environment. CloudTrail provides this.
- Troubleshooting: “The application stopped working around 2 PM. What changed in the account around that time?” CloudTrail can answer this by showing you if a security group was changed or an IAM policy was modified.
By default, CloudTrail provides 90 days of event history. For long-term security and compliance, best practice is to create a Trail, which continuously logs all events to an S3 bucket for permanent storage and analysis.
Diagnosing an Issue – CloudWatch vs. CloudTrail
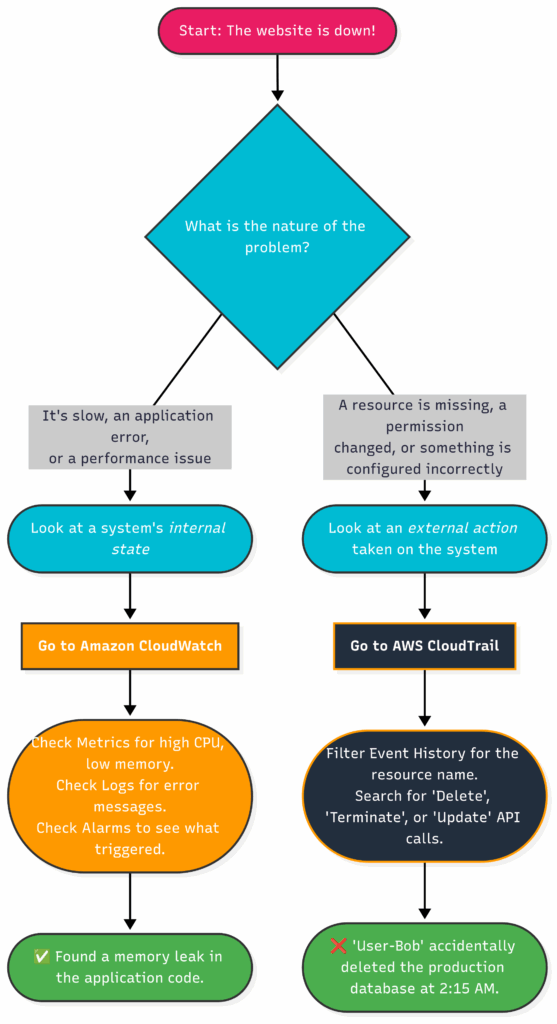
11.4 Practical AWS CLI Commands
Let’s use the CLI to create a CloudWatch Alarm that monitors an EC2 instance.
# PREREQUISITE: You need the Instance ID of an EC2 instance to monitor.
INSTANCE_ID="i-0123456789abcdef0"
# PREREQUISITE: You need the ARN of an SNS Topic to send notifications to.
SNS_TOPIC_ARN="arn:aws:sns:us-east-1:123456789012:MyAlarmsTopic"

# 1. Create a CloudWatch Alarm
# This alarm will watch the CPUUtilization metric for our EC2 instance.
# It will trigger if the average CPU is greater than 75% for 2 consecutive periods of 60 seconds (2 minutes).
# When it triggers, it will send a notification to our SNS topic.
echo "Creating CloudWatch CPU Alarm..."
aws cloudwatch put-metric-alarm \
    --alarm-name "High-CPU-Alarm-for-$INSTANCE_ID" \
    --alarm-description "Alarm when CPU exceeds 75% for 2 minutes" \
    --metric-name "CPUUtilization" \
    --namespace "AWS/EC2" \
    --statistic "Average" \
    --period 60 \
    --evaluation-periods 2 \
    --threshold 75 \
    --comparison-operator "GreaterThanOrEqualToThreshold" \
    --dimensions "Name=InstanceId,Value=$INSTANCE_ID" \
    --alarm-actions $SNS_TOPIC_ARN \
    --ok-actions $SNS_TOPIC_ARN # Also notify when the alarm returns to an OK state

echo "Alarm created. It is now monitoring the instance."

# 2. Look up a recent event in CloudTrail
# Let's find out who has been creating IAM users recently.
echo "Searching CloudTrail for 'CreateUser' events..."
aws cloudtrail lookup-events \
    --lookup-attributes "AttributeKey=EventName,AttributeValue=CreateUser" \
    --max-results 5 # Limit to the 5 most recent events

# You can also use the CloudTrail console to view the full details of these events.12.1 Why a 3-Tier Architecture? The Foundation of Modern Applications
Throughout this book, we’ve built pieces of a larger puzzle. Now, we’ll assemble them into one of the most common and proven architectural patterns: the 3-Tier Web Application.
This pattern is popular because it promotes separation of concerns. It decouples the major functional areas of an application into independent layers, or “tiers.” This separation makes the application easier to develop, manage, scale, and secure.
The three tiers are:
- The Web Tier (Presentation Layer): This is the user-facing layer. It’s responsible for presenting the user interface and handling user requests. In our architecture, this will be our fleet of EC2 web servers.
- The Application Tier (Logic Layer): This is the brains of the operation. It contains the business logic, processes user requests received from the Web Tier, and makes decisions. In a simple application, the Web and Application tiers can be combined on the same servers. In more complex microservices architectures, this might be a separate fleet of servers.
- The Database Tier (Data Layer): This is where all the application’s persistent data is stored and managed. It is the system of record. This tier should be the most secure and isolated.
By separating these tiers, we can scale, secure, and modify each one independently. For example, if we need more web-serving capacity, we can scale out the Web Tier without touching the database. If we need a more powerful database, we can upgrade the Database Tier without affecting the web servers.
12.2 The Complete Blueprint: A Resilient 3-Tier Architecture on AWS
Let’s now unveil the full architectural diagram. This diagram combines everything we have learned: VPCs, Public and Private Subnets, Load Balancing, Auto Scaling, Managed Databases, and DNS.
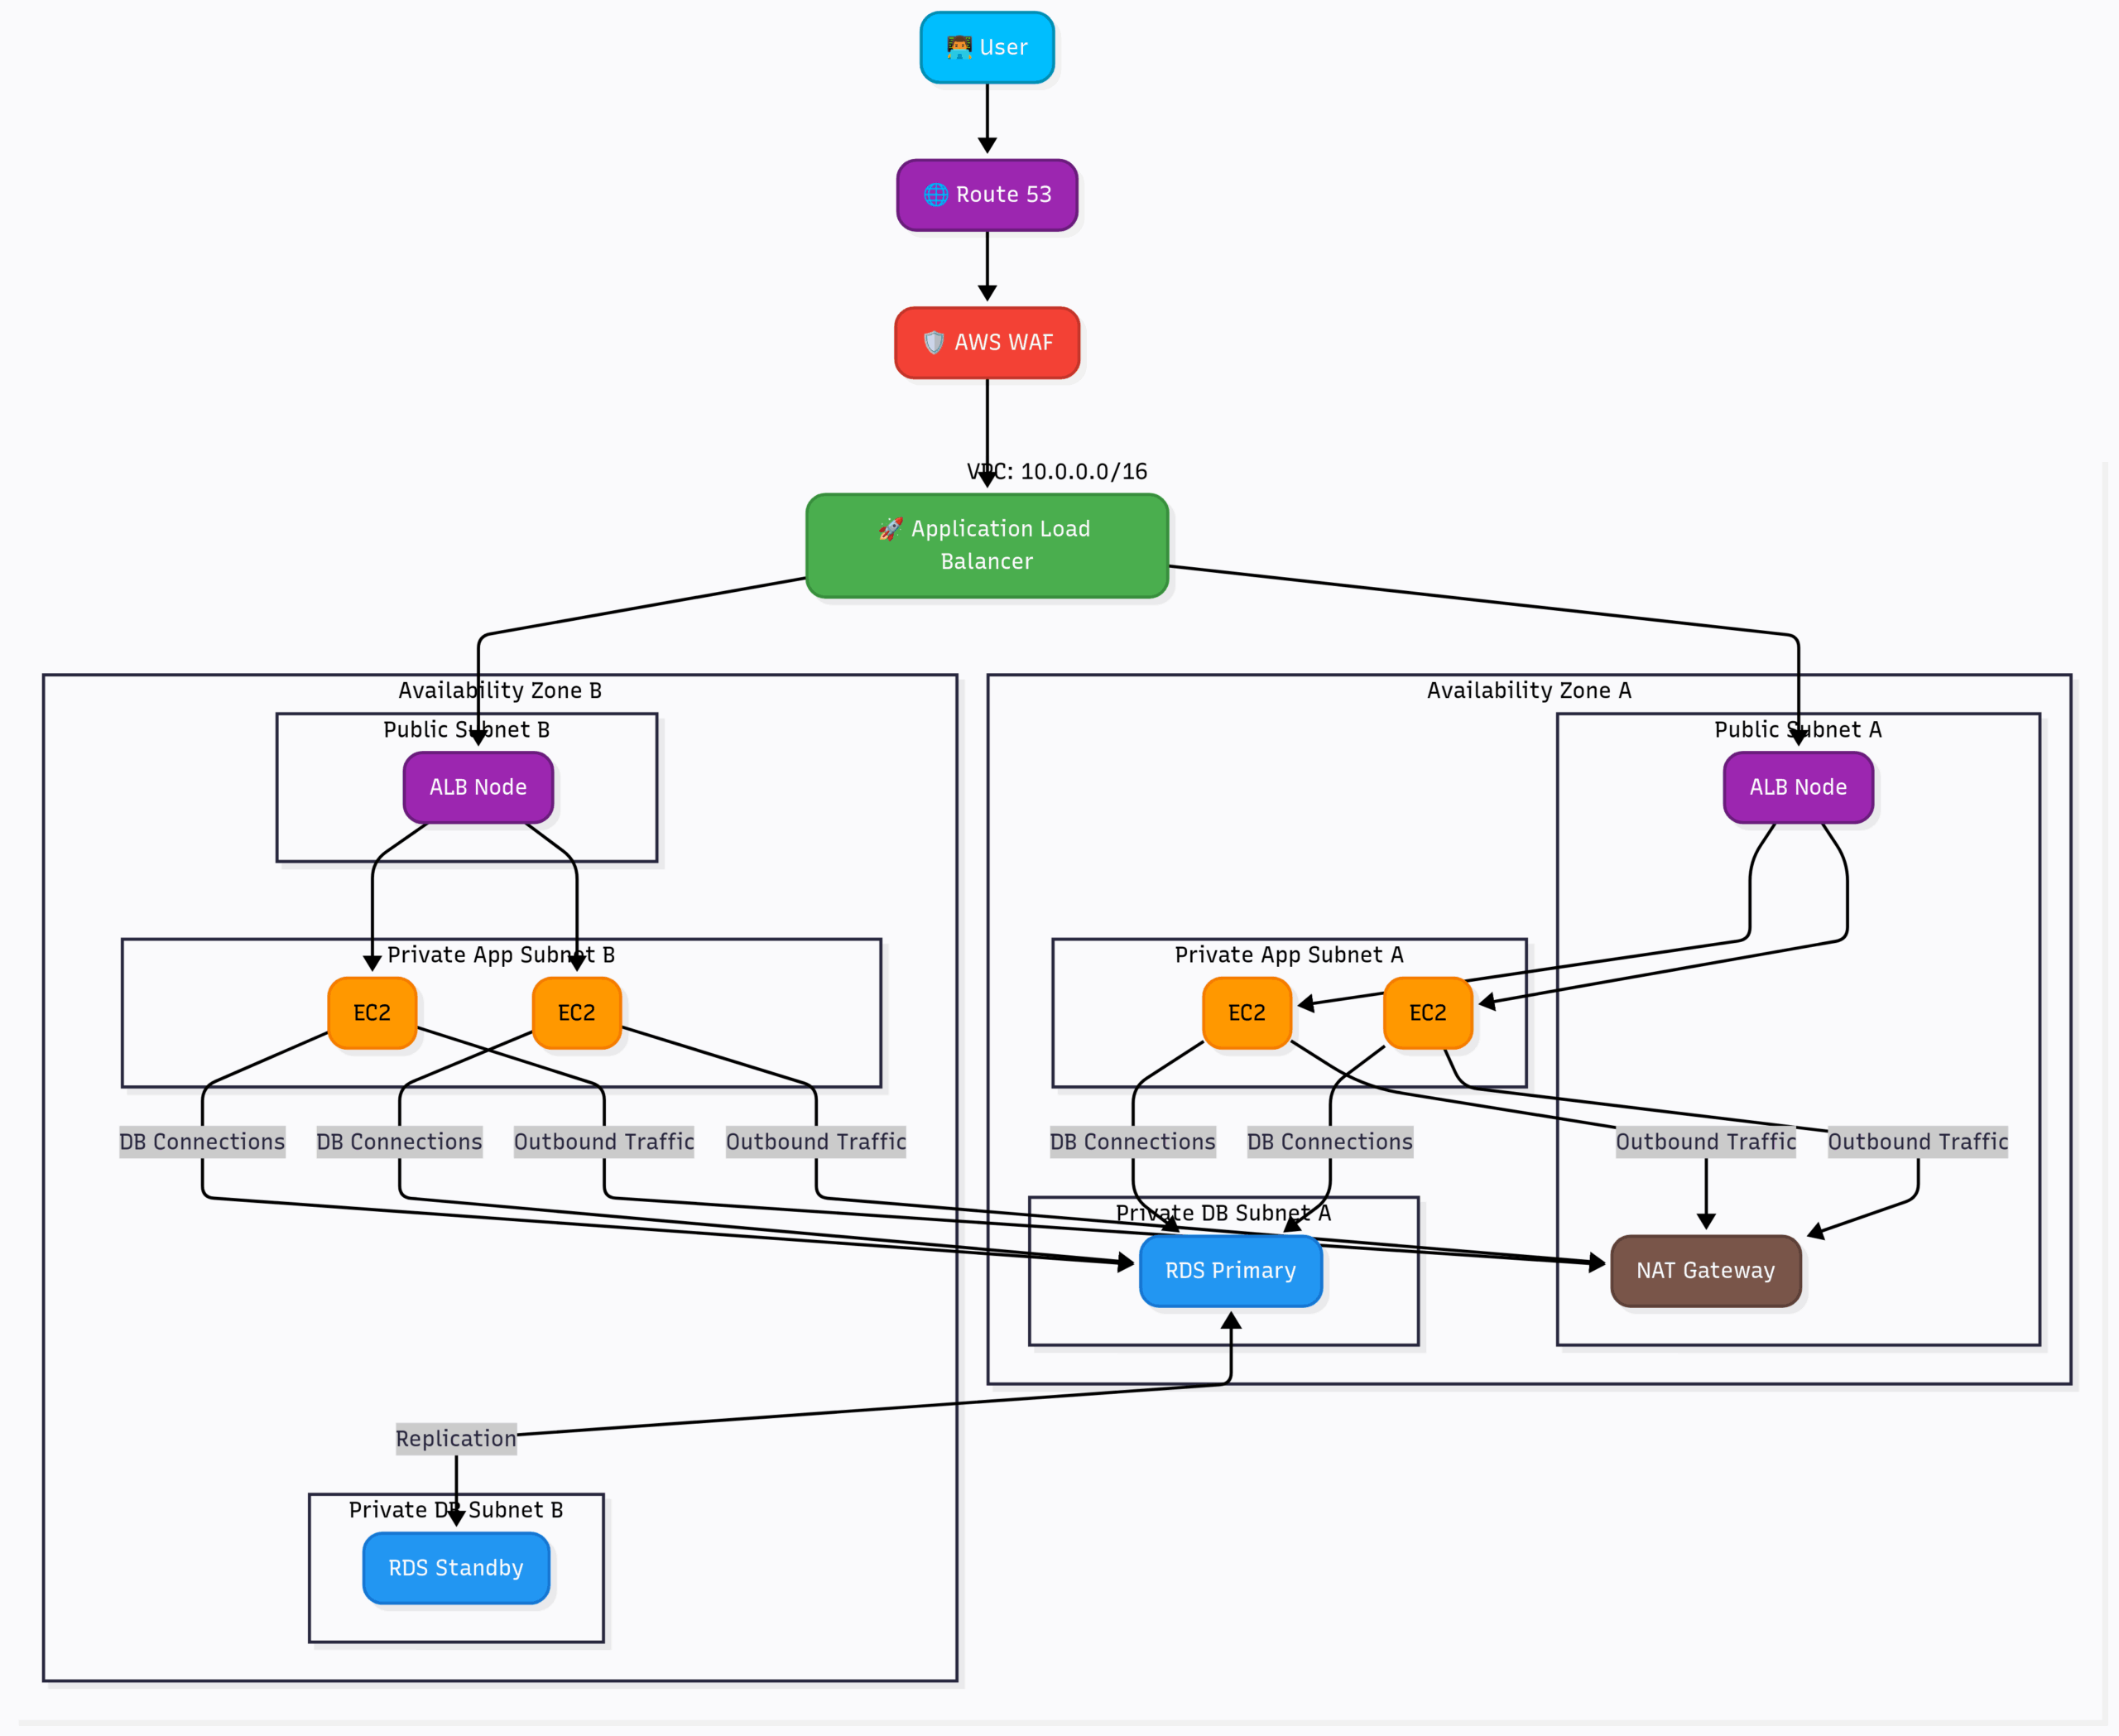
12.3 A Layer-by-Layer Breakdown of the Flow
Let’s trace the journey of a single user request through our architecture.
1. The Request (DNS and Edge Security)
- A user types
www.my-awesome-app.cominto their browser. - Route 53, AWS’s managed DNS service, resolves this domain name to the IP address of our Application Load Balancer.
- (Optional but Recommended) The request first passes through AWS WAF (Web Application Firewall), which is attached to our ALB. WAF inspects the request for common web exploits like SQL injection or cross-site scripting and blocks malicious traffic before it ever reaches our application.
2. The Web/Application Tier (Presentation and Logic)
- The legitimate request hits the Application Load Balancer (ALB). The ALB’s nodes are deployed across our Public Subnets in multiple Availability Zones, making it highly available.
- The ALB terminates the HTTPS connection, inspects the request, and based on its rules, forwards the traffic to a healthy EC2 instance in one of the Private Subnets.
- These EC2 instances are managed by an Auto Scaling Group (ASG).
- Resilience: The ASG is configured to span multiple AZs (
Private Subnet AandPrivate Subnet B). If AZ A fails completely, the ASG will launch new instances in AZ B to compensate, and the ALB will automatically route all traffic there. - Elasticity: The ASG has scaling policies (e.g., Target Tracking on CPU) to automatically add or remove instances based on real-time traffic load.
- Resilience: The ASG is configured to span multiple AZs (
- Security: The EC2 instances are in private subnets. They cannot be reached directly from the internet. The only traffic they accept is from the ALB, which is enforced by their Security Group rules.
3. The Outbound Path (NAT Gateway)
- What if an EC2 instance in the private application tier needs to reach the internet? For example, to call a third-party payment API or download a software update.
- The instance sends the outbound request to the NAT Gateway located in its AZ’s public subnet. The NAT Gateway then forwards the traffic to the internet using its own public IP address and manages the return traffic. This allows our private instances to initiate outbound connections without being exposed to inbound ones.
4. The Database Tier (Data Persistence)
- The application logic on an EC2 instance needs to fetch or store data. It opens a connection to the Amazon RDS (or Aurora) Endpoint.
- Security: The database instances are located in their own, even more secure, Private DB Subnets. The security group for the database is configured to only accept traffic from the security group of the application tier instances. It has no route to the internet whatsoever. This is a critical security best practice.
- Resilience: The RDS database is deployed in a Multi-AZ configuration. A
Primaryinstance in AZ A synchronously replicates all data to aStandbyinstance in AZ B. If the primary instance or all of AZ A fails, RDS automatically fails over to the standby in under a minute with no data loss, and the application resumes operation by connecting to the same endpoint.
12.4 Why This Architecture Works
This 3-tier design achieves all the goals of a modern cloud application:
- High Availability: By deploying across multiple Availability Zones at every layer (ALB, ASG, RDS), the application can withstand the failure of an entire data center.
- Scalability: The Auto Scaling Group can elastically grow and shrink the application tier to perfectly match demand, ensuring performance and optimizing costs.
- Security: The “defense-in-depth” approach uses multiple layers of security. WAF at the edge, no direct internet access for app or database servers, and tightly controlled Security Group rules at every boundary.
- Decoupling & Maintainability: Each tier is independent. The database team can manage the RDS cluster without affecting the web developers. The web developers can deploy new application code to the EC2 instances without changing the database. This decoupling speeds up development and reduces the risk of changes.
This architecture is not a theoretical exercise; it is the proven, battle-tested foundation for a vast number of applications running on AWS today. It provides the perfect balance of security, performance, resilience, and cost-efficiency for a huge range of use cases.
13.1 The Cloud’s Double-Edged Sword: The Pay-As-You-Go Model
The pay-as-you-go model is what gives the cloud its incredible power and agility. You can spin up a supercomputer cluster for an hour and pay only for that hour. This is a massive advantage over the old world of buying physical hardware.
However, this same power can be a dangerous trap. If you forget to turn off that supercomputer cluster, it will continue running and you will continue paying for it, 24/7. A small development experiment can accidentally turn into a multi-thousand-dollar bill.
Unlike a traditional data center where costs are fixed (capital expenditures), cloud costs are variable (operational expenditures). This requires a new mindset and a new set of tools to achieve financial governance in the cloud. The goal is not just to reduce costs, but to achieve cost-efficiency—getting the maximum business value for every dollar you spend.
13.2 Step 1: Visibility – Knowing What You’re Spending On
You cannot optimize what you cannot see. The first step in cost management is gaining clear visibility into your spending patterns.
1. AWS Cost Explorer This is your primary tool for visualizing and analyzing your costs. It’s a graphical interface in the AWS console that lets you:
- View historical costs: See your spending over the last 12 months.
- Filter and group data: Break down your costs by AWS Service (e.g., EC2, S3, RDS), Region, Linked Account, or, most importantly, by Tags.
- Forecast future costs: Cost Explorer uses machine learning to predict what your bill will be at the end of the month based on your current usage.
The Power of Tagging A tag is a simple key-value label that you can attach to almost any AWS resource. A consistent tagging strategy is the single most important thing you can do for cost visibility.
- Analogy: Imagine a company credit card used by all departments. Without categorizing expenses, the bill at the end of the month is just one giant, meaningless number. By requiring every employee to “tag” their expenses with a department code (
Project:Blue,CostCenter:Marketing,Team:Alpha), you can precisely see who is spending what. - Essential Tags:
ProjectorApplicationName: To attribute costs to a specific product.Environment: To differentiate betweenDev,Staging, andProdcosts.OwnerorTeam: To assign responsibility for a resource’s cost.ManagedBy: (e.g.,Terraform,CloudFormation)
Once you have tags, you can use Cost Explorer to filter your view and answer questions like, “How much is Project Blue’s production environment costing us this month?”
2. AWS Budgets AWS Budgets allows you to set custom cost and usage budgets and receive alerts when you exceed (or are forecasted to exceed) your thresholds.
- Cost Budgets: “Notify me via email and Slack when my total monthly spend exceeds $1,000.”
- Usage Budgets: “Notify me when my S3 Standard storage usage exceeds 5 Terabytes.”
- RI/Savings Plans Budgets: “Notify me if the utilization of my Reserved Instances drops below 90%.”
Budgets are your early warning system. They don’t stop you from spending, but they ensure you are never surprised by your bill.
The Cost Visibility & Alerting Loop
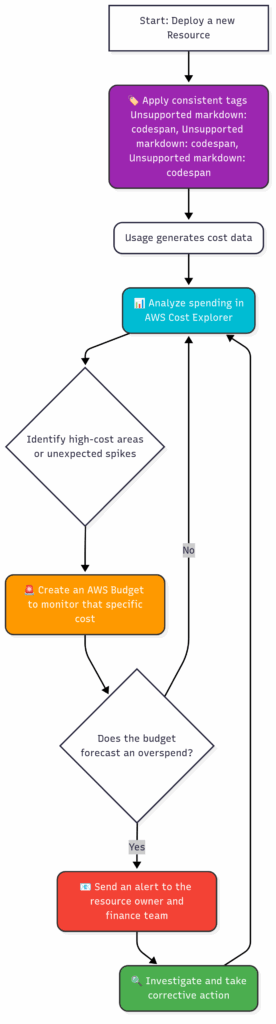
13.3 Step 2: Optimization – Making Smart Cost-Saving Choices
Once you can see where your money is going, you can start to optimize. Optimization falls into three main categories.
1. Right-Sizing: Don’t Pay for What You Don’t Need This is the process of matching your instance types and sizes to your actual performance needs. It’s the most impactful optimization strategy.
- The Problem: Developers often over-provision resources “just in case.” A
t3.largeinstance might be chosen for a small web server that rarely exceeds 5% CPU utilization. - The Solution: Use tools like AWS Compute Optimizer and the metrics in CloudWatch to analyze the utilization of your EC2 instances, EBS volumes, and RDS instances. These tools will provide specific recommendations, such as, “This
m5.xlargeinstance could be changed to anm5.largewith no performance impact, saving you 48%.”
2. Elasticity: Turn Off What You’re Not Using The cloud’s greatest advantage is elasticity. Use it!
- Non-Production Environments: Development and staging environments often don’t need to run 24/7. Use AWS Instance Scheduler or scheduled scaling policies to automatically shut down these instances overnight and on weekends, potentially saving 70% of their cost.
- Auto Scaling: As discussed in Chapter 8, properly configured Auto Scaling ensures you are only running the number of instances needed to handle your current load, automatically scaling in during quiet periods.
3. Pricing Models: Commit to AWS for a Discount The default “On-Demand” pricing is the most expensive but most flexible. If you have predictable, long-term workloads, you can get significant discounts by making a commitment to AWS.
- Savings Plans: This is the most flexible and recommended commitment model. You commit to spending a certain amount (e.g., $10/hour) on EC2, Fargate, or Lambda compute for a 1 or 3-year term. In exchange, you get a large discount (up to 72%) on that usage. Any usage above your commitment is billed at the regular On-Demand rate.
- Reserved Instances (RIs): The older model. You commit to a specific instance type in a specific region (e.g., ten
t3.microinstances inus-east-1). This is less flexible than Savings Plans but can offer slightly better discounts in some cases, especially for services like RDS. - Spot Instances: This is the cheapest way to get compute power (up to 90% off On-Demand), but it comes with a catch: AWS can take the instance away from you with only a two-minute warning if they need the capacity back. This makes Spot Instances perfect for fault-tolerant, non-critical workloads like batch processing, data analysis, or CI/CD jobs, but unsuitable for production databases or user-facing web servers.
The Cost Optimization Decision Tree
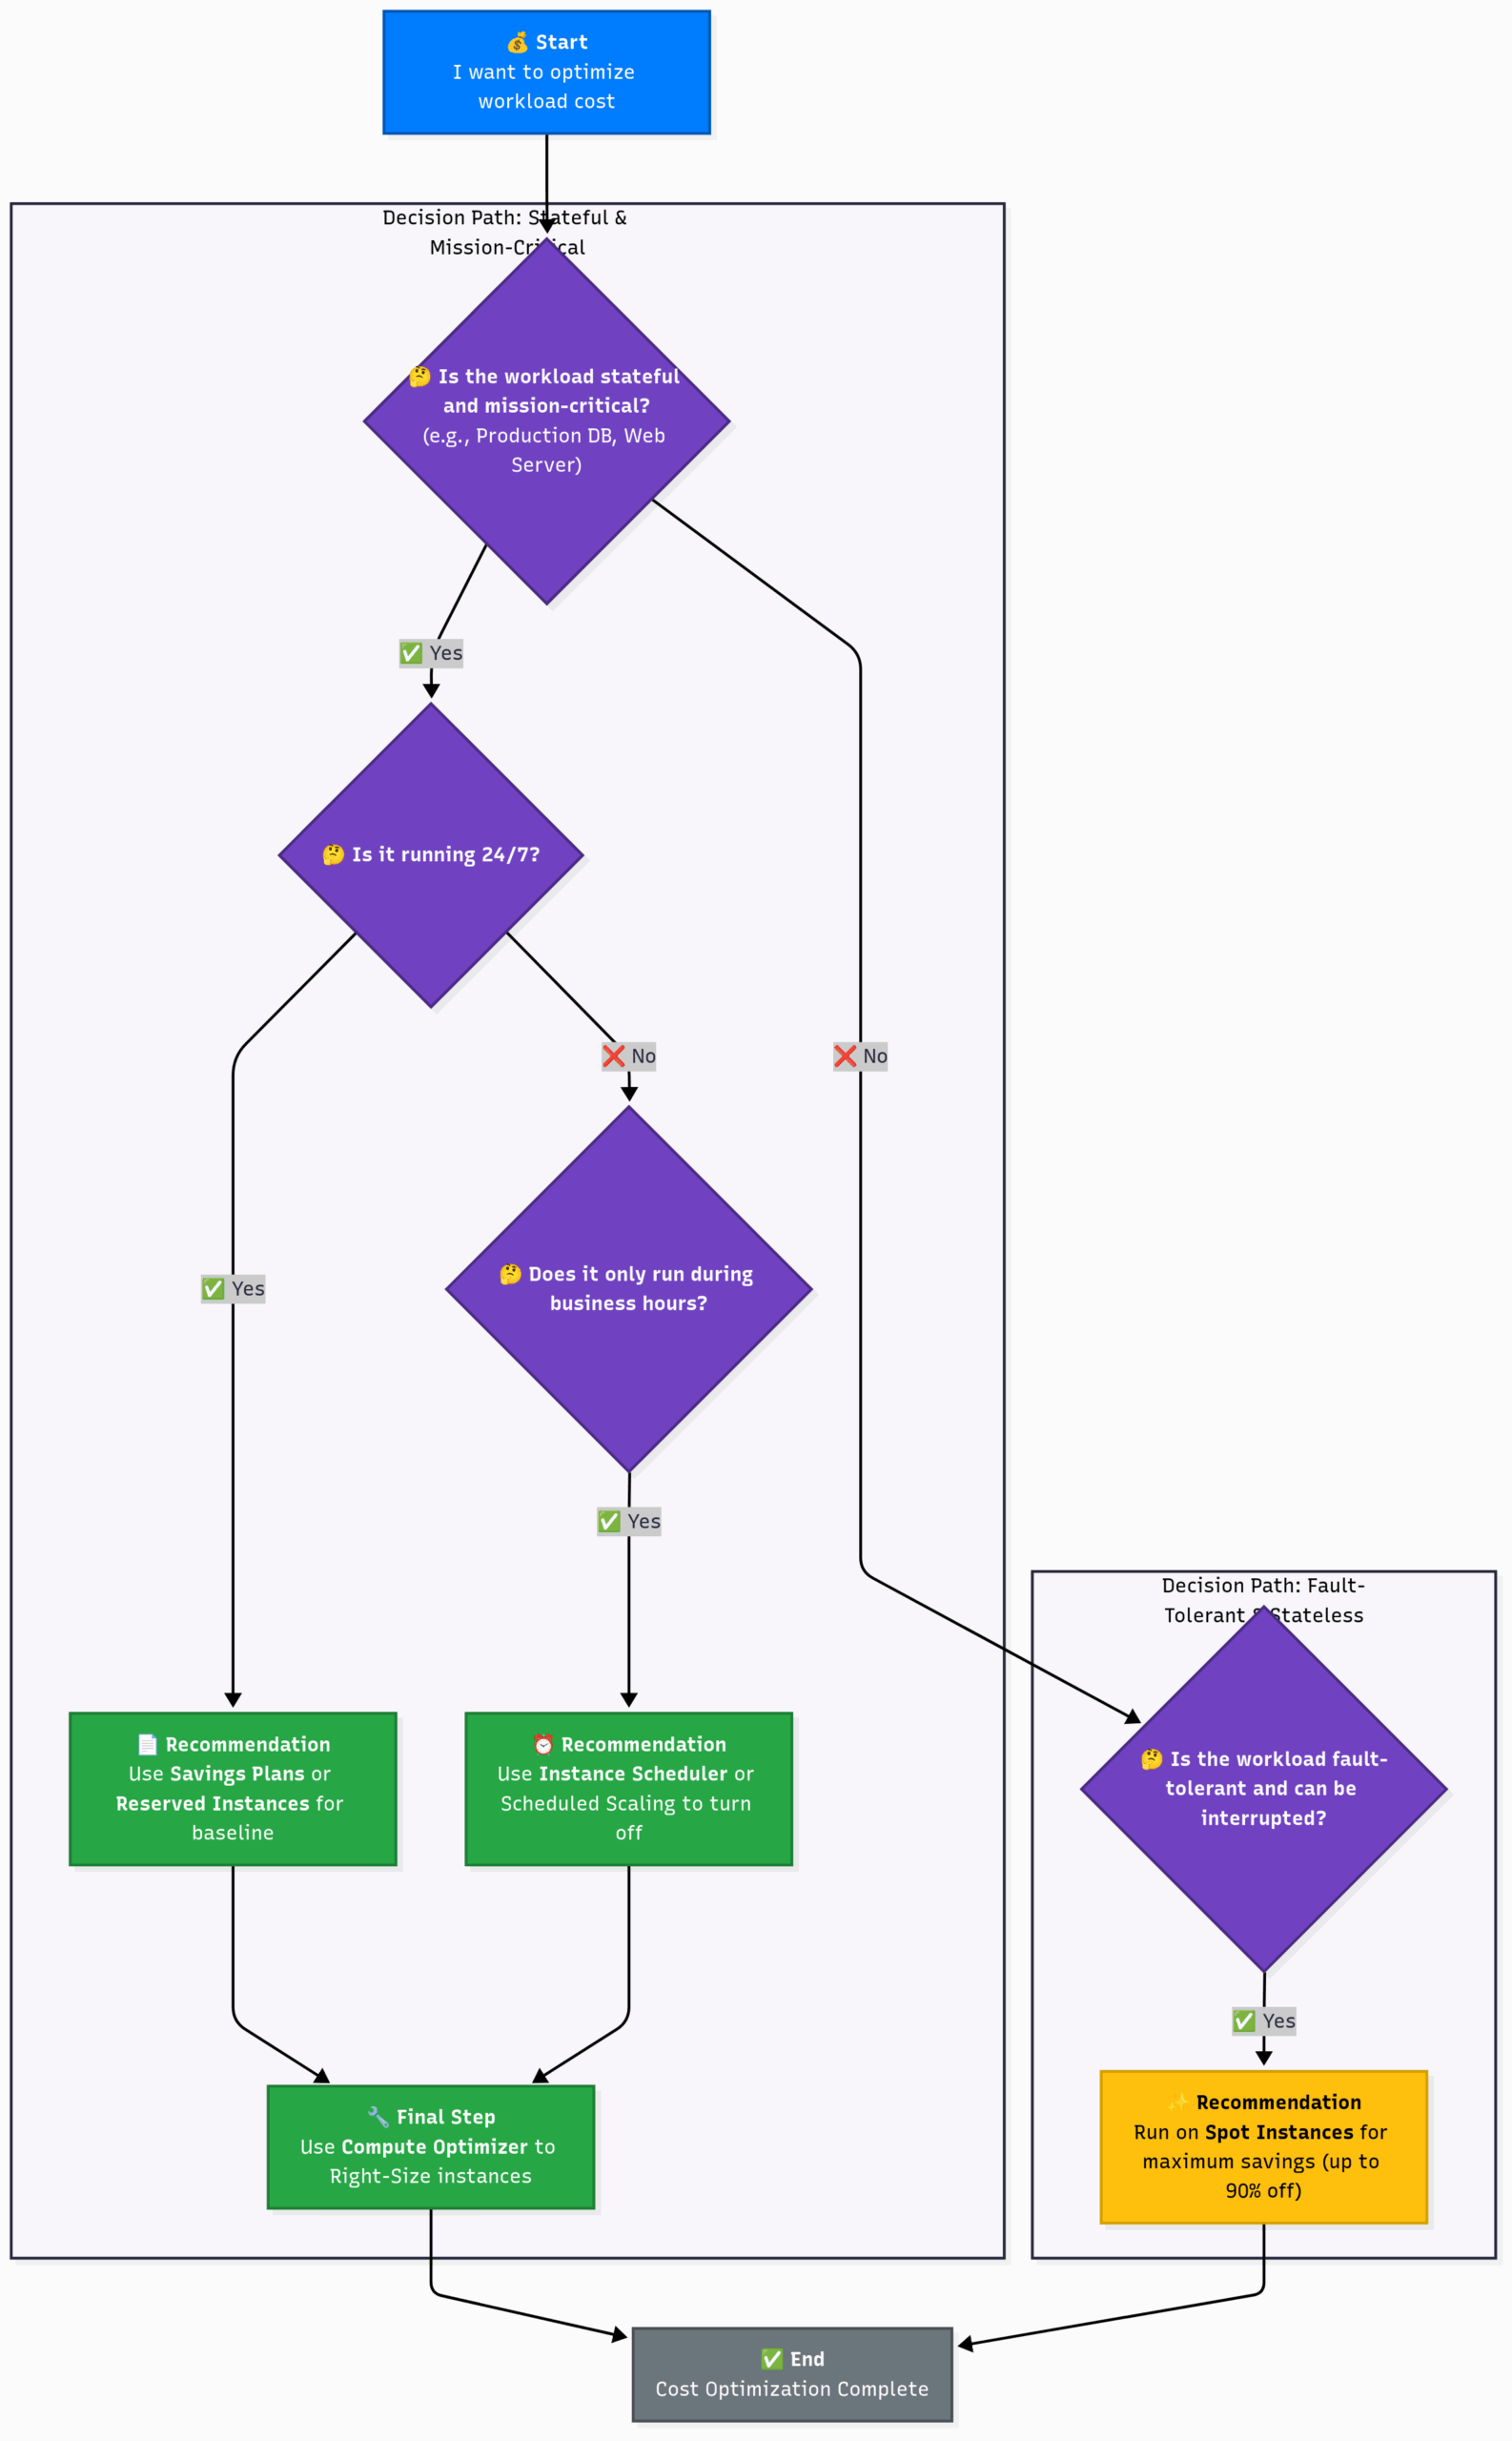
13.4 A Culture of Cost Awareness
Ultimately, cost optimization is not a one-time project; it’s a continuous process and a cultural shift.
- Empower Teams: Give development teams access to Cost Explorer (with appropriate permissions) and set up budgets for their specific projects. When they can see the cost impact of their architectural decisions, they will naturally start building more cost-efficiently.
- Automate Governance: Use AWS Config rules to automatically check if new resources are tagged correctly. Use Service Control Policies (SCPs) in AWS Organizations to prevent users from launching excessively large and expensive instance types in development accounts.
- Review Regularly: Hold regular cost review meetings. Make it a standard part of your team’s operational rhythm to review the AWS bill, look at Cost Explorer reports, and discuss optimization opportunities.
By combining visibility, strategic optimization, and a culture of ownership, you can harness the full power of the AWS cloud without breaking the bank. You can innovate faster, run more securely, and do it all in a way that is financially sustainable and responsible.